Epson R1800 User's Guide - Page 28
Selecting the Settings You Use Most Often - change ink
 |
UPC - 010343853072
View all Epson R1800 manuals
Add to My Manuals
Save this manual to your list of manuals |
Page 28 highlights
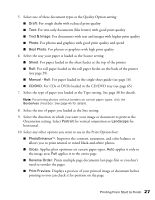
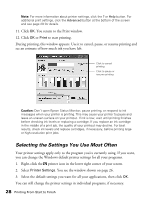
Note: For more information about printer settings, click the ? or Help button. For additional print settings, click the Advanced button at the bottom of the screen and see page 29 for details. 11. Click OK. You return to the Print window. 12. Click OK or Print to start printing. During printing, this window appears. Use it to cancel, pause, or resume printing and see an estimate of how much ink you have left. Click to cancel printing Click to pause or resume printing Caution: Don't open Epson Status Monitor, pause printing, or respond to ink messages when your printer is printing. This may cause your printer to pause and leave an uneven surface on your printout. If ink is low, wait until printing finishes before checking ink levels or replacing a cartridge. If you replace an ink cartridge in the middle of a print job, the quality of your printout may decline. For best results, check ink levels and replace cartridges, if necessary, before printing large or high-resolution print jobs. Selecting the Settings You Use Most Often Your printer settings apply only to the program you're currently using. If you want, you can change the Windows default printer settings for all your programs. 1. Right-click the printer icon in the lower right corner of your screen. 2. Select Printer Settings. You see the window shown on page 26. 3. Select the default settings you want for all your applications, then click OK. You can still change the printer settings in individual programs, if necessary. 28 Printing From Start to Finish
-
 1
1 -
2
-
3
-
4
-
5
-
6
-
7
-
8
-
9
-
10
-
11
-
12
-
13
-
14
-
15
-
16
-
17
-
18
-
19
-
20
-
21
-
22
-
 23
23 -
 24
24 -
 25
25 -
 26
26 -
 27
27 -
 28
28 -
 29
29 -
 30
30 -
 31
31 -
 32
32 -
 33
33 -
34
-
35
-
36
-
37
-
38
-
39
-
40
-
41
-
42
-
43
-
44
-
45
-
46
-
47
-
48
-
49
-
50
-
51
-
52
-
53
-
54
-
55
-
56
-
57
-
58
-
59
-
60
-
61
-
62
-
63
-
64
-
65
-
66
-
67
-
68
-
69
-
70
-
71
-
72
-
73
-
74
-
75
-
76
-
77
-
78
-
79
-
80
-
81
-
82
-
83
-
84
-
85
-
86
-
87
-
88
-
89
-
90
-
91
-
92
-
93
-
94
-
95
-
96
-
97
-
98
-
99
-
100
-
101
-
102
-
103
-
104
-
105
-
106
-
107
-
108
-
109
-
110
-
111
-
112
-
113
-
114
-
115
-
116
 |
 |
