Epson R1800 User's Guide - Page 47
Mac OS X, Select one of the portrait or landscape orientation icons as the Orientation setting.
 |
UPC - 010343853072
View all Epson R1800 manuals
Add to My Manuals
Save this manual to your list of manuals |
Page 47 highlights
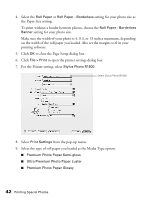
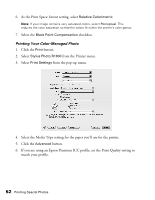
Mac OS X 1. Start your printing application and open your photo file. 2. Click File > Page Setup. 3. Select Stylus Photo R1800 as the Format for setting. Select Stylus Photo R1800 as the Format for setting Select the size of the paper you loaded here 4. Select the size of the paper you loaded with a Sheet Feeder - Borderless source as the Paper Size setting. 5. Select one of the portrait or landscape orientation icons as the Orientation setting. 6. Click OK. Printing Special Photos 47
-
 1
1 -
2
-
3
-
4
-
5
-
6
-
7
-
8
-
9
-
10
-
11
-
12
-
13
-
14
-
15
-
16
-
17
-
18
-
19
-
20
-
21
-
22
-
23
-
24
-
25
-
26
-
27
-
28
-
29
-
30
-
31
-
32
-
33
-
34
-
35
-
36
-
37
-
38
-
39
-
40
-
41
-
 42
42 -
 43
43 -
 44
44 -
 45
45 -
 46
46 -
 47
47 -
 48
48 -
 49
49 -
 50
50 -
 51
51 -
 52
52 -
53
-
54
-
55
-
56
-
57
-
58
-
59
-
60
-
61
-
62
-
63
-
64
-
65
-
66
-
67
-
68
-
69
-
70
-
71
-
72
-
73
-
74
-
75
-
76
-
77
-
78
-
79
-
80
-
81
-
82
-
83
-
84
-
85
-
86
-
87
-
88
-
89
-
90
-
91
-
92
-
93
-
94
-
95
-
96
-
97
-
98
-
99
-
100
-
101
-
102
-
103
-
104
-
105
-
106
-
107
-
108
-
109
-
110
-
111
-
112
-
113
-
114
-
115
-
116
 |
 |
Printing Special Photos
47
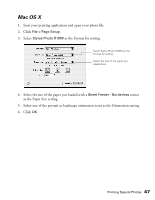
Mac OS X
1.
Start your printing application and open your photo file.
2.
Click
File > Page Setup
.
3.
Select
Stylus Photo R1800
as the Format for setting.
4.
Select the size of the paper you loaded with a
Sheet Feeder - Borderless
source
as the Paper Size setting.
5.
Select one of the portrait or landscape orientation icons as the Orientation setting.
6.
Click
OK
.
Select Stylus Photo R1800 as the
Format for setting
Select the size of the paper you
loaded here