Epson R1800 User's Guide - Page 80
Aligning the Print Head, Automatically Aligning the Print Head - stylus photo print head
 |
UPC - 010343853072
View all Epson R1800 manuals
Add to My Manuals
Save this manual to your list of manuals |
Page 80 highlights
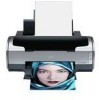
Aligning the Print Head If your printouts contain misaligned vertical lines, or you see light or dark horizontal banding, you may need to align the print head. You can have the printer automatically check and align the print head or you can check and adjust the alignment yourself. Automatically Aligning the Print Head 1. Turn on the printer. 2. Load letter-size Epson Presentation Paper Matte. 3. Do one of the following: Windows: Right-click the icon on your taskbar (in the lower right corner of your screen). Select Print Head Alignment. Note: If the icon does not appear, click Start > Printer (and Faxes), right-click on EPSON Stylus Photo R1800, and select Printing Preferences. Select the Maintenance tab and click Print Head Alignment. Mac OS X: Open the Applications folder and select EPSON Printer Utility. Select SP R1800, click OK, and select Print Head Alignment. You see a screen like this: 4. Click the Automatic button, if necessary, then click OK. 5. On the next screen, click Start. The printer prints and checks an alignment pattern, and then prints and checks two more patterns. 6. When alignment is finished, click Finish on the last screen. 80 Maintaining Your Printer
-
 1
1 -
2
-
3
-
4
-
5
-
6
-
7
-
8
-
9
-
10
-
11
-
12
-
13
-
14
-
15
-
16
-
17
-
18
-
19
-
20
-
21
-
22
-
23
-
24
-
25
-
26
-
27
-
28
-
29
-
30
-
31
-
32
-
33
-
34
-
35
-
36
-
37
-
38
-
39
-
40
-
41
-
42
-
43
-
44
-
45
-
46
-
47
-
48
-
49
-
50
-
51
-
52
-
53
-
54
-
55
-
56
-
57
-
58
-
59
-
60
-
61
-
62
-
63
-
64
-
65
-
66
-
67
-
68
-
69
-
70
-
71
-
72
-
73
-
74
-
 75
75 -
 76
76 -
 77
77 -
 78
78 -
 79
79 -
 80
80 -
 81
81 -
 82
82 -
 83
83 -
 84
84 -
 85
85 -
86
-
87
-
88
-
89
-
90
-
91
-
92
-
93
-
94
-
95
-
96
-
97
-
98
-
99
-
100
-
101
-
102
-
103
-
104
-
105
-
106
-
107
-
108
-
109
-
110
-
111
-
112
-
113
-
114
-
115
-
116
 |
 |