HP 3500 HP Color LaserJet 3500 and 3700 Series Printers - User Guide - Page 236
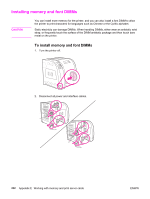
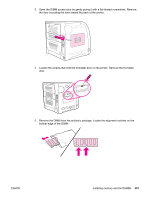
Appendix E, Align the formatter door in the tracks at the bottom of the slot, and turn the screw
 |
View all HP 3500 manuals
Add to My Manuals
Save this manual to your list of manuals |
Page 236 highlights
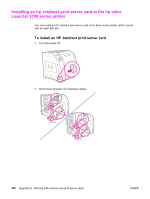
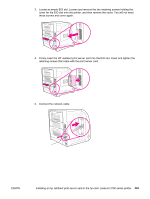
6. Holding the DIMM by the edges, align the notches on the DIMM with the bars in the DIMM slot. 7. Firmly press the DIMM straight into the slot. Close the locks on each side of the DIMM until they snap into place. Note If you have difficulty inserting the DIMM or closing the latches, make sure the notches on the bottom of the DIMM are aligned with the bars in the slot. If the DIMM still does not go in, make sure you are using the correct type of DIMM. 8. Align the formatter door in the tracks at the bottom of the slot, and turn the screw to attach the formatter board to the printer. 224 Appendix E Working with memory and print server cards ENWW
-
 1
1 -
2
-
3
-
4
-
5
-
6
-
7
-
8
-
9
-
10
-
11
-
12
-
13
-
14
-
15
-
16
-
17
-
18
-
19
-
20
-
21
-
22
-
23
-
24
-
25
-
26
-
27
-
28
-
29
-
30
-
31
-
32
-
33
-
34
-
35
-
36
-
37
-
38
-
39
-
40
-
41
-
42
-
43
-
44
-
45
-
46
-
47
-
48
-
49
-
50
-
51
-
52
-
53
-
54
-
55
-
56
-
57
-
58
-
59
-
60
-
61
-
62
-
63
-
64
-
65
-
66
-
67
-
68
-
69
-
70
-
71
-
72
-
73
-
74
-
75
-
76
-
77
-
78
-
79
-
80
-
81
-
82
-
83
-
84
-
85
-
86
-
87
-
88
-
89
-
90
-
91
-
92
-
93
-
94
-
95
-
96
-
97
-
98
-
99
-
100
-
101
-
102
-
103
-
104
-
105
-
106
-
107
-
108
-
109
-
110
-
111
-
112
-
113
-
114
-
115
-
116
-
117
-
118
-
119
-
120
-
121
-
122
-
123
-
124
-
125
-
126
-
127
-
128
-
129
-
130
-
131
-
132
-
133
-
134
-
135
-
136
-
137
-
138
-
139
-
140
-
141
-
142
-
143
-
144
-
145
-
146
-
147
-
148
-
149
-
150
-
151
-
152
-
153
-
154
-
155
-
156
-
157
-
158
-
159
-
160
-
161
-
162
-
163
-
164
-
165
-
166
-
167
-
168
-
169
-
170
-
171
-
172
-
173
-
174
-
175
-
176
-
177
-
178
-
179
-
180
-
181
-
182
-
183
-
184
-
185
-
186
-
187
-
188
-
189
-
190
-
191
-
192
-
193
-
194
-
195
-
196
-
197
-
198
-
199
-
200
-
201
-
202
-
203
-
204
-
205
-
206
-
207
-
208
-
209
-
210
-
211
-
212
-
213
-
214
-
215
-
216
-
217
-
218
-
219
-
220
-
221
-
222
-
223
-
224
-
225
-
226
-
227
-
228
-
229
-
230
-
 231
231 -
 232
232 -
 233
233 -
 234
234 -
 235
235 -
 236
236 -
 237
237 -
 238
238 -
 239
239 -
 240
240 -
 241
241 -
242
-
243
-
244
-
245
-
246
-
247
-
248
-
249
-
250
-
251
-
252
 |
 |

6.
Holding the DIMM by the edges, align the notches on the DIMM with the bars in the
DIMM slot.
7.
Firmly press the DIMM straight into the slot. Close the locks on each side of the DIMM
until they snap into place.
Note
If you have difficulty inserting the DIMM or closing the latches, make sure the notches on
the bottom of the DIMM are aligned with the bars in the slot. If the DIMM still does not go in,
make sure you are using the correct type of DIMM.
8.
Align the formatter door in the tracks at the bottom of the slot, and turn the screw to
attach the formatter board to the printer.
224
Appendix E
Working with memory and print server cards
ENWW