HP A7533A HP StorageWorks Fabric OS 6.1.1 administrator guide (5697-0235, Dece - Page 80
Configuring authentication servers on the switch
 |
UPC - 829160830858
View all HP A7533A manuals
Add to My Manuals
Save this manual to your list of manuals |
Page 80 highlights
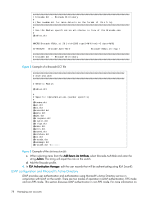
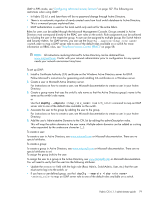
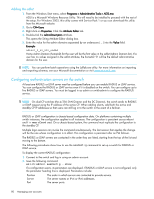
Adding the adlist 1. From the Windows Start menu, select Programs > Administrative Tools > ADSI.msc ADSI is a Microsoft Windows Resource Utility. This will need to be installed to proceed with the rest of the setup. For Windows 2003, this utility comes with Service Pack 1 or you can download this utility from the Microsoft website. 2. Go to CN=Users 3. Right click on Properties. Click the Attribute Editor tab. 4. Double-click the adminDescription attribute. This opens the String Attribute Editor dialog box. 5. Enter the value for the admin domains separated by an underscore ( _ ) into the Value field. Example adlist_0_10_200_endAd Home Admin Domain (homeAD) for the user will be the first value in the adlist (Admin Domain list). If a user has no values assigned in the adlist attribute, the homeAD '0' will be the default administrative domain for the user. NOTE: You can perform batch operations using the Ldifde.exe utility. For more information on importing and exporting schemas, see your Microsoft documentation or visit www.microsoft.com. Configuring authentication servers on the switch At least one RADIUS or LDAP server must be configured before you can enable RADIUS or LDAP service. You can configure the RADIUS or LDAP service even if it is disabled on the switch. You can configure up to five RADIUS or LDAP servers. You must be logged in as admin or switchadmin to configure the RADIUS service. NOTE: On dual-CP switches (the 4/256 SAN Director and the DC Director), the switch sends its RADIUS or LDAP request using the IP address of the active CP. When adding clients, add both the active and standby CP IP addresses so that users can still log in to the switch in the event of a failover. RADIUS or LDAP configuration is chassis-based configuration data. On platforms containing multiple switch instances, the configuration applies to all instances. The configuration is persistent across reboot and firmwareDownload. On a chassis-based system, the command must replicate the configuration to the standby CP. Multiple login sessions can invoke the command simultaneously. The last session that applies the change will be the one whose configuration is in effect. This configuration is persistent after an HA failover. The RADIUS or LDAP servers are contacted in the order they are listed, starting from the top of the list and moving to the bottom. The following procedures show how to use the aaaConfig command to set up a switch for RADIUS or LDAP service. To display the current RADIUS configuration: 1. Connect to the switch and log in using an admin account. 2. Issue the following command: switch:admin> aaaConfig --show If a configuration exists, its parameters are displayed. If RADIUS or LDAP service is not configured, only the parameter heading line is displayed. Parameters include: Position Server Port The order in which servers are contacted to provide service. The server names or IPv4 or IPv6 addresses. The server ports. 80 Managing user accounts
-
 1
1 -
2
-
3
-
4
-
5
-
6
-
7
-
8
-
9
-
10
-
11
-
12
-
13
-
14
-
15
-
16
-
17
-
18
-
19
-
20
-
21
-
22
-
23
-
24
-
25
-
26
-
27
-
28
-
29
-
30
-
31
-
32
-
33
-
34
-
35
-
36
-
37
-
38
-
39
-
40
-
41
-
42
-
43
-
44
-
45
-
46
-
47
-
48
-
49
-
50
-
51
-
52
-
53
-
54
-
55
-
56
-
57
-
58
-
59
-
60
-
61
-
62
-
63
-
64
-
65
-
66
-
67
-
68
-
69
-
70
-
71
-
72
-
73
-
74
-
 75
75 -
 76
76 -
 77
77 -
 78
78 -
 79
79 -
 80
80 -
 81
81 -
 82
82 -
 83
83 -
 84
84 -
 85
85 -
86
-
87
-
88
-
89
-
90
-
91
-
92
-
93
-
94
-
95
-
96
-
97
-
98
-
99
-
100
-
101
-
102
-
103
-
104
-
105
-
106
-
107
-
108
-
109
-
110
-
111
-
112
-
113
-
114
-
115
-
116
-
117
-
118
-
119
-
120
-
121
-
122
-
123
-
124
-
125
-
126
-
127
-
128
-
129
-
130
-
131
-
132
-
133
-
134
-
135
-
136
-
137
-
138
-
139
-
140
-
141
-
142
-
143
-
144
-
145
-
146
-
147
-
148
-
149
-
150
-
151
-
152
-
153
-
154
-
155
-
156
-
157
-
158
-
159
-
160
-
161
-
162
-
163
-
164
-
165
-
166
-
167
-
168
-
169
-
170
-
171
-
172
-
173
-
174
-
175
-
176
-
177
-
178
-
179
-
180
-
181
-
182
-
183
-
184
-
185
-
186
-
187
-
188
-
189
-
190
-
191
-
192
-
193
-
194
-
195
-
196
-
197
-
198
-
199
-
200
-
201
-
202
-
203
-
204
-
205
-
206
-
207
-
208
-
209
-
210
-
211
-
212
-
213
-
214
-
215
-
216
-
217
-
218
-
219
-
220
-
221
-
222
-
223
-
224
-
225
-
226
-
227
-
228
-
229
-
230
-
231
-
232
-
233
-
234
-
235
-
236
-
237
-
238
-
239
-
240
-
241
-
242
-
243
-
244
-
245
-
246
-
247
-
248
-
249
-
250
-
251
-
252
-
253
-
254
-
255
-
256
-
257
-
258
-
259
-
260
-
261
-
262
-
263
-
264
-
265
-
266
-
267
-
268
-
269
-
270
-
271
-
272
-
273
-
274
-
275
-
276
-
277
-
278
-
279
-
280
-
281
-
282
-
283
-
284
-
285
-
286
-
287
-
288
-
289
-
290
-
291
-
292
-
293
-
294
-
295
-
296
-
297
-
298
-
299
-
300
-
301
-
302
-
303
-
304
-
305
-
306
-
307
-
308
-
309
-
310
-
311
-
312
-
313
-
314
-
315
-
316
-
317
-
318
-
319
-
320
-
321
-
322
-
323
-
324
-
325
-
326
-
327
-
328
-
329
-
330
-
331
-
332
-
333
-
334
-
335
-
336
-
337
-
338
-
339
-
340
-
341
-
342
-
343
-
344
-
345
-
346
-
347
-
348
-
349
-
350
-
351
-
352
-
353
-
354
-
355
-
356
-
357
-
358
-
359
-
360
-
361
-
362
-
363
-
364
-
365
-
366
-
367
-
368
-
369
-
370
-
371
-
372
-
373
-
374
-
375
-
376
-
377
-
378
-
379
-
380
-
381
-
382
-
383
-
384
-
385
-
386
-
387
-
388
-
389
-
390
-
391
-
392
-
393
-
394
-
395
-
396
-
397
-
398
-
399
-
400
-
401
-
402
-
403
-
404
-
405
-
406
-
407
-
408
-
409
-
410
-
411
-
412
-
413
-
414
-
415
-
416
-
417
-
418
-
419
-
420
-
421
-
422
-
423
-
424
-
425
-
426
-
427
-
428
-
429
-
430
-
431
-
432
-
433
-
434
-
435
-
436
-
437
-
438
-
439
-
440
-
441
-
442
-
443
-
444
-
445
-
446
-
447
-
448
-
449
-
450
-
451
-
452
-
453
-
454
-
455
-
456
-
457
-
458
-
459
-
460
-
461
-
462
-
463
-
464
-
465
-
466
-
467
-
468
-
469
-
470
-
471
-
472
-
473
-
474
-
475
-
476
-
477
-
478
-
479
-
480
-
481
-
482
-
483
-
484
-
485
-
486
-
487
-
488
-
489
-
490
-
491
-
492
-
493
-
494
-
495
-
496
 |
 |
