HP Designjet T1500 HP Designjet T920 and T1500 ePrinter series - User's Guide - Page 170
Lines are too thick, too thin or missing, Speed, Quality, Image, quality maintenance
 |
View all HP Designjet T1500 manuals
Add to My Manuals
Save this manual to your list of manuals |
Page 170 highlights
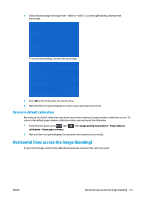
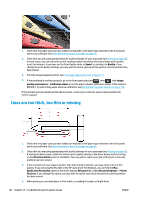
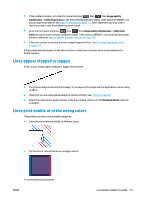
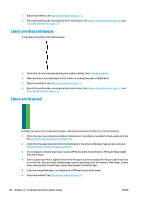
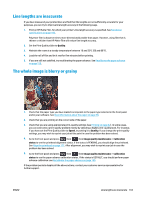
1. Check that the paper type you have loaded corresponds to the paper type selected in the front panel and in your software. See View information about the paper on page 56. 2. Check that you are using appropriate print-quality settings for your purposes (see Printing on page 62). In some cases, you can overcome a print-quality problem merely by selecting a higher print-quality level. For instance, if you have set the Print Quality slider to Speed, try setting it to Quality. If you change the print-quality settings, you may wish to reprint your job at this point in case the problem has been solved. 3. Print the Image Diagnostics Print. See The Image Diagnostics Print on page 171. 4. If the printhead is working correctly, go to the front panel and press , then , then Image quality maintenance > Calibration status to see the paper advance calibration status. If the status is DEFAULT, try performing paper advance calibration: see Recalibrate the paper advance on page 159. If the problem persists despite all the above actions, contact your customer service representative for further support. Lines are too thick, too thin or missing 1. Check that the paper type you have loaded corresponds to the paper type selected in the front panel and in your software. See View information about the paper on page 56. 2. Check that you are using appropriate print-quality settings for your purposes (see Printing on page 62). If printing on photo paper, select the custom print-quality options in the driver dialog, and try turning on the Maximum detail option (if available). You may wish to reprint your job at this point in case the problem has been solved. 3. If the resolution of your image is greater than the printing resolution, you may notice a loss of line quality. If you are using the PCL3GUI or the HP-GL/2 driver for Windows, you can find the Max. Application Resolution option in the driver dialog's Advanced tab, under Document Options > Printer Features. If you change this option, you may wish to reprint your job at this point in case the problem has been solved. 4. When printing on uncoated paper in Fast mode, try loading the paper as Bright Bond. 162 Chapter 18 Troubleshooting print-quality issues ENWW
-
 1
1 -
2
-
3
-
4
-
5
-
6
-
7
-
8
-
9
-
10
-
11
-
12
-
13
-
14
-
15
-
16
-
17
-
18
-
19
-
20
-
21
-
22
-
23
-
24
-
25
-
26
-
27
-
28
-
29
-
30
-
31
-
32
-
33
-
34
-
35
-
36
-
37
-
38
-
39
-
40
-
41
-
42
-
43
-
44
-
45
-
46
-
47
-
48
-
49
-
50
-
51
-
52
-
53
-
54
-
55
-
56
-
57
-
58
-
59
-
60
-
61
-
62
-
63
-
64
-
65
-
66
-
67
-
68
-
69
-
70
-
71
-
72
-
73
-
74
-
75
-
76
-
77
-
78
-
79
-
80
-
81
-
82
-
83
-
84
-
85
-
86
-
87
-
88
-
89
-
90
-
91
-
92
-
93
-
94
-
95
-
96
-
97
-
98
-
99
-
100
-
101
-
102
-
103
-
104
-
105
-
106
-
107
-
108
-
109
-
110
-
111
-
112
-
113
-
114
-
115
-
116
-
117
-
118
-
119
-
120
-
121
-
122
-
123
-
124
-
125
-
126
-
127
-
128
-
129
-
130
-
131
-
132
-
133
-
134
-
135
-
136
-
137
-
138
-
139
-
140
-
141
-
142
-
143
-
144
-
145
-
146
-
147
-
148
-
149
-
150
-
151
-
152
-
153
-
154
-
155
-
156
-
157
-
158
-
159
-
160
-
161
-
162
-
163
-
164
-
 165
165 -
 166
166 -
 167
167 -
 168
168 -
 169
169 -
 170
170 -
 171
171 -
 172
172 -
 173
173 -
 174
174 -
 175
175 -
176
-
177
-
178
-
179
-
180
-
181
-
182
-
183
-
184
-
185
-
186
-
187
-
188
-
189
-
190
-
191
-
192
-
193
-
194
-
195
-
196
-
197
-
198
-
199
-
200
-
201
-
202
-
203
-
204
-
205
-
206
-
207
-
208
-
209
-
210
 |
 |