HP Designjet T1500 HP Designjet T920 and T1500 ePrinter series - User's Guide - Page 185
Clean the printhead, Information and Print Quality
 |
View all HP Designjet T1500 manuals
Add to My Manuals
Save this manual to your list of manuals |
Page 185 highlights
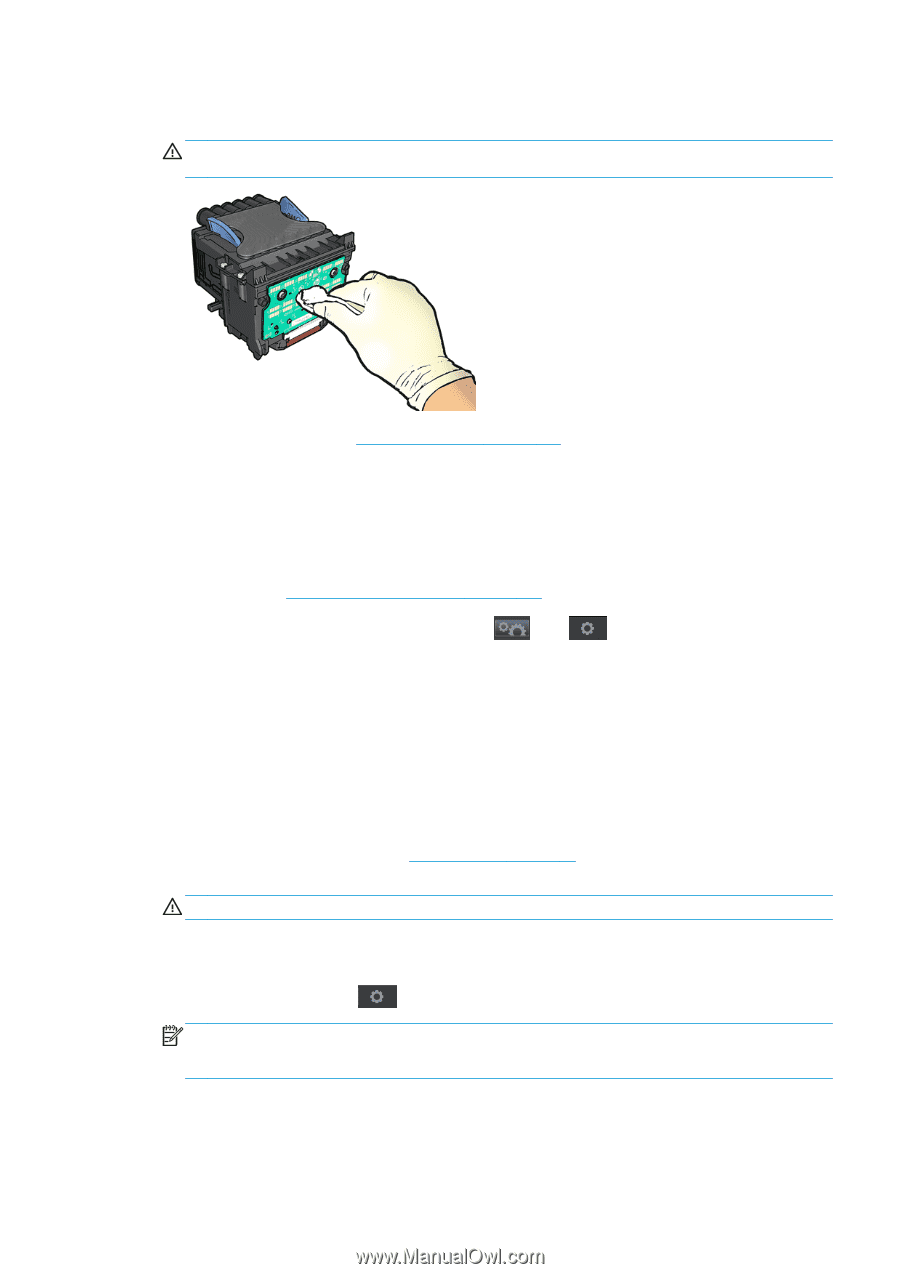
2. Clean the electrical connections on the backside of the printhead with a lint-free cloth. You can carefully use a mild rubbing alcohol if moisture is needed to remove residue. Do not use water. CAUTION: This is a delicate process and may damage the printhead. Do not touch the nozzles on the bottom side of the printhead, especially not with any alcohol. 3. Reinsert the printhead, see Insert the printhead on page 131. 4. Check the front-panel display message. If the problem remains, try a new printhead. Clean the printhead As long as the printer is kept turned on, automatic cleaning is performed periodically. This ensures there is fresh ink in the nozzles and prevents nozzle clogs, thus preserving print quality. If you have print quality problems, please see The Image Diagnostics Print on page 171 before proceeding. To clean the printhead, go to the front panel and press , then , then Image Quality Maintenance > Clean printhead, and select the color group including the color that needs cleaning (Clean all, Clean MK-Y, Clean C-M-PK-G). Align the printhead Precise printhead alignment is essential for accurate colors, smooth color transitions, and sharp edges in graphical elements. Your printer has an automatic printhead alignment process which runs whenever the printhead has been accessed or replaced. You may need to align the printhead after a paper jam or if you are experiencing print-quality problems. 1. Load the paper you wish to use, see Paper handling on page 44. You can use a roll or a cut sheet; plain white paper is recommended. CAUTION: Do not use transparent or semi-transparent paper to align the printhead. 2. Ensure that the window is closed, as a strong light source near the printer during printhead realignment can affect alignment. 3. From the front panel, press , then Image Quality Maintenance > Align printhead. NOTE: Printhead alignment can also be started from the Embedded Web Server (Support > Print Quality Troubleshooting), or from the HP Utility (Windows: Support > Print Quality Troubleshooting; Mac OS X: Information and Print Quality > Align). 4. If the loaded paper is satisfactory, the printer runs the realignment and prints a realignment pattern. 5. The process takes about five minutes. Wait until the front-panel display shows the process complete before using the printer. ENWW Clean the printhead 177
-
 1
1 -
2
-
3
-
4
-
5
-
6
-
7
-
8
-
9
-
10
-
11
-
12
-
13
-
14
-
15
-
16
-
17
-
18
-
19
-
20
-
21
-
22
-
23
-
24
-
25
-
26
-
27
-
28
-
29
-
30
-
31
-
32
-
33
-
34
-
35
-
36
-
37
-
38
-
39
-
40
-
41
-
42
-
43
-
44
-
45
-
46
-
47
-
48
-
49
-
50
-
51
-
52
-
53
-
54
-
55
-
56
-
57
-
58
-
59
-
60
-
61
-
62
-
63
-
64
-
65
-
66
-
67
-
68
-
69
-
70
-
71
-
72
-
73
-
74
-
75
-
76
-
77
-
78
-
79
-
80
-
81
-
82
-
83
-
84
-
85
-
86
-
87
-
88
-
89
-
90
-
91
-
92
-
93
-
94
-
95
-
96
-
97
-
98
-
99
-
100
-
101
-
102
-
103
-
104
-
105
-
106
-
107
-
108
-
109
-
110
-
111
-
112
-
113
-
114
-
115
-
116
-
117
-
118
-
119
-
120
-
121
-
122
-
123
-
124
-
125
-
126
-
127
-
128
-
129
-
130
-
131
-
132
-
133
-
134
-
135
-
136
-
137
-
138
-
139
-
140
-
141
-
142
-
143
-
144
-
145
-
146
-
147
-
148
-
149
-
150
-
151
-
152
-
153
-
154
-
155
-
156
-
157
-
158
-
159
-
160
-
161
-
162
-
163
-
164
-
165
-
166
-
167
-
168
-
169
-
170
-
171
-
172
-
173
-
174
-
175
-
176
-
177
-
178
-
179
-
 180
180 -
 181
181 -
 182
182 -
 183
183 -
 184
184 -
 185
185 -
 186
186 -
 187
187 -
 188
188 -
 189
189 -
 190
190 -
191
-
192
-
193
-
194
-
195
-
196
-
197
-
198
-
199
-
200
-
201
-
202
-
203
-
204
-
205
-
206
-
207
-
208
-
209
-
210
 |
 |