HP Deskjet F2100 User Guide - Page 11
Status light overview, Label, Name and Description - cartridge
 |
View all HP Deskjet F2100 manuals
Add to My Manuals
Save this manual to your list of manuals |
Page 11 highlights
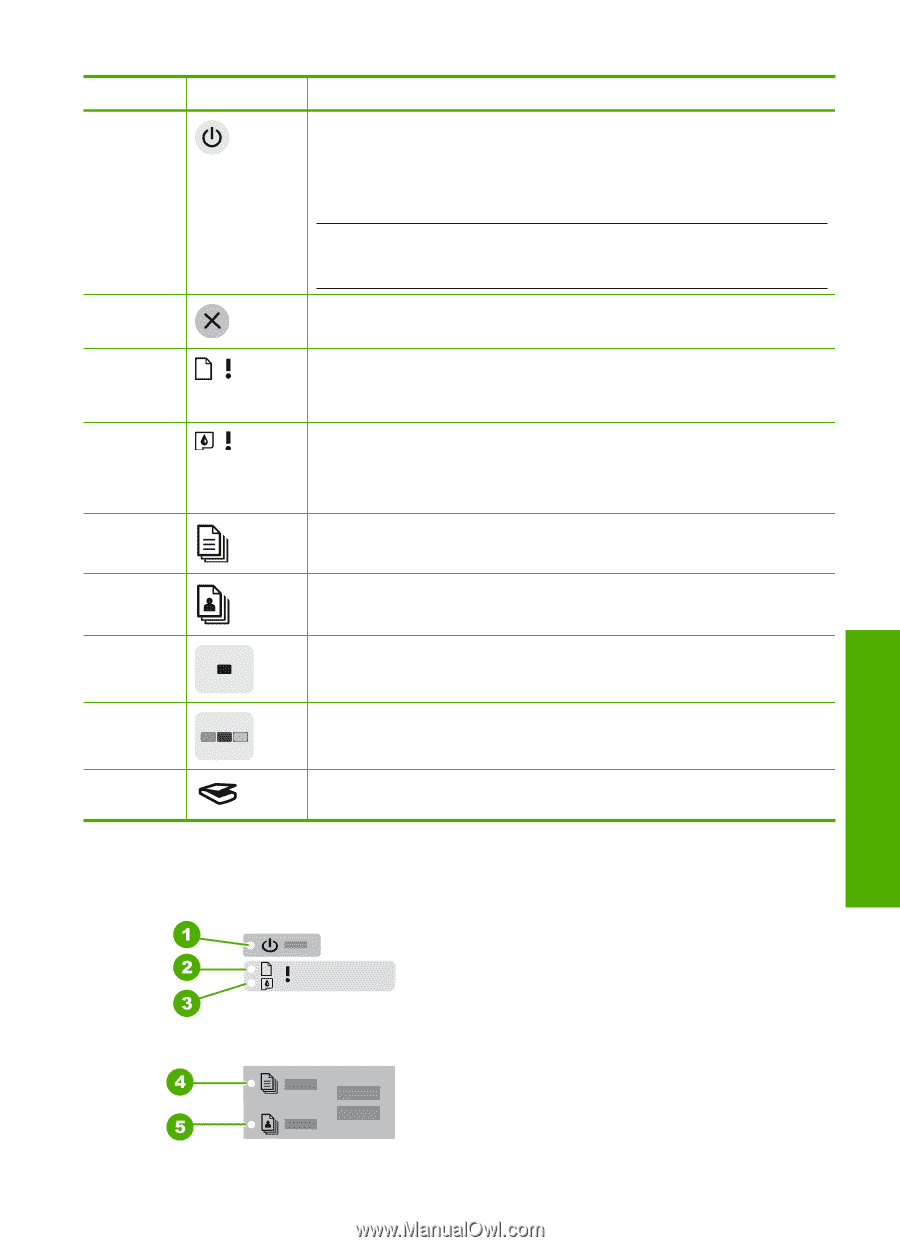
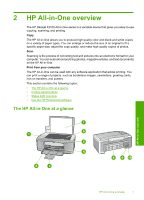
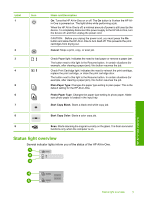
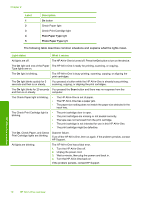
Label 1 Icon 2 3 4 5 6 7 Name and Description On: Turns the HP All-in-One on or off. The On button is lit when the HP Allin-One is powered on. The light blinks while performing a job. When the HP All-in-One is off, a minimal amount of power is still used by the device. To completely disconnect the power supply to the HP All-in-One, turn the device off, and then unplug the power cord. CAUTION: Before you unplug the power cord, you must press the On button and allow the HP All-in-One to turn itself off. This prevents the print cartridges from drying out. Cancel: Stops a print, copy, or scan job. Check Paper light: Indicates the need to load paper or remove a paper jam. The button next to this light is the Resume button. In certain situations (for example, after clearing a paper jam), this button resumes the job. Check Print Cartridge light: Indicates the need to reinsert the print cartridge, replace the print cartridge, or close the print cartridge door. The button next to this light is the Resume button. In certain situations (for example, after clearing a paper jam), this button resumes the job. Plain Paper Type: Changes the paper type setting to plain paper. This is the default setting for the HP All-in-One. Photo Paper Type: Changes the paper type setting to photo paper. Make sure photo paper is loaded in the input tray. Start Copy Black: Starts a black-and-white copy job. 8 Start Copy Color: Starts a color copy job. 9 Scan: Starts scanning the original currently on the glass. The Scan command functions only when the computer is on. Status light overview Several indicator lights inform you of the status of the HP All-in-One. HP All-in-One overview Status light overview 9
-
 1
1 -
2
-
3
-
4
-
5
-
 6
6 -
 7
7 -
 8
8 -
 9
9 -
 10
10 -
 11
11 -
 12
12 -
 13
13 -
 14
14 -
 15
15 -
 16
16 -
17
-
18
-
19
-
20
-
21
-
22
-
23
-
24
-
25
-
26
-
27
-
28
-
29
-
30
-
31
-
32
-
33
-
34
-
35
-
36
-
37
-
38
-
39
-
40
-
41
-
42
-
43
-
44
-
45
-
46
-
47
-
48
-
49
-
50
-
51
-
52
-
53
-
54
-
55
-
56
-
57
-
58
-
59
-
60
-
61
-
62
-
63
-
64
-
65
-
66
-
67
-
68
-
69
-
70
-
71
-
72
-
73
-
74
-
75
-
76
-
77
-
78
-
79
-
80
-
81
-
82
-
83
-
84
-
85
-
86
-
87
-
88
-
89
-
90
-
91
-
92
-
93
-
94
-
95
-
96
-
97
-
98
-
99
-
100
-
101
-
102
-
103
-
104
-
105
-
106
-
107
-
108
-
109
-
110
-
111
-
112
-
113
-
114
-
115
-
116
-
117
-
118
-
119
-
120
-
121
-
122
-
123
-
124
-
125
-
126
-
127
-
128
-
129
-
130
-
131
-
132
-
133
-
134
-
135
-
136
-
137
-
138
-
139
-
140
 |
 |