HP Deskjet F2100 User Guide - Page 81
Clear paper jams, View the Readme file, Hardware setup troubleshooting - series installation software
 |
View all HP Deskjet F2100 manuals
Add to My Manuals
Save this manual to your list of manuals |
Page 81 highlights
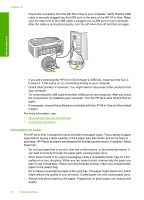
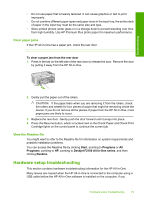
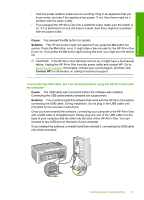
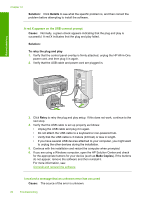
Troubleshooting • Do not use paper that is heavily textured. It can cause graphics or text to print improperly. • Do not combine different paper types and paper sizes in the input tray; the entire stack of paper in the input tray must be the same size and type. • Store printed photos under glass or in a storage book to prevent bleeding over time from high humidity. Use HP Premium Plus photo paper for maximum performance. Clear paper jams If the HP All-in-One has a paper jam, check the rear door. To clear a paper jam from the rear door 1. Press in the tab on the left side of the rear door to release the door. Remove the door by pulling it away from the HP All-in-One. 2. Gently pull the paper out of the rollers. CAUTION: If the paper tears when you are removing it from the rollers, check the rollers and wheels for torn pieces of paper that might be remaining inside the device. If you do not remove all the pieces of paper from the HP All-in-One, more paper jams are likely to occur. 3. Replace the rear door. Gently push the door forward until it snaps into place. 4. Press the Resume button, which is located next to the Check Paper and Check Print Cartridge lights on the control panel to continue the current job. View the Readme file You might want to refer to the Readme file for information on system requirements and possible installation problems. You can access the Readme file by clicking Start, pointing to Programs or All Programs, pointing to HP, pointing to Deskjet F2100 All-In-One series, and then clicking Readme. Hardware setup troubleshooting This section contains hardware troubleshooting information for the HP All-in-One. Many issues are caused when the HP All-in-One is connected to the computer using a USB cable before the HP All-in-One software is installed on the computer. If you Hardware setup troubleshooting 79
-
 1
1 -
2
-
3
-
4
-
5
-
6
-
7
-
8
-
9
-
10
-
11
-
12
-
13
-
14
-
15
-
16
-
17
-
18
-
19
-
20
-
21
-
22
-
23
-
24
-
25
-
26
-
27
-
28
-
29
-
30
-
31
-
32
-
33
-
34
-
35
-
36
-
37
-
38
-
39
-
40
-
41
-
42
-
43
-
44
-
45
-
46
-
47
-
48
-
49
-
50
-
51
-
52
-
53
-
54
-
55
-
56
-
57
-
58
-
59
-
60
-
61
-
62
-
63
-
64
-
65
-
66
-
67
-
68
-
69
-
70
-
71
-
72
-
73
-
74
-
75
-
 76
76 -
 77
77 -
 78
78 -
 79
79 -
 80
80 -
 81
81 -
 82
82 -
 83
83 -
 84
84 -
 85
85 -
 86
86 -
87
-
88
-
89
-
90
-
91
-
92
-
93
-
94
-
95
-
96
-
97
-
98
-
99
-
100
-
101
-
102
-
103
-
104
-
105
-
106
-
107
-
108
-
109
-
110
-
111
-
112
-
113
-
114
-
115
-
116
-
117
-
118
-
119
-
120
-
121
-
122
-
123
-
124
-
125
-
126
-
127
-
128
-
129
-
130
-
131
-
132
-
133
-
134
-
135
-
136
-
137
-
138
-
139
-
140
 |
 |
