HP Deskjet F2100 User Guide - Page 73
To clean the print cartridge contacts
 |
View all HP Deskjet F2100 manuals
Add to My Manuals
Save this manual to your list of manuals |
Page 73 highlights
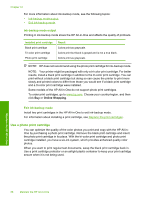
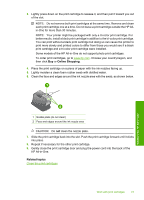
Make sure you have the following materials available: • Dry foam rubber swabs, lint-free cloth, or any soft material that will not come apart or leave fibers. TIP: Coffee filters are lint-free and work well for cleaning print cartridges. • Distilled, filtered, or bottled water (tap water might contain contaminants that can damage the print cartridges). CAUTION: Do not use platen cleaners or alcohol to clean the print cartridge contacts. These can damage the print cartridge or the HP All-in-One. To clean the print cartridge contacts 1. Turn on the HP All-in-One and open the print cartridge door. The print carriage moves to the center of the HP All-in-One. 2. Wait until the print carriage is idle and silent, and then unplug the power cord from the back of the HP All-in-One. 3. Lightly press down on the print cartridge to release it, and then pull it toward you out of the slot. NOTE: Do not remove both print cartridges at the same time. Remove and clean each print cartridge one at a time. Do not leave a print cartridge outside the HP Allin-One for more than 30 minutes. 4. Inspect the print cartridge contacts for ink and debris buildup. 5. Dip a clean foam rubber swab or lint-free cloth into distilled water, and squeeze any excess water from it. 6. Hold the print cartridge by its sides. 7. Clean only the copper-colored contacts. Allow the print cartridges to dry for approximately ten minutes before reinserting. Maintain the HP All-in-One 1 Copper-colored contacts 2 Ink nozzles (do not clean) 8. Slide the print cartridge back into the slot. Push the print cartridge forward until it clicks into place. Work with print cartridges 71
-
 1
1 -
2
-
3
-
4
-
5
-
6
-
7
-
8
-
9
-
10
-
11
-
12
-
13
-
14
-
15
-
16
-
17
-
18
-
19
-
20
-
21
-
22
-
23
-
24
-
25
-
26
-
27
-
28
-
29
-
30
-
31
-
32
-
33
-
34
-
35
-
36
-
37
-
38
-
39
-
40
-
41
-
42
-
43
-
44
-
45
-
46
-
47
-
48
-
49
-
50
-
51
-
52
-
53
-
54
-
55
-
56
-
57
-
58
-
59
-
60
-
61
-
62
-
63
-
64
-
65
-
66
-
67
-
 68
68 -
 69
69 -
 70
70 -
 71
71 -
 72
72 -
 73
73 -
 74
74 -
 75
75 -
 76
76 -
 77
77 -
 78
78 -
79
-
80
-
81
-
82
-
83
-
84
-
85
-
86
-
87
-
88
-
89
-
90
-
91
-
92
-
93
-
94
-
95
-
96
-
97
-
98
-
99
-
100
-
101
-
102
-
103
-
104
-
105
-
106
-
107
-
108
-
109
-
110
-
111
-
112
-
113
-
114
-
115
-
116
-
117
-
118
-
119
-
120
-
121
-
122
-
123
-
124
-
125
-
126
-
127
-
128
-
129
-
130
-
131
-
132
-
133
-
134
-
135
-
136
-
137
-
138
-
139
-
140
 |
 |