HP Deskjet F2100 User Guide - Page 75
Online Shopping, Related topics, HP All-in-One.
 |
View all HP Deskjet F2100 manuals
Add to My Manuals
Save this manual to your list of manuals |
Page 75 highlights
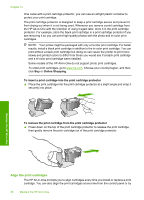
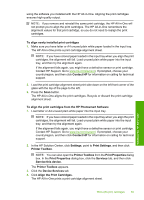
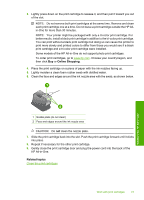
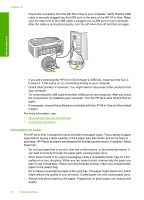
3. Lightly press down on the print cartridge to release it, and then pull it toward you out of the slot. NOTE: Do not remove both print cartridges at the same time. Remove and clean each print cartridge one at a time. Do not leave a print cartridge outside the HP Allin-One for more than 30 minutes. NOTE: Your printer might be packaged with only a tri-color print cartridge. For better results, install a black print cartridge in addition to the tri-color print cartridge. You can print without a black print cartridge but doing so can cause the printer to print more slowly and printed colors to differ from those you would see if a black print cartridge and a tri-color print cartridge were installed. Some models of the HP All-in-One do not support photo print cartridges. To order print cartridges, go to www.hp.com. Choose your country/region, and then click Buy or Online Shopping. 4. Place the print cartridge on a piece of paper with the ink nozzles facing up. 5. Lightly moisten a clean foam rubber swab with distilled water. 6. Clean the face and edges around the ink nozzle area with the swab, as shown below. Maintain the HP All-in-One 1 Nozzle plate (do not clean) 2 Face and edges around the ink nozzle area CAUTION: Do not clean the nozzle plate. 7. Slide the print cartridge back into the slot. Push the print cartridge forward until it clicks into place. 8. Repeat if necessary for the other print cartridge. 9. Gently close the print cartridge door and plug the power cord into the back of the HP All-in-One. Related topics Clean the print cartridges Work with print cartridges 73
-
 1
1 -
2
-
3
-
4
-
5
-
6
-
7
-
8
-
9
-
10
-
11
-
12
-
13
-
14
-
15
-
16
-
17
-
18
-
19
-
20
-
21
-
22
-
23
-
24
-
25
-
26
-
27
-
28
-
29
-
30
-
31
-
32
-
33
-
34
-
35
-
36
-
37
-
38
-
39
-
40
-
41
-
42
-
43
-
44
-
45
-
46
-
47
-
48
-
49
-
50
-
51
-
52
-
53
-
54
-
55
-
56
-
57
-
58
-
59
-
60
-
61
-
62
-
63
-
64
-
65
-
66
-
67
-
68
-
69
-
 70
70 -
 71
71 -
 72
72 -
 73
73 -
 74
74 -
 75
75 -
 76
76 -
 77
77 -
 78
78 -
 79
79 -
 80
80 -
81
-
82
-
83
-
84
-
85
-
86
-
87
-
88
-
89
-
90
-
91
-
92
-
93
-
94
-
95
-
96
-
97
-
98
-
99
-
100
-
101
-
102
-
103
-
104
-
105
-
106
-
107
-
108
-
109
-
110
-
111
-
112
-
113
-
114
-
115
-
116
-
117
-
118
-
119
-
120
-
121
-
122
-
123
-
124
-
125
-
126
-
127
-
128
-
129
-
130
-
131
-
132
-
133
-
134
-
135
-
136
-
137
-
138
-
139
-
140
 |
 |
