HP Deskjet F2100 User Guide - Page 90
Estimated Ink Level
 |
View all HP Deskjet F2100 manuals
Add to My Manuals
Save this manual to your list of manuals |
Page 90 highlights
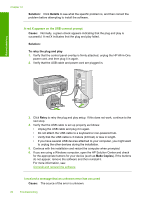
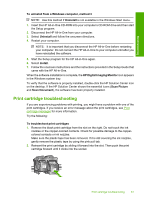
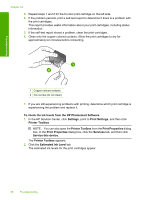
Chapter 12 3. Repeat steps 1 and 2 for the tri-color print cartridge on the left side. 4. If the problem persists, print a self-test report to determine if there is a problem with the print cartridges. This report provides useful information about your print cartridges, including status information. 5. If the self-test report shows a problem, clean the print cartridges. 6. Clean only the copper-colored contacts. Allow the print cartridges to dry for approximately ten minutes before reinserting. Troubleshooting 1 Copper-colored contacts 2 Ink nozzles (do not clean) 7. If you are still experiencing problems with printing, determine which print cartridge is experiencing the problem and replace it. To check the ink levels from the HP Photosmart Software 1. In the HP Solution Center, click Settings, point to Print Settings, and then click Printer Toolbox. NOTE: You can also open the Printer Toolbox from the Print Properties dialog box. In the Print Properties dialog box, click the Services tab, and then click Service this device. The Printer Toolbox appears. 2. Click the Estimated Ink Level tab. The estimated ink levels for the print cartridges appear. 88 Troubleshooting
-
 1
1 -
2
-
3
-
4
-
5
-
6
-
7
-
8
-
9
-
10
-
11
-
12
-
13
-
14
-
15
-
16
-
17
-
18
-
19
-
20
-
21
-
22
-
23
-
24
-
25
-
26
-
27
-
28
-
29
-
30
-
31
-
32
-
33
-
34
-
35
-
36
-
37
-
38
-
39
-
40
-
41
-
42
-
43
-
44
-
45
-
46
-
47
-
48
-
49
-
50
-
51
-
52
-
53
-
54
-
55
-
56
-
57
-
58
-
59
-
60
-
61
-
62
-
63
-
64
-
65
-
66
-
67
-
68
-
69
-
70
-
71
-
72
-
73
-
74
-
75
-
76
-
77
-
78
-
79
-
80
-
81
-
82
-
83
-
84
-
 85
85 -
 86
86 -
 87
87 -
 88
88 -
 89
89 -
 90
90 -
 91
91 -
 92
92 -
 93
93 -
 94
94 -
 95
95 -
96
-
97
-
98
-
99
-
100
-
101
-
102
-
103
-
104
-
105
-
106
-
107
-
108
-
109
-
110
-
111
-
112
-
113
-
114
-
115
-
116
-
117
-
118
-
119
-
120
-
121
-
122
-
123
-
124
-
125
-
126
-
127
-
128
-
129
-
130
-
131
-
132
-
133
-
134
-
135
-
136
-
137
-
138
-
139
-
140
 |
 |
