HP Dx5150 HP Business Desktop dx5150 Series Service Reference Guide, 1st Editi - Page 109
towards the rear of the computer
 |
UPC - 882780485433
View all HP Dx5150 manuals
Add to My Manuals
Save this manual to your list of manuals |
Page 109 highlights
Removal and Replacement Procedures- Small Form Factor (SFF) Chassis To replace the drive: 1. Install two guide screws in the lower holes on each side of the drive. Ä CAUTION: Use only 5-mm long screws as guide screws. Longer screws can damage the internal components of the drive. ✎ When replacing the drive, transfer the four screws from the old drive to the new one. The screws take the place of drive rails. 2. Position the guide screws on the drive into the J-slots in the drive bay 1. Then, slide the drive towards the rear of the computer 2. ✎ The drive release latch automatically locks in place when installing a drive. Service Reference Guide, dx5150 361685-001 7-15
-
 1
1 -
2
-
3
-
4
-
5
-
6
-
7
-
8
-
9
-
10
-
11
-
12
-
13
-
14
-
15
-
16
-
17
-
18
-
19
-
20
-
21
-
22
-
23
-
24
-
25
-
26
-
27
-
28
-
29
-
30
-
31
-
32
-
33
-
34
-
35
-
36
-
37
-
38
-
39
-
40
-
41
-
42
-
43
-
44
-
45
-
46
-
47
-
48
-
49
-
50
-
51
-
52
-
53
-
54
-
55
-
56
-
57
-
58
-
59
-
60
-
61
-
62
-
63
-
64
-
65
-
66
-
67
-
68
-
69
-
70
-
71
-
72
-
73
-
74
-
75
-
76
-
77
-
78
-
79
-
80
-
81
-
82
-
83
-
84
-
85
-
86
-
87
-
88
-
89
-
90
-
91
-
92
-
93
-
94
-
95
-
96
-
97
-
98
-
99
-
100
-
101
-
102
-
103
-
 104
104 -
 105
105 -
 106
106 -
 107
107 -
 108
108 -
 109
109 -
 110
110 -
 111
111 -
 112
112 -
 113
113 -
 114
114 -
115
-
116
-
117
-
118
-
119
-
120
-
121
-
122
-
123
-
124
-
125
-
126
-
127
-
128
-
129
-
130
-
131
-
132
-
133
-
134
-
135
-
136
-
137
-
138
-
139
-
140
-
141
-
142
-
143
-
144
-
145
-
146
-
147
-
148
-
149
-
150
-
151
-
152
-
153
-
154
-
155
-
156
-
157
-
158
-
159
-
160
-
161
-
162
-
163
-
164
-
165
-
166
-
167
-
168
-
169
-
170
-
171
-
172
-
173
-
174
-
175
-
176
-
177
-
178
-
179
-
180
-
181
-
182
 |
 |
Service Reference Guide, dx5150
361685-001
7–15
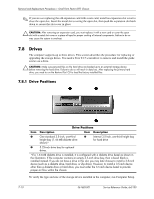
Removal and Replacement Procedures— Small Form Factor (SFF) Chassis
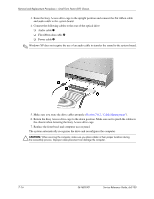
To replace the drive:
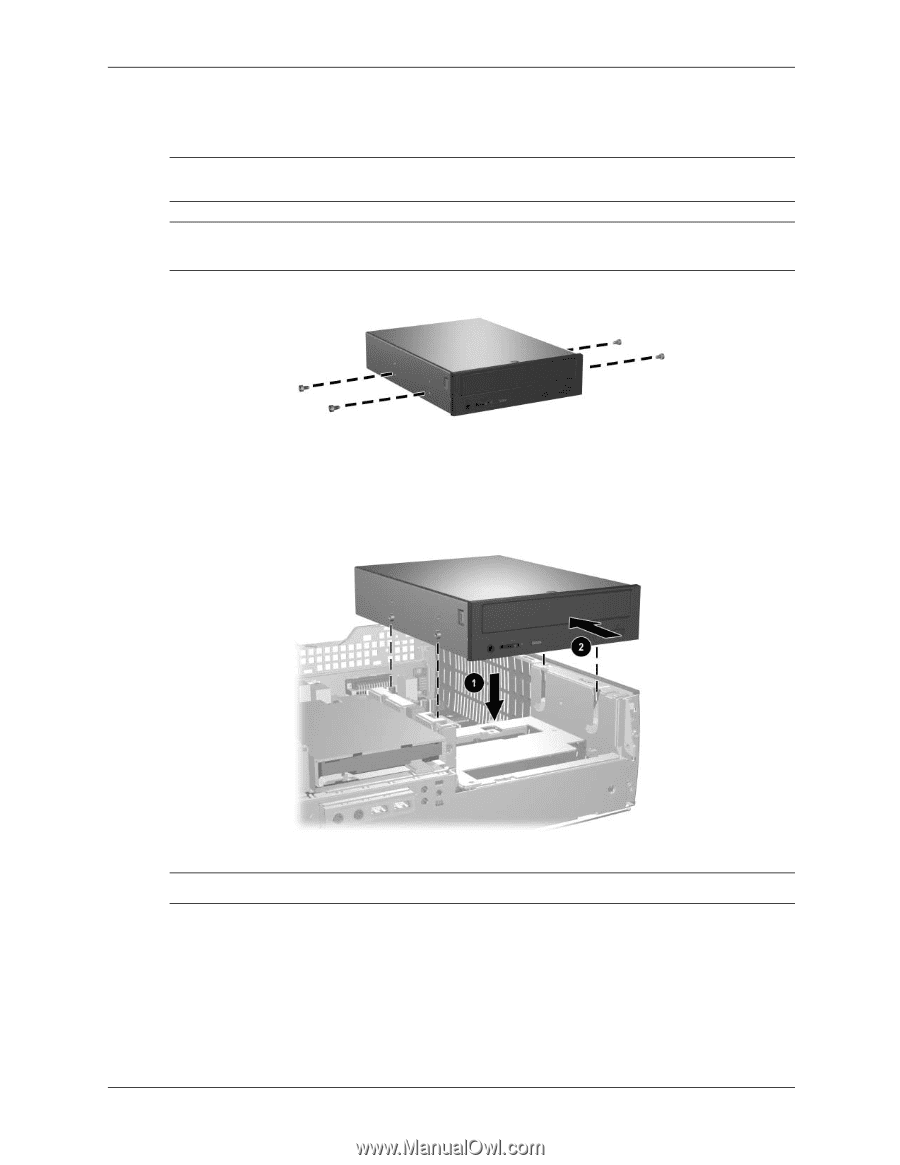
1. Install two guide screws in the lower holes on each side of the drive.
Ä
CAUTION:
Use only 5-mm long screws as guide screws. Longer screws can damage the internal
components of the drive.
✎
When replacing the drive, transfer the four screws from the old drive to the new one. The screws
take the place of drive rails.
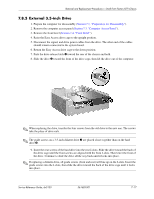
2.
Position the guide screws on the drive into the J-slots in the drive bay
1
. Then, slide the drive
towards the rear of the computer
2
.
✎
The drive release latch automatically locks in place when installing a drive.