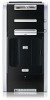
HP Media Center m1200 Getting Started Guide
HP Media Center m1200 - Desktop PC Manual
 |
View all HP Media Center m1200 manuals
Add to My Manuals
Save this manual to your list of manuals |
HP Media Center m1200 manual content summary:
- HP Media Center m1200 | Getting Started Guide - Page 1
HP Media Center PC Getting Started Guide - HP Media Center m1200 | Getting Started Guide - Page 2
THE SALE OF THIS PRODUCT OR SERVICE TO YOU. HP assumes no responsibility for the use or reliability of its Other brand or product names are trademarks of their respective holders. HP supports lawful use of technology and does not endorse or encourage the ii HP Media Center PC Getting Started Guide - HP Media Center m1200 | Getting Started Guide - Page 3
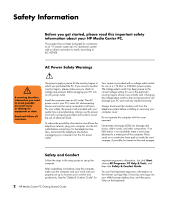
safety information about your HP Media Center PC 2 AC Power Safety Warnings 2 Safety and Comfort 2 Getting Help 3 Help and Support Center 3 Utility Programs 3 HP Web Site Support 4 Setup Poster 4 Warranty and Support Guide 4 HP Media Center Software Guide 5 Application and System Recovery - HP Media Center m1200 | Getting Started Guide - Page 4
iv HP Media Center PC User's Guide - HP Media Center m1200 | Getting Started Guide - Page 5
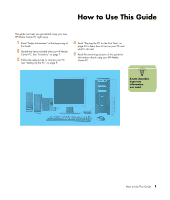
How to Use This Guide This guide can help you get started using your new HP Media Center PC right away. 1 Read "Safety Information" at the beginning of this book. 2 Identify the items included with your HP Media Center PC. See "Inventory" on page 7. 3 Follow the setup poster to connect your PC. See - HP Media Center m1200 | Getting Started Guide - Page 6
follow all warnings. The power supply is pre-set for the country/region in which you purchased the PC. If you move to Guide" for 2 HP Media Center PC Getting Started Guide important ergonomic information. Just click Start, choose All Programs, PC Help & Tools, and then click Safety & Comfort Guide - HP Media Center m1200 | Getting Started Guide - Page 7
Support, click HP Media Center PC help to read Help topics and run tests. Click Connect to Customer Support (select models only) to get troubleshooting help by using the Internet. To run a test or submit a problem to HP Instant Support, click Start a New Request and follow the onscreen instructions - HP Media Center m1200 | Getting Started Guide - Page 8
9. Warranty and Support Guide You can find the terms of your PC warranty coverage, license information, regulatory information, operating specifications, safety information, and support contact numbers and addresses. You can get help over the telephone from HP. 4 HP Media Center PC Getting Started - HP Media Center m1200 | Getting Started Guide - Page 9
program or the HP PC System Recovery programs. Now is a good time to make your recovery discs. For instructions on making recovery discs, repairing and recovering your software, and more information, refer to the Warranty and Support Guide that came with your PC. Problems with software programs - HP Media Center m1200 | Getting Started Guide - Page 10
link to get to the Microsoft Windows XP Media Center Web site. To get the latest news and information about your Media Center program, press the Start button on your remote control, and then select Online Spotlight from the Media Center Start menu. 6 HP Media Center PC Getting Started Guide - HP Media Center m1200 | Getting Started Guide - Page 11
A HP Media Center PC B Keyboard/wireless keyboard (wireless receiver not shown) C Wireless mouse D Mouse Speaker system components Your Media Center PC may come with either a set of 2.1 or a set of 5.1 speakers, depending on the model. E Documentation F Modem cable G Power cord (with power adapter - HP Media Center m1200 | Getting Started Guide - Page 12
9 ENTER hp media center K M N O P Q L J Remote control K Remote control sensor cable (emitter) L FM radio antenna M Two AA batteries for remote control N 10-ft. coaxial cable O S-video to composite video adapter P Composite video cable Q Remote sensor 8 HP Media Center PC Getting Started Guide - HP Media Center m1200 | Getting Started Guide - Page 13
items are not provided with your PC. Be sure you have them on hand if you need them for your setup: ■ Monitor (required). ■ TV. ■ Internet Service Provider (ISP), selected during initial setup (required for Media Center features, such as the Program Guide). ■ Coaxial cable splitter. ■ S-video cable - HP Media Center m1200 | Getting Started Guide - Page 14
" on page 78. 10 Turn on the monitor, the PC, and then turn on the speaker system. 11 Follow the onscreen instructions, including selecting an ISP using Easy Internet Sign-up. 12 Set up the Media Center. See the HP Media Center PC Software Guide. 13 After you've completed the initial startup and - HP Media Center m1200 | Getting Started Guide - Page 15
Front of PC P A n B Location and number of connectors may C vary by model. D E F G H I J K L M N O A port N USB 2.0 port (select models only) O On button with power indicator P Drive bay for the HP Personal Media Drive (removable hard disk drive that is sold separately). This bay is - HP Media Center m1200 | Getting Started Guide - Page 16
cord B Voltage selector C Power LED indicator D PS/2 mouse E PS/2 keyboard F Serial port G Parallel port H FireWire (IEEE 1394) port I 4 USB 2.0 (Universal Serial Bus) ports J LAN (Ethernet) K Microphone L Audio Line Out M Audio Line In 12 HP Media Center PC Getting Started Guide O LCD TV-OUT PQ - HP Media Center m1200 | Getting Started Guide - Page 17
Mouse Keyboard SERIAL OUT IN 1 or 2 on front panel, depending on your PC model 4 on the back panel Back panel Universal Serial Bus (USB) for Serial port for digital cameras or other serial devices Audio Line Out (powered speakers, green connector) Back panel Audio Line In (blue connector) Front - HP Media Center m1200 | Getting Started Guide - Page 18
Connector or Icon R L Location on PC 1 on front panel and 1 on back panel Front panel and on TV tuner card on the back panel Front panel TV Composite Video In TV In (TV antenna or cable input) Audio In right and left FM In (radio antenna input) Modem 14 HP Media Center PC Getting Started Guide - HP Media Center m1200 | Getting Started Guide - Page 19
(10BaseT) or Fast Ethernet (100BaseT) network hub. Connect this adapter in your PC to your local area network (LAN) hub or any broadband connection. 1 Plug a network cable into the Ethernet (RJ-45) port on the back of the PC. 2 Plug the other end of the network cable into a 10BaseT or 100BaseT port - HP Media Center m1200 | Getting Started Guide - Page 20
. 1 Screw the wireless LAN antenna into the wireless LAN connector on the back of the PC. 2 You may want to move the end of the antenna away from the PC to improve your signal reception. SERIAL ETHERNET IN OUT TV-OUT VID IN LCD R S-VID IN L TV 16 HP Media Center PC Getting Started Guide - HP Media Center m1200 | Getting Started Guide - Page 21
sensor is a small device that connects to the PC and allows the remote control to work with the Media Center program. 1 If you have a cable TV set the remote control sensor cable into a USB connector (D) on the back of the PC. 4 Place the remote sensor so that you can easily point at it with the - HP Media Center m1200 | Getting Started Guide - Page 22
Connecting a Digital Video Camera to the PC When connecting an analog camera to the PC, use the Video and Audio In connectors on the front of the PC. The following instructions only apply to digital cameras. See telling you the camera is ready to use. 18 HP Media Center PC Getting Started Guide - HP Media Center m1200 | Getting Started Guide - Page 23
the HP Media Center PC Software Guide. Connecting an HP Personal Media Drive to the PC The HP Media Center PC is designed to work with the HP Personal Media Drive that is purchased separately. The HP Media Center PC has a special drive bay that includes an internal USB port and power cable that - HP Media Center m1200 | Getting Started Guide - Page 24
into the bay. 4 Slide the drive all the way into the drive bay until the drive is firmly connected to the internal power and USB cables. When the PC is turned on, the blue power LED on the front of the drive is lit when the drive is inserted correctly. 20 HP Media Center PC Getting Started Guide - HP Media Center m1200 | Getting Started Guide - Page 25
or transferring data. To disconnect your HP Personal Media Drive safely: 1 Close Media Center and all other programs that may be accessing your HP Personal Media Drive. 2 Double-click the Safely Remove Hardware icon in the system tray at the bottom of the desktop. If this icon is hidden, click - HP Media Center m1200 | Getting Started Guide - Page 26
peripheral devices can be connected to the front or back of your HP Media Center PC by using USB or FireWire ports. You can connect peripheral devices such digital assistant) or handheld computer to the PC. See the documentation that came with your device. 22 HP Media Center PC Getting Started Guide - HP Media Center m1200 | Getting Started Guide - Page 27
the back of your set-top box to your PC. You may need other or additional cables, PC to your TV. An S-video cable provides separate color and black-and-white image signals, and delivers a sharper image than a composite video cable does. C n Select the signal source for TV in the Media Center - HP Media Center m1200 | Getting Started Guide - Page 28
provided) from your set-top box into the Audio In right (red) (A) connector and the Audio In left (white) (B) connector on the back of the PC, if you are using a set-top box with S-video or composite video output. FM IN TV IN S-VID IN L R AB C D 24 HP Media Center PC Getting Started Guide - HP Media Center m1200 | Getting Started Guide - Page 29
one of these cables to the input of the VCR and the other one to the TV connector on the back of the PC. Existing setup A B C D Add the PC with a splitter A B C G H C C J D E C F E C F A Wall B Cable C Coaxial cable D VCR In E VCR Out F TV In G Splitter In H Splitter Out J TV In on back of - HP Media Center m1200 | Getting Started Guide - Page 30
the TV connector on the back of the PC. Be sure to connect the remote control sensor cable (emitter) and position it on your set-top box or satellite box. This allows the PC to change the channel on the box. See "Connecting the Remote Sensor" on page 17. 26 HP Media Center PC Getting Started Guide - HP Media Center m1200 | Getting Started Guide - Page 31
D Set-top box/Satellite In E Set-top box/Satellite Out F VCR In G VCR Out H TV In J Splitter In K Splitter Out L TV In on back of PC M Remote control sensor cable N Remote control sensor Connecting the Television Signal 27 - HP Media Center m1200 | Getting Started Guide - Page 32
satellite box. Plug the other end of the cable into the S-video In connector on the back of the PC. 3 When using a composite video or S-video cable, you must also plug audio cables (not provided) adapter to the S-video In connector on the back of the PC. 28 HP Media Center PC Getting Started Guide - HP Media Center m1200 | Getting Started Guide - Page 33
/Satellite Out E S-video or composite cable F VCR In G VCR Out H TV In J Add an S-video or composite cable with adapter K S-video In on back of PC L Remote control sensor cable M Remote control sensor Connecting the Television Signal 29 - HP Media Center m1200 | Getting Started Guide - Page 34
an S-video cable (A) from the S-video In jack on the TV to the S-video Out jack (B) on the video card on the back of the PC. B A 30 HP Media Center PC Getting Started Guide - HP Media Center m1200 | Getting Started Guide - Page 35
only an S-video connector, plug an S-video to composite video adapter cable into the TV Out S-video (B) connector on the back of the PC. Connect a composite video cable, to the S-video to composite video adapter cable. 6 Plug the other end of the composite video cable into the TV In ( - HP Media Center m1200 | Getting Started Guide - Page 36
TV setting. 3 Turn on the PC. 4 When the Windows desktop appears, right-click an empty area of the desktop and choose Properties. The Display TV from the drop-down list. 32 HP Media Center PC Getting Started Guide 3 Click the Apply button. 4 When the PC image appears on the TV screen, click - HP Media Center m1200 | Getting Started Guide - Page 37
each display icon is a button and a status indicator. A red corner indicates an inactive display; a green corner indicates an active display. 2 To view the PC image on your PC monitor and your TV simultaneously, click the upper-left corner of the TV icon so that it is green. Click Apply. Or To view - HP Media Center m1200 | Getting Started Guide - Page 38
the video cable at the TV and the PC. 2 Click the upper-left corner of the TV icon so it is red, and then click the upper-left corner of the monitor icon so it is green. Click the Apply button. 3 When the PC image appears on the TV 34 HP Media Center PC Getting Started Guide - HP Media Center m1200 | Getting Started Guide - Page 39
Configuring Speaker and Sound Options HP Media Center PCs support many different audio options, PC. If you want to connect multichannel audio, follow the instructions carefully. Your PC model may include six sound connectors on the back of your PC. You can connect up to a 7.1 audio system to the PC - HP Media Center m1200 | Getting Started Guide - Page 40
in a multichannel audio configuration. Line out (lime green) for front speakers. OUT D E 36 HP Media Center PC Getting Started Guide IN mic (pink) connects to microphone. (3: Also functions as center/subwoofer line out when a multichannel audio configuration is activated.) Line in (light blue - HP Media Center m1200 | Getting Started Guide - Page 41
home audio receiver/amplifier) or digital speakers (select models only). Speaker Configurations You may set up your HP Media Center PC for the following supported configurations: Name Headphone 2 (stereo) 2.1 4.1 6/5.1 8/7.1 Home audio system Digital audio Speaker system None, muted. Left speaker - HP Media Center m1200 | Getting Started Guide - Page 42
PC (select models only), connect the audio line out connector to the subwoofer. 4 Connect the left and right speakers to the subwoofer. Refer to the speaker documentation. 5 Turn on the PC. 6 Plug in the speaker system power. 7 Turn on the speaker system. 38 HP Media Center PC Getting Started Guide - HP Media Center m1200 | Getting Started Guide - Page 43
installation: OUT IN OUT Connecting 4.1 Audio Speakers To connect two front speakers, two rear speakers, and a subwoofer for four-channel (4.1 speaker) output: 1 Turn off the PC. 2 . Connect the front speaker cable to the lime green audio line out connector that matches the back of your - HP Media Center m1200 | Getting Started Guide - Page 44
the rear speaker cable to the black connector that matches the back of your PC. IN 3 6 S OUT 3 6 S ■ For 3 Connector systems, the blue audio line in connector functions as a rear line out when a multichannel audio configuration is activated. 40 HP Media Center PC Getting Started Guide - HP Media Center m1200 | Getting Started Guide - Page 45
. 8 Plug in the speaker system power. 9 Turn on the speaker system. 10 After the speakers are connected to the PC, configure the audio software for sound output for your PC model: ■ For 3 Connector systems, the pink mic connector functions as a center/subwoofer speaker line out when a multichannel - HP Media Center m1200 | Getting Started Guide - Page 46
are connected to the PC, configure the audio software for sound output for your PC model: ■ 6 Connector: See "Configuring Audio Output with Sound Effect Manager" on page 51. ■ Sound Card: See "Configuring Audio Output with a Sound Card" on page 53. 42 HP Media Center PC Getting Started Guide - HP Media Center m1200 | Getting Started Guide - Page 47
The following diagram shows a typical 7.1 audio installation: Connecting the PC to a Home Audio System You can connect your HP Media Center PC to your home stereo or home theater multichannel audio receiver/amplifiers using your existing speakers. For example, see "2.1 home stereo installation" - HP Media Center m1200 | Getting Started Guide - Page 48
. Your system may be different. IN OUT n A A: PC back panel connectors (3, 6, or Sound Card) B B: Y adapter cables C: Receiver/amplifier D: Subwoofer C E: Front speakers (left and right) D E PC to 2.1 multichannel audio system connection 44 HP Media Center PC Getting Started Guide - HP Media Center m1200 | Getting Started Guide - Page 49
configuration. Your system may be different. IN OUT A B C D E F G PC to 5.1 multichannel audio system connection n A: PC back panel connectors (3, 6, or Sound Card) B: Y adapter cables C: Receiver/amplifier D: Subwoofer E: Center speaker F: Front speakers (left and right) G: Rear speakers - HP Media Center m1200 | Getting Started Guide - Page 50
. ■ 6 Connector: See "Configuring Audio Output with Sound Effect Manager" on page 51. ■ Sound Card: See "Configuring Audio Output with a Sound Card" on page 53. 46 HP Media Center PC Getting Started Guide - HP Media Center m1200 | Getting Started Guide - Page 51
with the following software. Use the software that applies to your PC model: ■ Multi-channel Sound Manager (3 Connector) ■ Sound Effect Manager (6 Connector) ■ Creative Speaker Settings (Sound Card) ■ Media Center (all systems) ■ WinDVD Player (all systems) Configuring Speaker and Sound Options - HP Media Center m1200 | Getting Started Guide - Page 52
speakers. An Audio Connector Switch indicates the speaker configuration. ■ Speaker Test - Test all connected speakers for correct configuration. ■ General - View Driver and audio information. 48 HP Media Center PC Getting Started Guide - HP Media Center m1200 | Getting Started Guide - Page 53
the Speaker Test tab. Follow the instructions. 9 Configure audio output for the Media Center. See "Configuring Audio for Media Center" on page 54. 10 Configure . 3 Connect the digital audio output connector on the back of your PC to your home audio system's digital audio input. 4 Select your stereo - HP Media Center m1200 | Getting Started Guide - Page 54
select an environment, such as Under Water or Auditorium. To use the equalizer, click the power button in the center of the circular equalizer control to turn on the equalizer. You can click a pre-set connections. See "Using the Audio Wizard" on page 51. 50 HP Media Center PC Getting Started Guide - HP Media Center m1200 | Getting Started Guide - Page 55
button. Follow the instructions. 8 Close the window. 9 Configure audio output for the Media Center. See "Configuring Audio for Media Center" on page 54. you connect front panel audio. To use the Audio Wizard: 1 Turn on the PC. 2 Click Start on the taskbar. 3 Choose Control Panel. 4 Click Sounds, - HP Media Center m1200 | Getting Started Guide - Page 56
window. Retasking front panel connectors The microphone connector and the headphone connector on the front of the PC can be retasked to perform different functions. 1 Follow steps 1 through 7 of the procedure, close to the speakers, feedback can occur. 52 HP Media Center PC Getting Started Guide - HP Media Center m1200 | Getting Started Guide - Page 57
the speakers. 7 Adjust the speaker volume settings on the PC. Click the Calibrate button. The wizard starts. Follow the wizard basic instructions. 8 Close the window. 9 Configure audio output for the Media Center. See "Configuring Audio for Media Center" on page 54. 10 Configure audio output for the - HP Media Center m1200 | Getting Started Guide - Page 58
change the audio properties for WinDVD to match your speaker configuration (if your InterVideo WinDVD program supports more than two channels). If you want to play a stereo DVD, you may change the able to hear the speakers. Click Stop, and then click OK. 54 HP Media Center PC Getting Started Guide - HP Media Center m1200 | Getting Started Guide - Page 59
■ Volume controls within a program, such as the volume buttons on the Media Center navigation bar or on the remote control. ■ Volume icon on the taskbar to the line out connector (lime green) on the back of your PC. 2.1 speaker system For select models with the 2.1 speaker system, look for - HP Media Center m1200 | Getting Started Guide - Page 60
as soon as you plug in your microphone. Another microphone connector is on the back of your PC. Only one microphone connector works at a time, and the back connector is ready to use. check in the Microphone check box. 6 Click OK. 7 Close the window. 56 HP Media Center PC Getting Started Guide - HP Media Center m1200 | Getting Started Guide - Page 61
sound cable connections. ■ Reinstall the sound card drivers by using HP Application Recovery. See "Application Recovery" in the Warranty and Support Guide. ■ Reconfigure the sound software for surround sound. ■ Use active, powered speakers, or speakers with an amplifier. ■ Some programs may result - HP Media Center m1200 | Getting Started Guide - Page 62
58 HP Media Center PC Getting Started Guide - HP Media Center m1200 | Getting Started Guide - Page 63
Microsoft Windows setup. 4 Register with HP to receive changes, updates, and support. You can register with HP any of these ways: Turn on the PC and follow the onscreen instructions, double-click the registration icon A on your desktop and follow onscreen instructions, or register online at: http - HP Media Center m1200 | Getting Started Guide - Page 64
Support Center. ■ Start a search. ■ Run a program. ■ View or change settings by opening the Control Panel. ■ End your current PC session and switch between users by clicking the Log Off button. ■ Turn off the PC or restart it by clicking the Turn Off Computer button. 60 HP Media Center PC Getting - HP Media Center m1200 | Getting Started Guide - Page 65
Desktop shortcuts (Select models only) Icon Opens Windows XP Start menu Help and Support Use it to Find all your software programs, turn off the PC, open Help and Support, and access all the PC utilities and features. View onscreen help information about your PC. Media Center Easy Internet Sign- - HP Media Center m1200 | Getting Started Guide - Page 66
Media Center cannot play TV programs previously recorded to disk or copied to DVD or to other media. For more information about protecting your recorded TV programs, refer to "Safeguarding Your Recorded TV Programs" in the HP Media Center Software Guide. 62 HP Media Center PC Getting Started Guide - HP Media Center m1200 | Getting Started Guide - Page 67
the HP Media Center PC Software Guide for more information. When your PC has software problems, it is possible that a voltage spike, power outage, deposits. HP Image Zone Plus appears within the My Pictures folder and provides easy access to software and services exclusively from HP. Norton - HP Media Center m1200 | Getting Started Guide - Page 68
HP Organize software is a desktop tool you use to organize both your PC shortcuts and your favorite Internet links. You can use it to organize the important things you do on the PC and the Internet. HP of the menu. 4 Click Turn Off. 5 Turn off the monitor. 64 HP Media Center PC Getting Started Guide - HP Media Center m1200 | Getting Started Guide - Page 69
when you wake it from standby, reset the PC by pressing and holding the On button on the front of the PC for approximately 5 seconds until the PC turns off. Then turn the PC back on. If you are using Media Center to record TV programs, put the PC into standby mode (instead of turning it off - HP Media Center m1200 | Getting Started Guide - Page 70
front of the PC. The PC returns everything (programs, folders, and documents) to the screen. If the PC does not work properly when you wake it from hibernation, restart the PC. w Do not use hibernate if you have scheduled TV recordings in Media Center. 66 HP Media Center PC Getting Started Guide - HP Media Center m1200 | Getting Started Guide - Page 71
auto-standby for the PC, click a time (such as After 20 mins) in the System standby list. ■ To turn on auto-hibernate, click a time (such as After 1 hour) in the System hibernates list. 7 Click OK. w Do not use auto-hibernate if you have scheduled TV recordings in Media Center; instead, set System - HP Media Center m1200 | Getting Started Guide - Page 72
listed for the new software for compatibility with your PC. Install the new software according to the directions provided by the software manufacturer. Check the manufacturer's documentation or customer service information for help if you need it. 68 HP Media Center PC Getting Started Guide - HP Media Center m1200 | Getting Started Guide - Page 73
wireless keyboard (select models only) uses a receiver/transmitter, instead of a connector cable, to communicate with your PC. A light on the receiver indicates receiver activity. The keyboard has an arrangement of standard keys, indicator lights, and special buttons. Alphanumeric keys are the main - HP Media Center m1200 | Getting Started Guide - Page 74
or out of power-saving mode. May take 10-30 seconds before screen reappears. Log off or switch between PC users. Links to an HP Web site. Opens the Help and Support Center. Opens the HP Image Zone Plus software program. Can be reconfigured. Starts iTunes or Windows Media Player. Can be reconfigured - HP Media Center m1200 | Getting Started Guide - Page 75
upper and lower optical drive tray. Starts recording to selected media. Stops media. Plays or pauses media. Rewinds media. Fast-forwards media. Volume knob controls speaker volume. Mute Turns speaker sound 4 through 6 for other buttons. 8 Click OK when you are finished. Using the PC Hardware 71 - HP Media Center m1200 | Getting Started Guide - Page 76
cable, to communicate with your PC. A light on the receiver PC box. A Wireless receiver B Wireless keyboard C Wireless mouse Wireless receiver A light on the receiver indicates receiver activity. A Number lock B Caps lock C Scroll lock D Receiver activity 72 HP Media Center PC Getting Started Guide - HP Media Center m1200 | Getting Started Guide - Page 77
TV programs, play previously recorded TV programs, and play music, movies, or video. See "Using the Remote Control" in the HP Media Center PC Software Guide for detailed instructions on using the features of the remote control. To use the remote control, simply point it at the remote sensor and - HP Media Center m1200 | Getting Started Guide - Page 78
n Use alkaline batteries in the remote control. Installing the remote control batteries 1 Slide the battery cover off the back of the remote control. 2 Insert the two AA batteries (provided). 3 Replace the battery cover. 74 HP Media Center PC Getting Started Guide - HP Media Center m1200 | Getting Started Guide - Page 79
Microdrive disk drive. The card reader is accessible directly on the front of the PC or located inside a cover. It has four horizontal card slots, which accept and the Microdrive disk drive. A B C w Do not try to remove media when the inuse light is blinking. Doing so may cause loss of data. D - HP Media Center m1200 | Getting Started Guide - Page 80
in-use light The memory card reader in-use light is off when there are no media cards plugged into the four slots. The light turns on when a media card is inserted into a slot. The light blinks when data is being transferred between the card and the PC. 76 HP Media Center PC Getting Started Guide - HP Media Center m1200 | Getting Started Guide - Page 81
Troubleshooting the memory card reader If you are having problems media. ■ Make sure the memory card is fully inserted into the correct slot. ■ Remove the memory card and shine a flashlight into the empty slot to see if any pins are bent. Replace the memory card reader or have the PC serviced - HP Media Center m1200 | Getting Started Guide - Page 82
and two camera docking bay lids. This bay is designed to hold an HP camera docking station and several HP digital cameras (which are purchased separately). To install the HP camera docking station: 1 Gently press down and slide the CD storage lid open. 78 HP Media Center PC Getting Started Guide - HP Media Center m1200 | Getting Started Guide - Page 83
2 Place the camera docking station (A) on the top of the PC. 3 Place the camera bracket (B) that came with your digital camera on the camera docking station. B n A The camera bracket clips onto the camera dock base. This bracket comes with the digital camera. . Using the PC Hardware 79 - HP Media Center m1200 | Getting Started Guide - Page 84
) into a TV if you want to view the camera images on a TV (optional). ■ Plug the power cord into a power outlet. Refer to the instructions that came with the HP camera docking station. IN OUT SERIAL ETHERNET TV-OUT VID IN LCD R S-VID IN L TV . 80 HP Media Center PC Getting Started Guide - HP Media Center m1200 | Getting Started Guide - Page 85
6 Place the correct camera docking station lid (D) on top of the PC. Gently guide the edge of the lid into the top of the PC. E 7 Place the HP digital camera (E) into the camera docking station. 8 Follow the instructions that came with your camera docking station. D Using the PC Hardware 81 - HP Media Center m1200 | Getting Started Guide - Page 86
82 HP Media Center PC Getting Started Guide - HP Media Center m1200 | Getting Started Guide - Page 87
. ■ Be sure that you installed the device drivers that came with the new device. ■ You may need an updated driver for Windows XP. For non-HP peripherals, contact the vendor directly. For HP peripherals, visit the HP Web site. Refer to the Warranty and Support Guide for details. Troubleshooting 83 - HP Media Center m1200 | Getting Started Guide - Page 88
System Recovery" in the Warranty and Support Guide that came with your PC. ■ It's possible that a voltage spike, power outage, or brownout has occurred. Symptoms suppressor made for use with computers between the power outlet and the computer power cord. 84 HP Media Center PC Getting Started Guide - HP Media Center m1200 | Getting Started Guide - Page 89
Problem The computer doesn't make any sound. volume. ■ If your speakers have a power button, check whether it is turned on and whether the power supply is connected to the power source. ■ Check the speaker connections. ■ Or Click Calibrate to adjust the speaker volume settings. Troubleshooting 85 - HP Media Center m1200 | Getting Started Guide - Page 90
Problem When I push one of the special or multimedia buttons on the keyboard, nothing happens. Solution Check the button configuration. To the computer On button until the computer turns off (approximately five seconds). Then turn the computer back on. 86 HP Media Center PC Getting Started Guide - HP Media Center m1200 | Getting Started Guide - Page 91
on the front of the monitor is lit, the monitor is getting power.) n When Media Center is open, you can press F1 on the keyboard to open Media Center Help. The mouse doesn't work, even though everything else does. ■ off (approximately 5 seconds). Then turn the computer back on. Troubleshooting 87 - HP Media Center m1200 | Getting Started Guide - Page 92
Close Media Center, restart the PC, and then open Media Center again. ■ If the remote control works in Media Center but not when changing channels, you need to reconfigure the Media Center software settings for the cable set-top box or satellite receiver. 88 HP Media Center PC Getting Started Guide - HP Media Center m1200 | Getting Started Guide - Page 93
Problem My remote sensor is the end of the USB cable on the remote sensor from the PC and plug it into the same USB port. 6 Disconnect all other USB devices , leave the remote sensor plugged in, and then restart the PC. Plug in other USB devices after the remote sensor appears in the - HP Media Center m1200 | Getting Started Guide - Page 94
Problem ■ Make sure the memory card is one of the supported types: CompactFlash (1, 2, and Microdrive), Memory Stick, Memory pins are bent, replace the memory card reader, or have the PC serviced if a pin is touching another pin. To straighten slightly bent HP Media Center PC Getting Started Guide - HP Media Center m1200 | Getting Started Guide - Page 95
My PC is experiencing video errors. Solution ■ Your file may be corrupt or in an unsupported format. Open the video file in a video editor such as WinDVD Creator, and then resave the file in a supported format. ■ There may be a problem with the codec. For more information, look in Windows Media - HP Media Center m1200 | Getting Started Guide - Page 96
you need more information about using or troubleshooting Media Center, refer to the Media Center online Help or Help and Support in the Start menu. Problem My DVD won't play. Solution You can put data files on a DVD to store them or transfer them to another PC. However, data files on a DVD do not - HP Media Center m1200 | Getting Started Guide - Page 97
See turning on computer buttons media control or playback 71 On 59 C cables connecting PC to TV 30 connecting the PC to TV 23 camera docking station 14 TV In 14 USB 13 Control Panel, opening 60 D desktop 60 organizing tool 64 shortcuts 61 devices connecting 22 digital camera connecting 18, - HP Media Center m1200 | Getting Started Guide - Page 98
71 Internet 70 media playback 71 not working 86 special 70 M Media Center desktop 60 opening through Start menu 60 with remote control 73 PC desktop 60 software 5 start button 61 memory card reader in-use light 76 troubleshooting 77 using 75, 76 94 HP Media Center PC Getting Started Guide - HP Media Center m1200 | Getting Started Guide - Page 99
guides 6 Online Spotlight link to Microsoft Web site 6 P PC back connectors 12 components 7 components for Media Center troubleshooting 3, 5 troubleshooting information 64 turning off 64 PC Help & Tools, using 64 PC Tune Up & Repair 61 power Service Provider 59 Serial port connector 13 settings power - HP Media Center m1200 | Getting Started Guide - Page 100
working with home videos 18, 19 virus-scanning program 63 volume adjusting 55 volume, adjusting 55 W warnings voltage select switch 83 warranty information 4 Windows Media Player icon 61 Windows Start menu 61 wireless LAN 16 connecting 16 X xD reader 75 96 HP Media Center PC Getting Started Guide
-
 1
1 -
 2
2 -
 3
3 -
 4
4 -
 5
5 -
 6
6 -
 7
7 -
8
-
9
-
10
-
11
-
12
-
13
-
14
-
15
-
16
-
17
-
18
-
19
-
20
-
21
-
22
-
23
-
24
-
25
-
26
-
27
-
28
-
29
-
30
-
31
-
32
-
33
-
34
-
35
-
36
-
37
-
38
-
39
-
40
-
41
-
42
-
43
-
44
-
45
-
46
-
47
-
48
-
49
-
50
-
51
-
52
-
53
-
54
-
55
-
56
-
57
-
58
-
59
-
60
-
61
-
62
-
63
-
64
-
65
-
66
-
67
-
68
-
69
-
70
-
71
-
72
-
73
-
74
-
75
-
76
-
77
-
78
-
79
-
80
-
81
-
82
-
83
-
84
-
85
-
86
-
87
-
88
-
89
-
90
-
91
-
92
-
93
-
94
-
95
-
96
-
97
-
98
-
99
-
100
 |
 |
HP Media Center PC
Getting Started Guide