HP Media Center m1200 Getting Started Guide - Page 60
Using a Microphone
 |
View all HP Media Center m1200 manuals
Add to My Manuals
Save this manual to your list of manuals |
Page 60 highlights
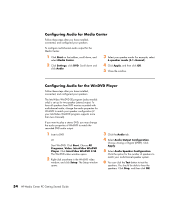
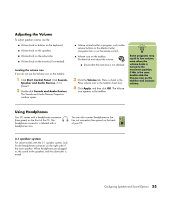
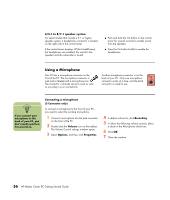
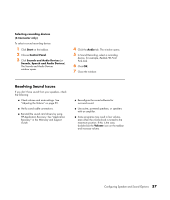
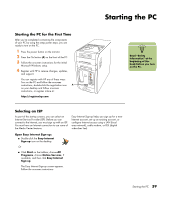
6/5.1 to 8/7.1 speaker system For select models that include a 5.1 or higher speaker system, a headphones connector is located on the right side of the control tower. If the control tower displays HP (for HeadPhones), the headphones are enabled; the sound to the speakers and the subwoofer is muted. ■ Push and hold the On button on the control tower for several seconds to enable sound from the speakers. ■ Press the On button briefly to enable the headphones. Using a Microphone Your PC has a microphone connector on the front of the PC. The microphone connector is pink and is labeled with a microphone icon. The connector is already set up to work as soon as you plug in your microphone. Another microphone connector is on the back of your PC. Only one microphone connector works at a time, and the back connector is ready to use. n If you connect your microphone to the back of your PC, you don't need to perform this procedure. Connecting a microphone (3 Connector only) To connect a microphone to the front of your PC, you need to select the working microphone: 1 Connect a microphone into the pink connector on the front of the PC. 2 Double-click the Volume icon on the taskbar. The Volume Control settings window opens. 3 Select Options, and then click Properties. 4 In Adjust volume for, click Recording. 5 In Show the following volume controls, place a check in the Microphone check box. 6 Click OK. 7 Close the window. 56 HP Media Center PC Getting Started Guide
-
 1
1 -
2
-
3
-
4
-
5
-
6
-
7
-
8
-
9
-
10
-
11
-
12
-
13
-
14
-
15
-
16
-
17
-
18
-
19
-
20
-
21
-
22
-
23
-
24
-
25
-
26
-
27
-
28
-
29
-
30
-
31
-
32
-
33
-
34
-
35
-
36
-
37
-
38
-
39
-
40
-
41
-
42
-
43
-
44
-
45
-
46
-
47
-
48
-
49
-
50
-
51
-
52
-
53
-
54
-
 55
55 -
 56
56 -
 57
57 -
 58
58 -
 59
59 -
 60
60 -
 61
61 -
 62
62 -
 63
63 -
 64
64 -
 65
65 -
66
-
67
-
68
-
69
-
70
-
71
-
72
-
73
-
74
-
75
-
76
-
77
-
78
-
79
-
80
-
81
-
82
-
83
-
84
-
85
-
86
-
87
-
88
-
89
-
90
-
91
-
92
-
93
-
94
-
95
-
96
-
97
-
98
-
99
-
100
 |
 |