HP Workstation x4000 hp workstation x4000 - Technical Reference manual - Windo - Page 163
Inserting RIMMs and CRIMMs
 |
View all HP Workstation x4000 manuals
Add to My Manuals
Save this manual to your list of manuals |
Page 163 highlights
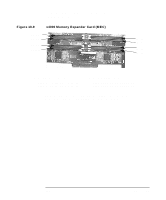
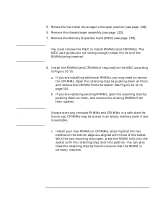
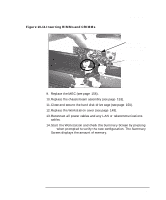
Installing or Replacing Parts and Accessories System Memory Figure 10-11 Inserting RIMMs and CRIMMs MEC Voltage Regulator Module (not on all MECs) Retaining Clip fully engaged 9. Replace the MEC (see page 156). 10. Replace the chassis beam assembly (see page 153). 11. Close and secure the hard disk drive cage (see page 150). 12. Replace the Workstation cover (see page 148). 13. Reconnect all power cables and any LAN or telecommunications cables. 14. Start the Workstation and check the Summary Screen by pressing Esc when prompted to verify the new configuration. The Summary Screen displays the amount of memory. Chapter 10 161
-
 1
1 -
2
-
3
-
4
-
5
-
6
-
7
-
8
-
9
-
10
-
11
-
12
-
13
-
14
-
15
-
16
-
17
-
18
-
19
-
20
-
21
-
22
-
23
-
24
-
25
-
26
-
27
-
28
-
29
-
30
-
31
-
32
-
33
-
34
-
35
-
36
-
37
-
38
-
39
-
40
-
41
-
42
-
43
-
44
-
45
-
46
-
47
-
48
-
49
-
50
-
51
-
52
-
53
-
54
-
55
-
56
-
57
-
58
-
59
-
60
-
61
-
62
-
63
-
64
-
65
-
66
-
67
-
68
-
69
-
70
-
71
-
72
-
73
-
74
-
75
-
76
-
77
-
78
-
79
-
80
-
81
-
82
-
83
-
84
-
85
-
86
-
87
-
88
-
89
-
90
-
91
-
92
-
93
-
94
-
95
-
96
-
97
-
98
-
99
-
100
-
101
-
102
-
103
-
104
-
105
-
106
-
107
-
108
-
109
-
110
-
111
-
112
-
113
-
114
-
115
-
116
-
117
-
118
-
119
-
120
-
121
-
122
-
123
-
124
-
125
-
126
-
127
-
128
-
129
-
130
-
131
-
132
-
133
-
134
-
135
-
136
-
137
-
138
-
139
-
140
-
141
-
142
-
143
-
144
-
145
-
146
-
147
-
148
-
149
-
150
-
151
-
152
-
153
-
154
-
155
-
156
-
157
-
 158
158 -
 159
159 -
 160
160 -
 161
161 -
 162
162 -
 163
163 -
 164
164 -
 165
165 -
 166
166 -
 167
167 -
 168
168 -
169
-
170
-
171
-
172
-
173
-
174
-
175
-
176
-
177
-
178
-
179
-
180
-
181
-
182
-
183
-
184
-
185
-
186
-
187
-
188
-
189
-
190
-
191
-
192
-
193
-
194
-
195
-
196
-
197
-
198
-
199
-
200
-
201
-
202
-
203
-
204
-
205
-
206
-
207
-
208
-
209
-
210
-
211
-
212
-
213
-
214
-
215
-
216
-
217
-
218
-
219
-
220
-
221
-
222
-
223
-
224
-
225
-
226
-
227
-
228
-
229
-
230
-
231
-
232
-
233
-
234
-
235
-
236
-
237
-
238
 |
 |

Installing or Replacing Parts and Accessories
System Memory
Chapter 10
161
Figure 10-11 Inserting RIMMs and CRIMMs
9.
Replace the MEC (see page 156).
10.Replace the chassis beam assembly (see page 153).
11.Close and secure the hard disk drive cage (see page 150).
12.Replace the Workstation cover (see page 148).
13.Reconnect all power cables and any LAN or telecommunications
cables.
14.Start the Workstation and check the Summary Screen by pressing
Esc
when prompted to verify the new configuration. The Summary
Screen displays the amount of memory.
MEC Voltage
Regulator Module
(not on all MECs)
Retaining Clip
fully engaged