HP Workstation x4000 hp workstation x4000 - Technical Reference manual - Windo - Page 172
Installing a SCSI Hard Disk Drive, SCSI Hard Drive,
 |
View all HP Workstation x4000 manuals
Add to My Manuals
Save this manual to your list of manuals |
Page 172 highlights
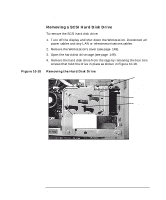
CAUTION Installing or Replacing Parts and Accessories SCSI Hard Drive Installing a SCSI Hard Disk Drive Before proceeding with this section, make sure you have set the SCSI ID for your hard disk drive (see page 169). Devices that are incorrectly configured cause the Workstation to behave unpredictably. Take care when handling the hard disk drive during installation. A one-quarter inch drop can damage it. To install one or two hard disk drives: 1. Turn off the display and shut down the Workstation. Disconnect all power cables and any LAN or telecommunications cables. 2. Remove the Workstation's cover (see page 145). 3. Open the hard disk drive cage (see page 149). 4. Install the hard disk drive(s) in the cage using the screws provided on the hard disk drive cage as shown in Figure 10-18 on page 168: a. If you only have one hard drive, install it in the bottom bay. b. If required, install a second hard drive in the top bay. c. Align the screw holes on each hard drive with the openings in the hard disk drive cage. d. Fasten each hard disk drive to the cage with four screws, two on each side of the cage. The screws for installing the new drive are attached to the hard disk drive cage. 5. Close and secure the hard disk drive cage (see page 150). 6. Replace the Workstation cover (see page 148). 7. Reconnect all power cables and any LAN or telecommunications cables. 8. Start the Workstation and check the Summary Screen by pressing Esc when prompted to verify the new configuration. 170 Chapter 10
-
 1
1 -
2
-
3
-
4
-
5
-
6
-
7
-
8
-
9
-
10
-
11
-
12
-
13
-
14
-
15
-
16
-
17
-
18
-
19
-
20
-
21
-
22
-
23
-
24
-
25
-
26
-
27
-
28
-
29
-
30
-
31
-
32
-
33
-
34
-
35
-
36
-
37
-
38
-
39
-
40
-
41
-
42
-
43
-
44
-
45
-
46
-
47
-
48
-
49
-
50
-
51
-
52
-
53
-
54
-
55
-
56
-
57
-
58
-
59
-
60
-
61
-
62
-
63
-
64
-
65
-
66
-
67
-
68
-
69
-
70
-
71
-
72
-
73
-
74
-
75
-
76
-
77
-
78
-
79
-
80
-
81
-
82
-
83
-
84
-
85
-
86
-
87
-
88
-
89
-
90
-
91
-
92
-
93
-
94
-
95
-
96
-
97
-
98
-
99
-
100
-
101
-
102
-
103
-
104
-
105
-
106
-
107
-
108
-
109
-
110
-
111
-
112
-
113
-
114
-
115
-
116
-
117
-
118
-
119
-
120
-
121
-
122
-
123
-
124
-
125
-
126
-
127
-
128
-
129
-
130
-
131
-
132
-
133
-
134
-
135
-
136
-
137
-
138
-
139
-
140
-
141
-
142
-
143
-
144
-
145
-
146
-
147
-
148
-
149
-
150
-
151
-
152
-
153
-
154
-
155
-
156
-
157
-
158
-
159
-
160
-
161
-
162
-
163
-
164
-
165
-
166
-
 167
167 -
 168
168 -
 169
169 -
 170
170 -
 171
171 -
 172
172 -
 173
173 -
 174
174 -
 175
175 -
 176
176 -
 177
177 -
178
-
179
-
180
-
181
-
182
-
183
-
184
-
185
-
186
-
187
-
188
-
189
-
190
-
191
-
192
-
193
-
194
-
195
-
196
-
197
-
198
-
199
-
200
-
201
-
202
-
203
-
204
-
205
-
206
-
207
-
208
-
209
-
210
-
211
-
212
-
213
-
214
-
215
-
216
-
217
-
218
-
219
-
220
-
221
-
222
-
223
-
224
-
225
-
226
-
227
-
228
-
229
-
230
-
231
-
232
-
233
-
234
-
235
-
236
-
237
-
238
 |
 |
