HP Workstation x4000 hp workstation x4000 - Technical Reference manual - Windo - Page 174
Determining IDE Connections, Removing a CD-ROM, CD-RW, or DVD, CD-ROM, CD-RW or DVD,
 |
View all HP Workstation x4000 manuals
Add to My Manuals
Save this manual to your list of manuals |
Page 174 highlights
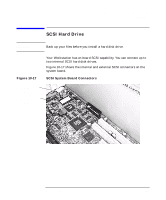
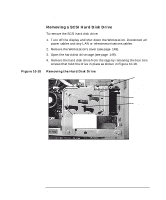
Installing or Replacing Parts and Accessories CD-ROM, CD-RW or DVD Determining IDE Connections The following table explains which data connectors to use when you install IDE devices. All the IDE devices are jumpered Cable Select at the factory. This means that Master and Slave configurations are determined by the device position on the IDE cable: • The device attached to the connector closest to the system board is the Slave. • The device attached to the connector farthest from the system board is the Master. IDE Drive Cabling Suggestions (always use the secondary IDE controller) 1 CD-ROM drive 1 CD-RW drive 1 DVD drive 1 CD-ROM drive 1 CD-RW drive 1 CD-ROM drive 1 DVD drive 1 DVD drive 1 CD-RW drive Master Master Master Master Slave Master Slave Master Slave Removing a CD-ROM, CD-RW, or DVD To remove an optical device: 1. Turn off the display and shut down the Workstation. Disconnect all power cables and any LAN or telecommunications cables. 2. Remove the Workstation's cover and front bezel (see page 145) for instructions). 3. Disconnect the power, data, and audio cables from the old drive. 4. Remove the drive by pressing the two front rail clips inward and sliding the drive out the front of the chassis. 5. Remove the guide rails by gently prying them off the drive. These guide rails are required for the new drive. 172 Chapter 10
-
 1
1 -
2
-
3
-
4
-
5
-
6
-
7
-
8
-
9
-
10
-
11
-
12
-
13
-
14
-
15
-
16
-
17
-
18
-
19
-
20
-
21
-
22
-
23
-
24
-
25
-
26
-
27
-
28
-
29
-
30
-
31
-
32
-
33
-
34
-
35
-
36
-
37
-
38
-
39
-
40
-
41
-
42
-
43
-
44
-
45
-
46
-
47
-
48
-
49
-
50
-
51
-
52
-
53
-
54
-
55
-
56
-
57
-
58
-
59
-
60
-
61
-
62
-
63
-
64
-
65
-
66
-
67
-
68
-
69
-
70
-
71
-
72
-
73
-
74
-
75
-
76
-
77
-
78
-
79
-
80
-
81
-
82
-
83
-
84
-
85
-
86
-
87
-
88
-
89
-
90
-
91
-
92
-
93
-
94
-
95
-
96
-
97
-
98
-
99
-
100
-
101
-
102
-
103
-
104
-
105
-
106
-
107
-
108
-
109
-
110
-
111
-
112
-
113
-
114
-
115
-
116
-
117
-
118
-
119
-
120
-
121
-
122
-
123
-
124
-
125
-
126
-
127
-
128
-
129
-
130
-
131
-
132
-
133
-
134
-
135
-
136
-
137
-
138
-
139
-
140
-
141
-
142
-
143
-
144
-
145
-
146
-
147
-
148
-
149
-
150
-
151
-
152
-
153
-
154
-
155
-
156
-
157
-
158
-
159
-
160
-
161
-
162
-
163
-
164
-
165
-
166
-
167
-
168
-
 169
169 -
 170
170 -
 171
171 -
 172
172 -
 173
173 -
 174
174 -
 175
175 -
 176
176 -
 177
177 -
 178
178 -
 179
179 -
180
-
181
-
182
-
183
-
184
-
185
-
186
-
187
-
188
-
189
-
190
-
191
-
192
-
193
-
194
-
195
-
196
-
197
-
198
-
199
-
200
-
201
-
202
-
203
-
204
-
205
-
206
-
207
-
208
-
209
-
210
-
211
-
212
-
213
-
214
-
215
-
216
-
217
-
218
-
219
-
220
-
221
-
222
-
223
-
224
-
225
-
226
-
227
-
228
-
229
-
230
-
231
-
232
-
233
-
234
-
235
-
236
-
237
-
238
 |
 |
