HP Workstation x4000 hp workstation x4000 - Technical Reference manual - Windo - Page 170
Removing a SCSI Hard Disk Drive,
 |
View all HP Workstation x4000 manuals
Add to My Manuals
Save this manual to your list of manuals |
Page 170 highlights
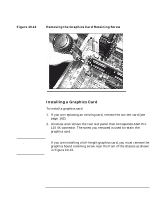
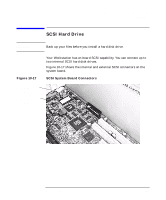
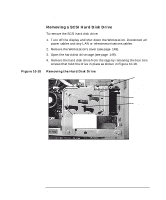
Installing or Replacing Parts and Accessories SCSI Hard Drive Removing a SCSI Hard Disk Drive To remove the SCSI hard disk drive: 1. Turn off the display and shut down the Workstation. Disconnect all power cables and any LAN or telecommunications cables. 2. Remove the Workstation's cover (see page 145). 3. Open the hard disk drive cage (see page 149). 4. Remove the hard disk drive from the cage by removing the four torx screws that hold the drive in place as shown in Figure 10-18. Figure 10-18 Removing the Hard Disk Drive Screws for installing a second hard disk drive Upper Bay Lower Bay These 4 screws (2 front, 2 back) hold one hard drive in place. 168 Chapter 10
-
 1
1 -
2
-
3
-
4
-
5
-
6
-
7
-
8
-
9
-
10
-
11
-
12
-
13
-
14
-
15
-
16
-
17
-
18
-
19
-
20
-
21
-
22
-
23
-
24
-
25
-
26
-
27
-
28
-
29
-
30
-
31
-
32
-
33
-
34
-
35
-
36
-
37
-
38
-
39
-
40
-
41
-
42
-
43
-
44
-
45
-
46
-
47
-
48
-
49
-
50
-
51
-
52
-
53
-
54
-
55
-
56
-
57
-
58
-
59
-
60
-
61
-
62
-
63
-
64
-
65
-
66
-
67
-
68
-
69
-
70
-
71
-
72
-
73
-
74
-
75
-
76
-
77
-
78
-
79
-
80
-
81
-
82
-
83
-
84
-
85
-
86
-
87
-
88
-
89
-
90
-
91
-
92
-
93
-
94
-
95
-
96
-
97
-
98
-
99
-
100
-
101
-
102
-
103
-
104
-
105
-
106
-
107
-
108
-
109
-
110
-
111
-
112
-
113
-
114
-
115
-
116
-
117
-
118
-
119
-
120
-
121
-
122
-
123
-
124
-
125
-
126
-
127
-
128
-
129
-
130
-
131
-
132
-
133
-
134
-
135
-
136
-
137
-
138
-
139
-
140
-
141
-
142
-
143
-
144
-
145
-
146
-
147
-
148
-
149
-
150
-
151
-
152
-
153
-
154
-
155
-
156
-
157
-
158
-
159
-
160
-
161
-
162
-
163
-
164
-
 165
165 -
 166
166 -
 167
167 -
 168
168 -
 169
169 -
 170
170 -
 171
171 -
 172
172 -
 173
173 -
 174
174 -
 175
175 -
176
-
177
-
178
-
179
-
180
-
181
-
182
-
183
-
184
-
185
-
186
-
187
-
188
-
189
-
190
-
191
-
192
-
193
-
194
-
195
-
196
-
197
-
198
-
199
-
200
-
201
-
202
-
203
-
204
-
205
-
206
-
207
-
208
-
209
-
210
-
211
-
212
-
213
-
214
-
215
-
216
-
217
-
218
-
219
-
220
-
221
-
222
-
223
-
224
-
225
-
226
-
227
-
228
-
229
-
230
-
231
-
232
-
233
-
234
-
235
-
236
-
237
-
238
 |
 |

Installing or Replacing Parts and Accessories
SCSI Hard Drive
Chapter 10
168
Removing a SCSI Hard Disk Drive
To remove the SCSI hard disk drive:
1.
Turn off the display and shut down the Workstation. Disconnect all
power cables and any LAN or telecommunications cables.
2.
Remove the Workstation’s cover (see page 145).
3.
Open the hard disk drive cage (see page 149).
4.
Remove the hard disk drive from the cage by removing the four torx
screws that hold the drive in place as shown in Figure 10-18.
Figure 10-18
Removing the Hard Disk Drive
These 4 screws
(2 front, 2 back)
hold one hard
drive in place.
Upper Bay
Lower Bay
Screws for
installing a
second
hard disk
drive