HP Workstation x4000 hp workstation x4000 - Technical Reference manual - Windo - Page 175
Installing a CD-ROM, CD-RW or DVD, Removing the Old Drive
 |
View all HP Workstation x4000 manuals
Add to My Manuals
Save this manual to your list of manuals |
Page 175 highlights
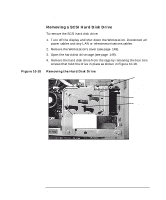
Figure 10-20 Installing or Replacing Parts and Accessories CD-ROM, CD-RW or DVD Removing the Old Drive Step 4 Step 3 Installing a CD-ROM, CD-RW or DVD To install an optical device: 1. Turn off the display and shut down the Workstation. Disconnect all power cables and any LAN or telecommunications cables. 2. Remove the Workstation's cover and front bezel (see page 145) for instructions). 3. Remove the 5.25-inch metal filler plate from the chassis of the Workstation by using your finger to pull the plate from the chassis. 4. Add the guide rails to the new drive. Refer to the sticker on the Workstation chassis for the correct rails for your drive. Insert the guide rails in the two holes located at the bottom of the drive. The guide rails are not side-specific. 5. Align the guide rails on both sides of the drive with the internal shelf guides, then slide the drive until it clicks into position. You should put your Master device in the top bay and your Slave device in the lower bay. For more information on Master/Slave configuration, see page 172. 6. Connect the power, data, and audio cables to the rear of the new drive. 7. Remove the plastic cover piece from the Workstation's bezel that corresponds to your new drive before attaching the bezel and front cover (see page 148). 8. Reconnect all the power and telecommunications cables. Chapter 10 173
-
 1
1 -
2
-
3
-
4
-
5
-
6
-
7
-
8
-
9
-
10
-
11
-
12
-
13
-
14
-
15
-
16
-
17
-
18
-
19
-
20
-
21
-
22
-
23
-
24
-
25
-
26
-
27
-
28
-
29
-
30
-
31
-
32
-
33
-
34
-
35
-
36
-
37
-
38
-
39
-
40
-
41
-
42
-
43
-
44
-
45
-
46
-
47
-
48
-
49
-
50
-
51
-
52
-
53
-
54
-
55
-
56
-
57
-
58
-
59
-
60
-
61
-
62
-
63
-
64
-
65
-
66
-
67
-
68
-
69
-
70
-
71
-
72
-
73
-
74
-
75
-
76
-
77
-
78
-
79
-
80
-
81
-
82
-
83
-
84
-
85
-
86
-
87
-
88
-
89
-
90
-
91
-
92
-
93
-
94
-
95
-
96
-
97
-
98
-
99
-
100
-
101
-
102
-
103
-
104
-
105
-
106
-
107
-
108
-
109
-
110
-
111
-
112
-
113
-
114
-
115
-
116
-
117
-
118
-
119
-
120
-
121
-
122
-
123
-
124
-
125
-
126
-
127
-
128
-
129
-
130
-
131
-
132
-
133
-
134
-
135
-
136
-
137
-
138
-
139
-
140
-
141
-
142
-
143
-
144
-
145
-
146
-
147
-
148
-
149
-
150
-
151
-
152
-
153
-
154
-
155
-
156
-
157
-
158
-
159
-
160
-
161
-
162
-
163
-
164
-
165
-
166
-
167
-
168
-
169
-
 170
170 -
 171
171 -
 172
172 -
 173
173 -
 174
174 -
 175
175 -
 176
176 -
 177
177 -
 178
178 -
 179
179 -
 180
180 -
181
-
182
-
183
-
184
-
185
-
186
-
187
-
188
-
189
-
190
-
191
-
192
-
193
-
194
-
195
-
196
-
197
-
198
-
199
-
200
-
201
-
202
-
203
-
204
-
205
-
206
-
207
-
208
-
209
-
210
-
211
-
212
-
213
-
214
-
215
-
216
-
217
-
218
-
219
-
220
-
221
-
222
-
223
-
224
-
225
-
226
-
227
-
228
-
229
-
230
-
231
-
232
-
233
-
234
-
235
-
236
-
237
-
238
 |
 |
