HP iPAQ 614c HP iPAQ Trip Guide (UK) - Page 52
Route line, Distance Left
 |
View all HP iPAQ 614c manuals
Add to My Manuals
Save this manual to your list of manuals |
Page 52 highlights
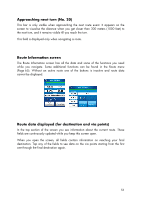
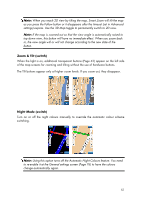
Route line The upper part of this screen shows your planned route as a horizontal line. Its leftmost point is the start of the route, the rightmost one is the final destination, and you can see your via point flags along the line, spaced in proportion to their distance. The blue (yellow when using night colours) arrow representing your position will travel from the left to the right, giving you visual feedback of your journey. When you reach a via point, it becomes the starting point of the route, the past will be deleted, the line with all the other via points will be modified instantly, and the arrow jumps back to the left. When HP iPAQ Trip Guide needs to recalculate the route, the arrow will not jump back to the left as when reaching a via point, but it may drift a bit as the length of the new route may be different from the previous one. When the data corresponding to the entire route is displayed in the fields below, the line is coloured the same way as the route line shown on the map. When you see data that belongs to a via point, the route is coloured only up to that via point. The rest of the line remains grey. Distance Left This value can also be displayed in one of the Route data fields on the Cockpit screen as 'Distance to destination'. This is the distance you need to travel on the route before reaching your final destination. If via points exist, tap and tap again any of the fields to see the distance to reach the first, second, etc. via point. 52
-
 1
1 -
2
-
3
-
4
-
5
-
6
-
7
-
8
-
9
-
10
-
11
-
12
-
13
-
14
-
15
-
16
-
17
-
18
-
19
-
20
-
21
-
22
-
23
-
24
-
25
-
26
-
27
-
28
-
29
-
30
-
31
-
32
-
33
-
34
-
35
-
36
-
37
-
38
-
39
-
40
-
41
-
42
-
43
-
44
-
45
-
46
-
 47
47 -
 48
48 -
 49
49 -
 50
50 -
 51
51 -
 52
52 -
 53
53 -
 54
54 -
 55
55 -
 56
56 -
 57
57 -
58
-
59
-
60
-
61
-
62
-
63
-
64
-
65
-
66
-
67
-
68
-
69
-
70
-
71
-
72
-
73
-
74
-
75
-
76
-
77
-
78
-
79
-
80
-
81
-
82
-
83
-
84
-
85
-
86
-
87
-
88
-
89
-
90
-
91
-
92
-
93
-
94
-
95
-
96
-
97
-
98
-
99
-
100
-
101
-
102
-
103
-
104
-
105
-
106
-
107
-
108
-
109
-
110
-
111
-
112
-
113
-
114
-
115
-
116
-
117
-
118
-
119
-
120
-
121
-
122
-
123
-
124
-
125
-
126
-
127
-
128
 |
 |