Hitachi DZ-HS903A Owners Guide - Page 103
Dividing a Movie, Edit - Divide
 |
UPC - 050585224117
View all Hitachi DZ-HS903A manuals
Add to My Manuals
Save this manual to your list of manuals |
Page 103 highlights
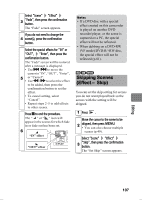
Hints • You can also delete a scene by pressing DELETE on the remote control after placing the cursor on the scene you want to delete on the disc navigation screen. • To delete an unwanted part of a scene on HDD/DVD-RAM/ DVD-RW (VR mode) disc, divide the scene first, then delete the unnecessary part (p.103). Notes • The remaining space indicator may not show any increase if the deleted amount is small (e.g. deleting a short movie, small number of stills, etc.). • The locked scenes on a card cannot be deleted (p.110). • If you delete all data on the HDD/ DVD/card, formatting the HDD/ DVD/card is recommended (p.112). z Editing using the Submenu Other than the Menu from the disc navigation screen (p.88), there is a Submenu. When you press MENU while in some step, Submenu appears whenever it is available. • The Submenu appears only in steps where any of the Submenu items are usable and only usable items are displayed. • To return to the original step, press C. The table below is the example of the Submenu when MENU is pressed in step 3 in "Deleting Scenes (Edit - Delete)" (p.102). Submenu items Explanation Delete Deletes the selected scene. Edit Exit Returns to the disc navigation screen. Start → Selects all the scenes from the top to the scene at the Current cursor position. Select Current → End Selects all the scenes from the scene at the cursor position to the end. All Selects all scenes. Top Go To End Moves the cursor to the top scene. Moves the cursor to the scene at the end. HDD RAM -RW (VR) Dividing a Movie (Edit - Divide) You can divide a scene into two parts. To delete an unnecessary portion of a scene, first divide the scene at the point where you want to end or start saving, and then delete the unnecessary portion. 1 Press . 2 Select the scene you want to divide, then press MENU. Select "Scene" "Edit" 3 "Divide", then press the confirmation button. The "Divide Scene" screen appears. Editing 103
-
 1
1 -
2
-
3
-
4
-
5
-
6
-
7
-
8
-
9
-
10
-
11
-
12
-
13
-
14
-
15
-
16
-
17
-
18
-
19
-
20
-
21
-
22
-
23
-
24
-
25
-
26
-
27
-
28
-
29
-
30
-
31
-
32
-
33
-
34
-
35
-
36
-
37
-
38
-
39
-
40
-
41
-
42
-
43
-
44
-
45
-
46
-
47
-
48
-
49
-
50
-
51
-
52
-
53
-
54
-
55
-
56
-
57
-
58
-
59
-
60
-
61
-
62
-
63
-
64
-
65
-
66
-
67
-
68
-
69
-
70
-
71
-
72
-
73
-
74
-
75
-
76
-
77
-
78
-
79
-
80
-
81
-
82
-
83
-
84
-
85
-
86
-
87
-
88
-
89
-
90
-
91
-
92
-
93
-
94
-
95
-
96
-
97
-
 98
98 -
 99
99 -
 100
100 -
 101
101 -
 102
102 -
 103
103 -
 104
104 -
 105
105 -
 106
106 -
 107
107 -
 108
108 -
109
-
110
-
111
-
112
-
113
-
114
-
115
-
116
-
117
-
118
-
119
-
120
-
121
-
122
-
123
-
124
-
125
-
126
-
127
-
128
-
129
-
130
-
131
-
132
-
133
-
134
-
135
-
136
-
137
-
138
-
139
-
140
-
141
-
142
-
143
-
144
-
145
-
146
-
147
-
148
-
149
-
150
-
151
-
152
-
153
-
154
-
155
-
156
-
157
-
158
-
159
-
160
-
161
-
162
-
163
-
164
-
165
-
166
-
167
-
168
-
169
-
170
-
171
-
172
-
173
-
174
-
175
-
176
-
177
-
178
-
179
-
180
-
181
-
182
-
183
-
184
-
185
-
186
-
187
-
188
-
189
-
190
-
191
 |
 |
