Hitachi DZ-HS903A Owners Guide - Page 75
Changing the Movie, Quality VIDEO Mode, Recording Movies for, Wide-Screen TVs
 |
UPC - 050585224117
View all Hitachi DZ-HS903A manuals
Add to My Manuals
Save this manual to your list of manuals |
Page 75 highlights
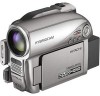
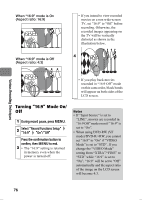
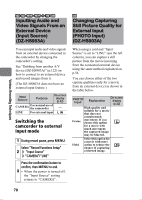
Various Recording Techniques HDD RAM -RW (VR) -RW (VF) R +RW Changing the Movie Quality (VIDEO Mode) You can change the movie recording quality to make high quality recordings or lower the quality to record over longer periods of time. HDD movie quality and recordable time (DZ-HS903A) Video Mode Quality Recordable time XTRA* Best Approx. 7 hrs. FINE High Approx. 11 hrs. STD Extended recording Approx. 23 hrs. (DZ-HS803A) Video Mode Quality Recordable time XTRA* Best Approx. 1 hr. 50 mins. FINE STD High Extended recording Approx. 3 hrs. Approx. 6 hrs. DVD movie quality and recordable time Video Mode Quality Recordable time XTRA* Best Approx. 18 mins. FINE High Approx. 30 mins. STD Extended recording Approx. 60 mins. * In high temperature environments, the image quality may be degraded to an FINE equivalent. Switching movie quality 1 During record pause, press MENU. Select "Record Functions Setup" 2 "VIDEO Mode" a movie quality option Press the confirmation button to confirm, then MENU to end. The selected movie quality will be 3 displayed in the LCD monitor (p.42). • The movie quality setting is retained in memory even if the power is turned off. HDD RAM -RW (VR) -RW (VF) R +RW Recording Movies for Wide-Screen TVs (16:9) If you intend to view recorded movies on a wide-screen TV (aspect ratio 16:9), set "16:9" to "On" before recording. (When "16:9" is set to "Off", movies are recorded in 4:3 aspect ratio.) The image appearing on the LCD screen differs according to the "16:9" setting as follows. 75
-
 1
1 -
2
-
3
-
4
-
5
-
6
-
7
-
8
-
9
-
10
-
11
-
12
-
13
-
14
-
15
-
16
-
17
-
18
-
19
-
20
-
21
-
22
-
23
-
24
-
25
-
26
-
27
-
28
-
29
-
30
-
31
-
32
-
33
-
34
-
35
-
36
-
37
-
38
-
39
-
40
-
41
-
42
-
43
-
44
-
45
-
46
-
47
-
48
-
49
-
50
-
51
-
52
-
53
-
54
-
55
-
56
-
57
-
58
-
59
-
60
-
61
-
62
-
63
-
64
-
65
-
66
-
67
-
68
-
69
-
 70
70 -
 71
71 -
 72
72 -
 73
73 -
 74
74 -
 75
75 -
 76
76 -
 77
77 -
 78
78 -
 79
79 -
 80
80 -
81
-
82
-
83
-
84
-
85
-
86
-
87
-
88
-
89
-
90
-
91
-
92
-
93
-
94
-
95
-
96
-
97
-
98
-
99
-
100
-
101
-
102
-
103
-
104
-
105
-
106
-
107
-
108
-
109
-
110
-
111
-
112
-
113
-
114
-
115
-
116
-
117
-
118
-
119
-
120
-
121
-
122
-
123
-
124
-
125
-
126
-
127
-
128
-
129
-
130
-
131
-
132
-
133
-
134
-
135
-
136
-
137
-
138
-
139
-
140
-
141
-
142
-
143
-
144
-
145
-
146
-
147
-
148
-
149
-
150
-
151
-
152
-
153
-
154
-
155
-
156
-
157
-
158
-
159
-
160
-
161
-
162
-
163
-
164
-
165
-
166
-
167
-
168
-
169
-
170
-
171
-
172
-
173
-
174
-
175
-
176
-
177
-
178
-
179
-
180
-
181
-
182
-
183
-
184
-
185
-
186
-
187
-
188
-
189
-
190
-
191
 |
 |