Hitachi DZ-HS903A Owners Guide - Page 142
If you click Recently Imported
 |
UPC - 050585224117
View all Hitachi DZ-HS903A manuals
Add to My Manuals
Save this manual to your list of manuals |
Page 142 highlights
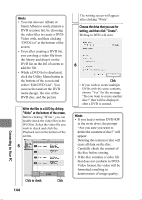
Choose the movie you wish to import and click "Import" at the bottom of screen. Importing will start. 2 Click "Library" in the top left of the screen. The video files imported to the Macintosh will appear in a list as shown below. Click Choose an image Click to import. Choose the movie you wish to import and click "Import" at the bottom of screen. Importing will start. 3 Choose an image Click to import. 4 • To play back a file, select one from the library screen and click the Playback button at the bottom of screen. Also, clicking the "Movie Edit" icon allows you to cut-edit the video. • Refer to the PDF instruction manual of ImageMixer 3 for details on use (p.140). Hint If you click "Recently Imported Files" in "Smart Album" on the left of the screen, only the files recently imported will automatically appear. If you designate a specific condition, such as title, Smart Album will also automatically display the matching video files. For detailed use of Smart Album, refer to "How to Use" - "Creating Albums" - "Creating Smart Albums" in the PDF manual. 142 Connecting to Your PC
-
 1
1 -
2
-
3
-
4
-
5
-
6
-
7
-
8
-
9
-
10
-
11
-
12
-
13
-
14
-
15
-
16
-
17
-
18
-
19
-
20
-
21
-
22
-
23
-
24
-
25
-
26
-
27
-
28
-
29
-
30
-
31
-
32
-
33
-
34
-
35
-
36
-
37
-
38
-
39
-
40
-
41
-
42
-
43
-
44
-
45
-
46
-
47
-
48
-
49
-
50
-
51
-
52
-
53
-
54
-
55
-
56
-
57
-
58
-
59
-
60
-
61
-
62
-
63
-
64
-
65
-
66
-
67
-
68
-
69
-
70
-
71
-
72
-
73
-
74
-
75
-
76
-
77
-
78
-
79
-
80
-
81
-
82
-
83
-
84
-
85
-
86
-
87
-
88
-
89
-
90
-
91
-
92
-
93
-
94
-
95
-
96
-
97
-
98
-
99
-
100
-
101
-
102
-
103
-
104
-
105
-
106
-
107
-
108
-
109
-
110
-
111
-
112
-
113
-
114
-
115
-
116
-
117
-
118
-
119
-
120
-
121
-
122
-
123
-
124
-
125
-
126
-
127
-
128
-
129
-
130
-
131
-
132
-
133
-
134
-
135
-
136
-
 137
137 -
 138
138 -
 139
139 -
 140
140 -
 141
141 -
 142
142 -
 143
143 -
 144
144 -
 145
145 -
 146
146 -
 147
147 -
148
-
149
-
150
-
151
-
152
-
153
-
154
-
155
-
156
-
157
-
158
-
159
-
160
-
161
-
162
-
163
-
164
-
165
-
166
-
167
-
168
-
169
-
170
-
171
-
172
-
173
-
174
-
175
-
176
-
177
-
178
-
179
-
180
-
181
-
182
-
183
-
184
-
185
-
186
-
187
-
188
-
189
-
190
-
191
 |
 |
