Hitachi DZ-HS903A Owners Guide - Page 136
Storing movies onto a PC, and creating a, DVD-RW/DVD-R playable, on your DVD recorder, player
 |
UPC - 050585224117
View all Hitachi DZ-HS903A manuals
Add to My Manuals
Save this manual to your list of manuals |
Page 136 highlights
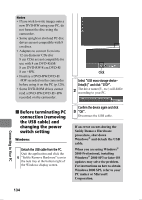
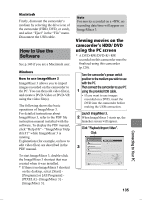
Click on "Hitachi DVDCAM" on the left side of the screen. 4 The recorded images on the camcorder's medium you chose will be displayed. Double-click the thumbnail of the movie you wish to play back (or choose a thumbnail and click "Playback"). The playback screen will appear and playback will start. Click 5 Click Eject button Choose an image to play back. • Double-click the playback screen for full-screen display. To exit the full-screen display, doubleclick the screen again. • To play back images on another DVD, click the Eject button in the bottom left of the library screen with playback stopped. The disc compartment of the camcorder will open. Replace the DVD. Storing movies onto a PC and creating a DVD-RW/DVD-R playable on your DVD recorder/ player Store images recorded on the camcorder onto your PC, then you can create a DVD that you can play back using your DVD recorder/player. Launch ImageMixer 3. When ImageMixer 3 starts up, the launcher screen will appear. Click "Create DVD-Video". Click 1 Click "Create New DVD". 2 The project settings screen will appear. Connecting to Your PC 136
-
 1
1 -
2
-
3
-
4
-
5
-
6
-
7
-
8
-
9
-
10
-
11
-
12
-
13
-
14
-
15
-
16
-
17
-
18
-
19
-
20
-
21
-
22
-
23
-
24
-
25
-
26
-
27
-
28
-
29
-
30
-
31
-
32
-
33
-
34
-
35
-
36
-
37
-
38
-
39
-
40
-
41
-
42
-
43
-
44
-
45
-
46
-
47
-
48
-
49
-
50
-
51
-
52
-
53
-
54
-
55
-
56
-
57
-
58
-
59
-
60
-
61
-
62
-
63
-
64
-
65
-
66
-
67
-
68
-
69
-
70
-
71
-
72
-
73
-
74
-
75
-
76
-
77
-
78
-
79
-
80
-
81
-
82
-
83
-
84
-
85
-
86
-
87
-
88
-
89
-
90
-
91
-
92
-
93
-
94
-
95
-
96
-
97
-
98
-
99
-
100
-
101
-
102
-
103
-
104
-
105
-
106
-
107
-
108
-
109
-
110
-
111
-
112
-
113
-
114
-
115
-
116
-
117
-
118
-
119
-
120
-
121
-
122
-
123
-
124
-
125
-
126
-
127
-
128
-
129
-
130
-
 131
131 -
 132
132 -
 133
133 -
 134
134 -
 135
135 -
 136
136 -
 137
137 -
 138
138 -
 139
139 -
 140
140 -
 141
141 -
142
-
143
-
144
-
145
-
146
-
147
-
148
-
149
-
150
-
151
-
152
-
153
-
154
-
155
-
156
-
157
-
158
-
159
-
160
-
161
-
162
-
163
-
164
-
165
-
166
-
167
-
168
-
169
-
170
-
171
-
172
-
173
-
174
-
175
-
176
-
177
-
178
-
179
-
180
-
181
-
182
-
183
-
184
-
185
-
186
-
187
-
188
-
189
-
190
-
191
 |
 |
