Hitachi DZ-HS903A Owners Guide - Page 134
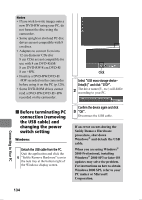
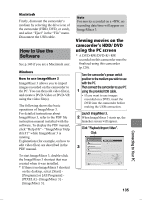
Before terminating PC, connection removing, the USB cable and, changing the power, switch setting
 |
UPC - 050585224117
View all Hitachi DZ-HS903A manuals
Add to My Manuals
Save this manual to your list of manuals |
Page 134 highlights
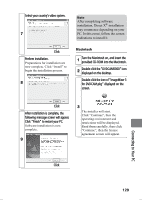
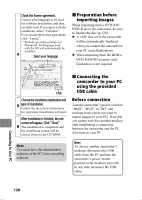
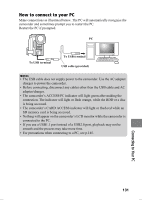
Notes • If you wish to write images onto a new DVD-RW using your PC, do not format the disc using the camcorder. • Some upright or slot load PC disc drives are not compatible with 8 cm discs. • Adapters to convert 8 cm into 12 cm diameter CDs (for 8 cm CDs) are not compatible for use with 8 cm DVD-RAM/ 8 cm DVD-RW/8 cm DVD-R/ 8 cm +RW. • Finalize a DVD-RW/DVD-R/ +RW recorded on the camcorder before using it on the PC (p.120). • Some DVD-ROM drives cannot read a DVD-RW/DVD-R/+RW recorded on the camcorder. Click Select "USB mass-storage device - Drive(E:)" and click "STOP". 2 The drive name (E:, etc.) will differ according to your PC. „ Before terminating PC connection (removing the USB cable) and changing the power switch setting Windows Detach the USB cable from the PC. Quit the application and click the 1 "Safely Remove Hardware" icon in the task tray at the bottom right of the Windows display screen. Confirm the device again and click 3 "OK". Disconnect the USB cable. If an error occurs during the Safely Remove Hardware procedure, shut down Windows® and detach the USB cable. When you are using Windows® 2000 Professional, installing Windows® 2000 SP3 or later OS updates may solve the problem. For instructions on how to obtain Windows 2000 SP3, refer to your PC maker or Microsoft Corporation. Connecting to Your PC 134
-
 1
1 -
2
-
3
-
4
-
5
-
6
-
7
-
8
-
9
-
10
-
11
-
12
-
13
-
14
-
15
-
16
-
17
-
18
-
19
-
20
-
21
-
22
-
23
-
24
-
25
-
26
-
27
-
28
-
29
-
30
-
31
-
32
-
33
-
34
-
35
-
36
-
37
-
38
-
39
-
40
-
41
-
42
-
43
-
44
-
45
-
46
-
47
-
48
-
49
-
50
-
51
-
52
-
53
-
54
-
55
-
56
-
57
-
58
-
59
-
60
-
61
-
62
-
63
-
64
-
65
-
66
-
67
-
68
-
69
-
70
-
71
-
72
-
73
-
74
-
75
-
76
-
77
-
78
-
79
-
80
-
81
-
82
-
83
-
84
-
85
-
86
-
87
-
88
-
89
-
90
-
91
-
92
-
93
-
94
-
95
-
96
-
97
-
98
-
99
-
100
-
101
-
102
-
103
-
104
-
105
-
106
-
107
-
108
-
109
-
110
-
111
-
112
-
113
-
114
-
115
-
116
-
117
-
118
-
119
-
120
-
121
-
122
-
123
-
124
-
125
-
126
-
127
-
128
-
 129
129 -
 130
130 -
 131
131 -
 132
132 -
 133
133 -
 134
134 -
 135
135 -
 136
136 -
 137
137 -
 138
138 -
 139
139 -
140
-
141
-
142
-
143
-
144
-
145
-
146
-
147
-
148
-
149
-
150
-
151
-
152
-
153
-
154
-
155
-
156
-
157
-
158
-
159
-
160
-
161
-
162
-
163
-
164
-
165
-
166
-
167
-
168
-
169
-
170
-
171
-
172
-
173
-
174
-
175
-
176
-
177
-
178
-
179
-
180
-
181
-
182
-
183
-
184
-
185
-
186
-
187
-
188
-
189
-
190
-
191
 |
 |
