Hitachi DZ-HS903A Owners Guide - Page 83
Dubbing All Scenes, Recorded on the Same, Day Date
 |
UPC - 050585224117
View all Hitachi DZ-HS903A manuals
Add to My Manuals
Save this manual to your list of manuals |
Page 83 highlights
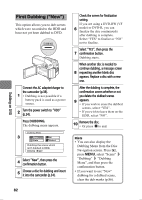
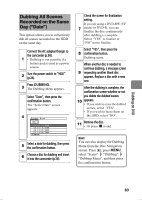
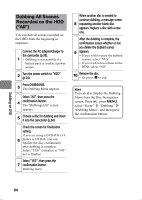
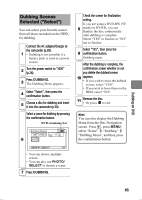
Dubbing All Scenes Recorded on the Same Day ("Date") This option allows you to collectively dub all scenes recorded on the HDD on the same day. Connect the AC adapter/charger to the camcorder (p.38). 1 • Dubbing is not possible if a battery pack is used as a power source. 2 Turn the power switch to "HDD" (p.24). Press DUBBING. 3 The Dubbing Menu appears. Select "Date", then press the confirmation button. The "Select Date" screen appears. 4 Select Date 01 12/ 1 / 2008 02 12/ 5 / 2008 03 12/ 10 / 2008 04 12/ 15 / 2008 ENTER 5 Select a date for dubbing, then press the confirmation button. 6 Choose a disc for dubbing and insert it into the camcorder (p.34). Check the screen for finalization setting. If you are using a DVD-RW (VF 7 mode) or DVD-R, you can finalize the disc continuously after dubbing is complete. Select "YES" to finalize or "NO" not to finalize. Select "YES", then press the 8 confirmation button. Dubbing starts. When another disc is needed to continue dubbing, a message screen 9 requesting another blank disc appears. Replace a disc with a new one. After the dubbing is complete, the confirmation screen whether or not you delete the dubbed scenes 10 appears. • If you wish to erase the dubbed scenes, select "YES". • If you wish to leave them on the HDD, select "NO". 11 Remove the disc. • Or press C to end. Hint You can also display the Dubbing Menu from the Disc Navigation screen. Press , press MENU, select "Scene" "Dubbing" "Dubbing Menu", and then press the confirmation button. Dubbing on DVD 83
-
 1
1 -
2
-
3
-
4
-
5
-
6
-
7
-
8
-
9
-
10
-
11
-
12
-
13
-
14
-
15
-
16
-
17
-
18
-
19
-
20
-
21
-
22
-
23
-
24
-
25
-
26
-
27
-
28
-
29
-
30
-
31
-
32
-
33
-
34
-
35
-
36
-
37
-
38
-
39
-
40
-
41
-
42
-
43
-
44
-
45
-
46
-
47
-
48
-
49
-
50
-
51
-
52
-
53
-
54
-
55
-
56
-
57
-
58
-
59
-
60
-
61
-
62
-
63
-
64
-
65
-
66
-
67
-
68
-
69
-
70
-
71
-
72
-
73
-
74
-
75
-
76
-
77
-
 78
78 -
 79
79 -
 80
80 -
 81
81 -
 82
82 -
 83
83 -
 84
84 -
 85
85 -
 86
86 -
 87
87 -
 88
88 -
89
-
90
-
91
-
92
-
93
-
94
-
95
-
96
-
97
-
98
-
99
-
100
-
101
-
102
-
103
-
104
-
105
-
106
-
107
-
108
-
109
-
110
-
111
-
112
-
113
-
114
-
115
-
116
-
117
-
118
-
119
-
120
-
121
-
122
-
123
-
124
-
125
-
126
-
127
-
128
-
129
-
130
-
131
-
132
-
133
-
134
-
135
-
136
-
137
-
138
-
139
-
140
-
141
-
142
-
143
-
144
-
145
-
146
-
147
-
148
-
149
-
150
-
151
-
152
-
153
-
154
-
155
-
156
-
157
-
158
-
159
-
160
-
161
-
162
-
163
-
164
-
165
-
166
-
167
-
168
-
169
-
170
-
171
-
172
-
173
-
174
-
175
-
176
-
177
-
178
-
179
-
180
-
181
-
182
-
183
-
184
-
185
-
186
-
187
-
188
-
189
-
190
-
191
 |
 |
