Hitachi DZ-HS903A Owners Guide - Page 132
How to remove
 |
UPC - 050585224117
View all Hitachi DZ-HS903A manuals
Add to My Manuals
Save this manual to your list of manuals |
Page 132 highlights
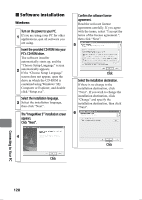
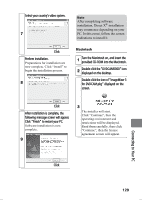
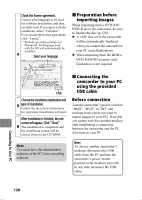
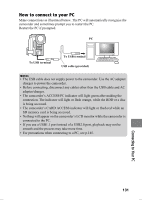
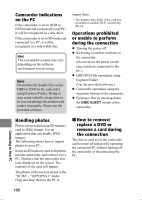
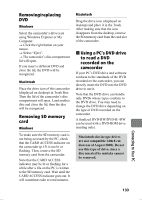
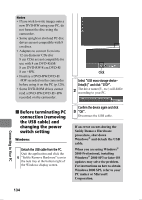
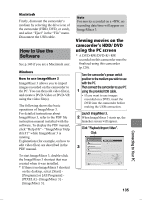
Camcorder indications on the PC If the camcorder is set to HDD or DVD mode and connected to your PC, it will be recognized as a disc drive. If the camcorder is set to SD mode and connected to a PC, it will be recognized as a removable disc. Hint The icon and drive name may vary depending on the software environment you are using. Note Do not directly handle files on the HDD or DVD in the camcorder using Explorer/Finder. Doing so may cause valuable image data to be lost and damage the medium and render it unusable. Please use the provided software. import them. * The number may differ if the card was recorded on another DCF conforming device. Operations prohibited or unable to perform during the connection z Turning the power off. z Switching to another medium on the camcorder (Do not move the power switch once you have connected to the PC.) z HDD/DVD file operations using Explorer/Finder (Use the provided software.) z Camcorder operations using the operation buttons of the camcorder z Ejecting a disc by pressing down the DISC EJECT switch of the camcorder. Handling photos Photos are recorded on an SD memory card in JPEG format. Use an application that can handle JPEG images. The following shows how to import photos to your PC: Insert an SD memory card with photos into the camcorder, and connect it to a PC. Double-click the removable disc icon displayed on the screen. The contents of the card will appear. The photos of the card are stored in the "DCIM" - "100*HPNX1" folder. Drag and drop them to the PC to „ How to remove/ replace a DVD or remove a card during the connection The disc or card set in the camcorder can be removed/replaced by operating the connected PC without turning off the camcorder or disconnecting the PC. Connecting to Your PC 132
-
 1
1 -
2
-
3
-
4
-
5
-
6
-
7
-
8
-
9
-
10
-
11
-
12
-
13
-
14
-
15
-
16
-
17
-
18
-
19
-
20
-
21
-
22
-
23
-
24
-
25
-
26
-
27
-
28
-
29
-
30
-
31
-
32
-
33
-
34
-
35
-
36
-
37
-
38
-
39
-
40
-
41
-
42
-
43
-
44
-
45
-
46
-
47
-
48
-
49
-
50
-
51
-
52
-
53
-
54
-
55
-
56
-
57
-
58
-
59
-
60
-
61
-
62
-
63
-
64
-
65
-
66
-
67
-
68
-
69
-
70
-
71
-
72
-
73
-
74
-
75
-
76
-
77
-
78
-
79
-
80
-
81
-
82
-
83
-
84
-
85
-
86
-
87
-
88
-
89
-
90
-
91
-
92
-
93
-
94
-
95
-
96
-
97
-
98
-
99
-
100
-
101
-
102
-
103
-
104
-
105
-
106
-
107
-
108
-
109
-
110
-
111
-
112
-
113
-
114
-
115
-
116
-
117
-
118
-
119
-
120
-
121
-
122
-
123
-
124
-
125
-
126
-
 127
127 -
 128
128 -
 129
129 -
 130
130 -
 131
131 -
 132
132 -
 133
133 -
 134
134 -
 135
135 -
 136
136 -
 137
137 -
138
-
139
-
140
-
141
-
142
-
143
-
144
-
145
-
146
-
147
-
148
-
149
-
150
-
151
-
152
-
153
-
154
-
155
-
156
-
157
-
158
-
159
-
160
-
161
-
162
-
163
-
164
-
165
-
166
-
167
-
168
-
169
-
170
-
171
-
172
-
173
-
174
-
175
-
176
-
177
-
178
-
179
-
180
-
181
-
182
-
183
-
184
-
185
-
186
-
187
-
188
-
189
-
190
-
191
 |
 |
