IBM 7979B1U User Manual - Page 123
Installing, SMBridge, management, utility, program
 |
View all IBM 7979B1U manuals
Add to My Manuals
Save this manual to your list of manuals |
Page 123 highlights
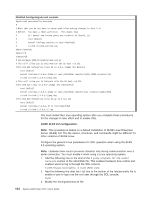
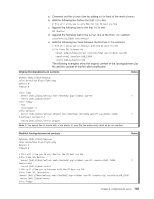
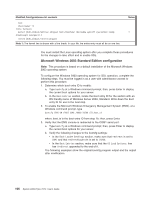
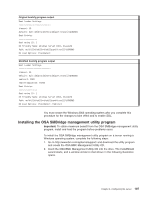
Original bootcfg program output Boot Loader Settings timeout: 30 default: multi(0)disk(0)rdisk(0)partition(1)\WINDOWS Boot Entries Boot entry ID: 1 OS Friendly Name: Windows Server 2003, Standard Path: multi(0)disk(0)rdisk(0)partition(1)\WINDOWS OS Load Options: /fastdetect Modified bootcfg program output Boot Loader Settings timeout: 30 default: multi(0)disk(0)rdisk(0)partition(1)\WINDOWS redirect: COM1 redirectbaudrate: 19200 Boot Entries Boot entry ID: 1 OS Friendly Name: Windows Server 2003, Standard Path: multi(0)disk(0)rdisk(0)partition(1)\WINDOWS OS Load Options: /fastdetect /redirect You must restart the Windows 2003 operating system after you complete this procedure for the changes to take effect and to enable SOL. Installing the OSA SMBridge management utility program Important: To obtain maximum benefit from the OSA SMBridge management utility program, install and load the program before problems occur. To install the OSA SMBridge management utility program on a server running a Windows operating system, complete the following steps: 1. Go to http://www.ibm.com/systems/support/ and download the utility program and create the OSA BMC Management Utility CD. 2. Insert the OSA BMC Management Utility CD into the drive. The InstallShield wizard starts, and a window similar to that shown in the following illustration opens. Chapter 3. Configuring the server 107
-
 1
1 -
2
-
3
-
4
-
5
-
6
-
7
-
8
-
9
-
10
-
11
-
12
-
13
-
14
-
15
-
16
-
17
-
18
-
19
-
20
-
21
-
22
-
23
-
24
-
25
-
26
-
27
-
28
-
29
-
30
-
31
-
32
-
33
-
34
-
35
-
36
-
37
-
38
-
39
-
40
-
41
-
42
-
43
-
44
-
45
-
46
-
47
-
48
-
49
-
50
-
51
-
52
-
53
-
54
-
55
-
56
-
57
-
58
-
59
-
60
-
61
-
62
-
63
-
64
-
65
-
66
-
67
-
68
-
69
-
70
-
71
-
72
-
73
-
74
-
75
-
76
-
77
-
78
-
79
-
80
-
81
-
82
-
83
-
84
-
85
-
86
-
87
-
88
-
89
-
90
-
91
-
92
-
93
-
94
-
95
-
96
-
97
-
98
-
99
-
100
-
101
-
102
-
103
-
104
-
105
-
106
-
107
-
108
-
109
-
110
-
111
-
112
-
113
-
114
-
115
-
116
-
117
-
 118
118 -
 119
119 -
 120
120 -
 121
121 -
 122
122 -
 123
123 -
 124
124 -
 125
125 -
 126
126 -
 127
127 -
 128
128 -
129
-
130
-
131
-
132
-
133
-
134
-
135
-
136
-
137
-
138
-
139
-
140
-
141
-
142
-
143
-
144
 |
 |