IBM 7979B1U User Manual - Page 63
Installing, drive
 |
View all IBM 7979B1U manuals
Add to My Manuals
Save this manual to your list of manuals |
Page 63 highlights
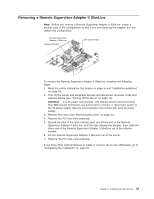
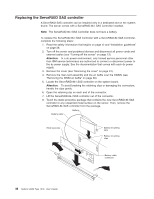
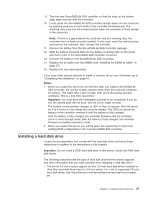
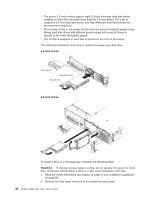
9. Turn the new ServeRAID-8k SAS controller so that the keys on the bottom edge align correctly with the connector. 10. Firmly press the ServeRAID-8k SAS controller straight down into the connector by applying pressure on both ends of the controller simultaneously. The retaining clips snap into the locked position when the controller is firmly seated in the connector. Note: If there is a gap between the controller and the retaining clips, the controller has not been correctly installed. In this case, open the retaining clips and remove the controller; then, reinsert the controller. 11. Remove the battery from the ServeRAID-8k SAS Controller package. 12. Slide the battery mounting tabs into the battery mounting clips on the server wall that is next to the ServeRAID SAS controller connector. 13. Connect the battery to the ServeRAID-8k SAS Controller. 14. Replace the air baffle over the DIMMs (see "Installing the DIMM air baffle" on page 37). 15. Replace the riser-card assembly. If you have other optional devices to install or remove, do so now. Otherwise, go to "Completing the installation" on page 81. Notes: 1. When you restart the server for the first time after you install a ServeRAID-8k SAS controller, the monitor screen remains blank while the controller initializes the battery. This might take a few minutes, after which the startup process continues. This is a one-time occurrence. Important: You must allow the initialization process to be completed. If you do not, the battery pack will not work, and the server might not start. The battery comes partially charged, at 30% or less of capacity. Run the server for 4 to 6 hours to fully charge the controller battery. The LED just above the battery on the controller remains lit until the battery is fully charged. Until the battery is fully charged, the controller firmware sets the controller cache to write-through mode; after the battery is fully charged, the controller firmware re-enables write-back mode. 2. When you restart the server, you will be given the opportunity to import the existing RAID configuration to the new ServeRAID SAS controller. Installing a hard disk drive Locate the documentation that comes with the hard disk drive and follow those instructions in addition to the instructions in this chapter. Important: Do not install a SCSI hard disk drive in this server; install only SAS hard disk drives. The following notes describe the type of hard disk drive that the server supports and other information that you must consider when installing a hard disk drive: v The server 3.5-inch models support six slim 3.5-inch hard disk drives installed on Ultra-Slim hard disk drive trays for 3.5-inch drives. For a list of supported 3.5-inch hard disk drives, see http://www.ibm.com/servers/eserver/serverproven/compat/ us/. Chapter 2. Installing optional devices 47
-
 1
1 -
2
-
3
-
4
-
5
-
6
-
7
-
8
-
9
-
10
-
11
-
12
-
13
-
14
-
15
-
16
-
17
-
18
-
19
-
20
-
21
-
22
-
23
-
24
-
25
-
26
-
27
-
28
-
29
-
30
-
31
-
32
-
33
-
34
-
35
-
36
-
37
-
38
-
39
-
40
-
41
-
42
-
43
-
44
-
45
-
46
-
47
-
48
-
49
-
50
-
51
-
52
-
53
-
54
-
55
-
56
-
57
-
 58
58 -
 59
59 -
 60
60 -
 61
61 -
 62
62 -
 63
63 -
 64
64 -
 65
65 -
 66
66 -
 67
67 -
 68
68 -
69
-
70
-
71
-
72
-
73
-
74
-
75
-
76
-
77
-
78
-
79
-
80
-
81
-
82
-
83
-
84
-
85
-
86
-
87
-
88
-
89
-
90
-
91
-
92
-
93
-
94
-
95
-
96
-
97
-
98
-
99
-
100
-
101
-
102
-
103
-
104
-
105
-
106
-
107
-
108
-
109
-
110
-
111
-
112
-
113
-
114
-
115
-
116
-
117
-
118
-
119
-
120
-
121
-
122
-
123
-
124
-
125
-
126
-
127
-
128
-
129
-
130
-
131
-
132
-
133
-
134
-
135
-
136
-
137
-
138
-
139
-
140
-
141
-
142
-
143
-
144
 |
 |