IBM 86645RY Hardware Maintenance Manual - Page 151
If you disconnected any cables from the back of the, server to allow for air circulation.
 |
View all IBM 86645RY manuals
Add to My Manuals
Save this manual to your list of manuals |
Page 151 highlights
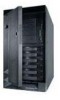
1 Flange 2 Server door a. Set the door 2 on the bottom hinge. b. Press the flange 1 downward while pressing the top of the door toward the server, until the flange connects with the top hinge. Release the flange. 6. Close and lock the server door. Attention Be sure to maintain a clearance of at least 127 mm (5 inches) on the front and rear of the server to allow for air circulation. 7. If you disconnected any cables from the back of the server, reconnect the cables; then, plug the power cords into properly grounded electrical outlets. Note If necessary, see "Input/output connectors and expansion slots" on page 91 for connector locations. Netfinity 5600 - Type 8664 143
-
 1
1 -
2
-
3
-
4
-
5
-
6
-
7
-
8
-
9
-
10
-
11
-
12
-
13
-
14
-
15
-
16
-
17
-
18
-
19
-
20
-
21
-
22
-
23
-
24
-
25
-
26
-
27
-
28
-
29
-
30
-
31
-
32
-
33
-
34
-
35
-
36
-
37
-
38
-
39
-
40
-
41
-
42
-
43
-
44
-
45
-
46
-
47
-
48
-
49
-
50
-
51
-
52
-
53
-
54
-
55
-
56
-
57
-
58
-
59
-
60
-
61
-
62
-
63
-
64
-
65
-
66
-
67
-
68
-
69
-
70
-
71
-
72
-
73
-
74
-
75
-
76
-
77
-
78
-
79
-
80
-
81
-
82
-
83
-
84
-
85
-
86
-
87
-
88
-
89
-
90
-
91
-
92
-
93
-
94
-
95
-
96
-
97
-
98
-
99
-
100
-
101
-
102
-
103
-
104
-
105
-
106
-
107
-
108
-
109
-
110
-
111
-
112
-
113
-
114
-
115
-
116
-
117
-
118
-
119
-
120
-
121
-
122
-
123
-
124
-
125
-
126
-
127
-
128
-
129
-
130
-
131
-
132
-
133
-
134
-
135
-
136
-
137
-
138
-
139
-
140
-
141
-
142
-
143
-
144
-
145
-
 146
146 -
 147
147 -
 148
148 -
 149
149 -
 150
150 -
 151
151 -
 152
152 -
 153
153 -
 154
154 -
 155
155 -
 156
156 -
157
-
158
-
159
-
160
-
161
-
162
-
163
-
164
-
165
-
166
-
167
-
168
-
169
-
170
-
171
-
172
-
173
-
174
-
175
-
176
-
177
-
178
-
179
-
180
-
181
-
182
-
183
-
184
-
185
-
186
-
187
-
188
-
189
-
190
-
191
-
192
-
193
-
194
-
195
-
196
-
197
-
198
-
199
-
200
-
201
-
202
-
203
-
204
-
205
-
206
-
207
-
208
-
209
-
210
-
211
-
212
-
213
-
214
-
215
-
216
-
217
-
218
-
219
-
220
-
221
-
222
-
223
-
224
-
225
-
226
-
227
-
228
-
229
-
230
-
231
-
232
-
233
-
234
-
235
-
236
-
237
-
238
-
239
-
240
-
241
-
242
-
243
-
244
-
245
-
246
-
247
-
248
-
249
-
250
-
251
-
252
-
253
-
254
-
255
-
256
-
257
-
258
-
259
-
260
-
261
-
262
-
263
-
264
-
265
-
266
-
267
-
268
-
269
-
270
-
271
-
272
-
273
-
274
-
275
-
276
 |
 |

±1²
Flange
±2²
Server door
a.
Set the door
±2²
on the bottom hinge.
b.
Press the flange
±1²
downward while pressing
the top of the door toward the server, until the
flange connects with the top hinge.
Release the
flange.
6.
Close and lock the server door.
Attention
Be sure to maintain a clearance of at least
127 mm (5 inches) on the front and rear of the
server to allow for air circulation.
7.
If you disconnected any cables from the back of the
server, reconnect the cables; then, plug the power
cords into properly grounded electrical outlets.
Note
If necessary, see “Input/output connectors and
expansion slots” on page
91 for connector
locations.
Netfinity 5600 - Type 8664
143