Konica Minolta AccurioPress C14000 UK-301 Auto Inspection User Guide - Page 46
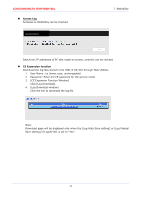
enter [Number of Ref. Image s].
 |
View all Konica Minolta AccurioPress C14000 manuals
Add to My Manuals
Save this manual to your list of manuals |
Page 46 highlights
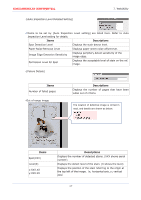
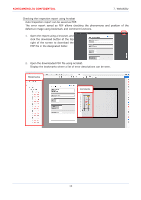
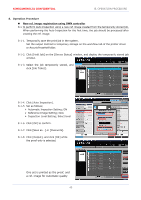
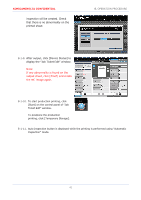
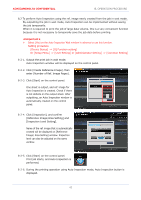
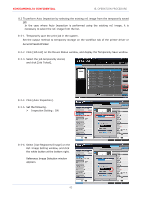
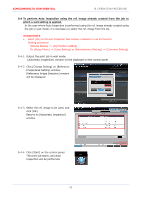
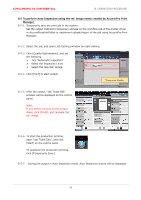
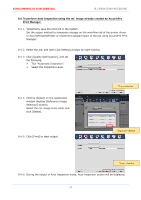
KONICAMINOLTA CONFIDENTIAL 8. OPERATION PROCEDURE 8.2 To perform Auto Inspection using the ref. image newly created from the job in wait mode. By outputting the job in wait mode, Auto Inspection can be implemented without saving the job temporarily. When it is required to print the job of large data volume, this is a very convenient function because it is not necessary to temporarily save the job data before printing. ★Important★ Select [Yes] on the Auto Inspection Wait window in advance to use this function. Setting procedure [Device Status] ⇒ [IQ Function setting] Or [Setup Menu] ⇒ [User Setting] or [Administrator Setting] ⇒ [Common Setting] 8-2-1. Output the print job in wait mode. Auto Inspection window will be displayed on the control panel. 8-2-2. Click [Create Reference Image], then enter [Number of Ref. Image Pages]. 8-2-3. Click [Start] on the control panel. One sheet is output, and ref. image for Auto Inspection is created. Check if there is not defects on the output sheet. After outputting, an Auto Inspection window is automatically created on the control panel. 8-2-4. Click [Inspection], and confirm [Reference Image/Area Setting] and [Inspection Level Setting]. Name of the ref. image that is automatically created will be displayed on [Reference Image/ Area Setting] window. Inspection level can also be adjusted on the same window. 8-2-5. Click [Start] on the control panel. Start Print job starts, and Auto Inspection is performed. 8-2-6. During the printing operation using Auto Inspection mode, Auto Inspection button is displayed. 42
-
 1
1 -
2
-
3
-
4
-
5
-
6
-
7
-
8
-
9
-
10
-
11
-
12
-
13
-
14
-
15
-
16
-
17
-
18
-
19
-
20
-
21
-
22
-
23
-
24
-
25
-
26
-
27
-
28
-
29
-
30
-
31
-
32
-
33
-
34
-
35
-
36
-
37
-
38
-
39
-
40
-
 41
41 -
 42
42 -
 43
43 -
 44
44 -
 45
45 -
 46
46 -
 47
47 -
 48
48 -
 49
49 -
 50
50 -
 51
51 -
52
-
53
-
54
-
55
-
56
-
57
-
58
-
59
-
60
-
61
-
62
-
63
-
64
-
65
 |
 |
