Konica Minolta AccurioPress C14000 UK-301 Auto Inspection User Guide - Page 53
Specify the Reference Image Management ID.
 |
View all Konica Minolta AccurioPress C14000 manuals
Add to My Manuals
Save this manual to your list of manuals |
Page 53 highlights
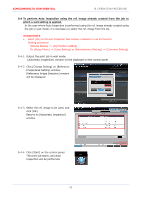
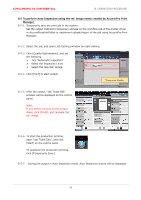
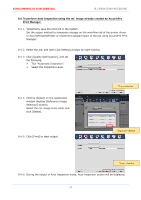
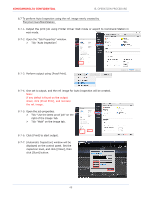
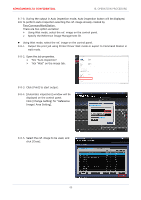
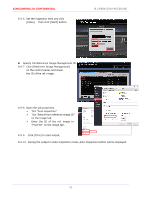
KONICAMINOLTA CONFIDENTIAL 8. OPERATION PROCEDURE 8-7-8. During the output in Auto Inspection mode, Auto Inspection button will be displayed. 8.8 To perform Auto Inspection selecting the ref. image already created by FieryCommandWorkStation There are two option as below: Using Wait mode, select the ref. image on the control panel. Specify the Reference Image Management ID. Using Wait mode, select the ref. image on the control panel. 8-8-1. Output the print job using Printer Driver Wait mode or export to Command Station in wait mode. 8-8-2. Open the job properties. Tick "Auto inspection". Tick "Wait" on the image tab. 8-8-3. Click [Print] to start output. 8-8-4. [Automatic inspection] window will be displayed on the control panel. Click [Change Setting] for "Reference Image/ Area Setting]. 8-8-5. Select the ref. image to be used, and click [Close]. 49
-
 1
1 -
2
-
3
-
4
-
5
-
6
-
7
-
8
-
9
-
10
-
11
-
12
-
13
-
14
-
15
-
16
-
17
-
18
-
19
-
20
-
21
-
22
-
23
-
24
-
25
-
26
-
27
-
28
-
29
-
30
-
31
-
32
-
33
-
34
-
35
-
36
-
37
-
38
-
39
-
40
-
41
-
42
-
43
-
44
-
45
-
46
-
47
-
 48
48 -
 49
49 -
 50
50 -
 51
51 -
 52
52 -
 53
53 -
 54
54 -
 55
55 -
 56
56 -
 57
57 -
 58
58 -
59
-
60
-
61
-
62
-
63
-
64
-
65
 |
 |
