LG U8210 User Guide - Page 55
Call log, 1.3 Contacts, 2 Send message, 3 Save to draft, 4 Preview, 5 View objects, 6 Set slide
 |
View all LG U8210 manuals
Add to My Manuals
Save this manual to your list of manuals |
Page 55 highlights
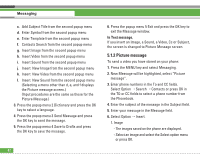
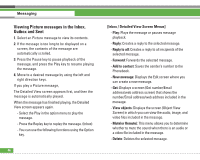
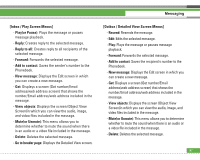
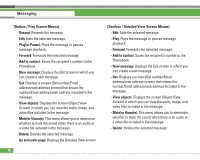
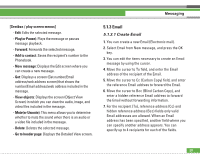
Messaging 1.1.2 Call log Select and enter a phone number from the list of phone numbers to which you have recently made a call. 1.1.3 Contacts Phonebook screen appears > You can select and enter a phone number. 1.2 Send message Select this menu to send the created message. 1.3 Save to draft Select this menu to save the created message in Draftbox. 1.4 Preview Select this menu to preview the created message before transmission.This menu is enabled only after text or file is attached. 1.5 View objects Select this menu to view all the files attached to the current slide. This menu is enabled only after file is attached. 1.6 Set slide Select this menu to configure the play time and the background colour of each of the slides. 54 1.7 Remove Select this menu to remove the current slide or an object included in the current slide (represented by Image/Video/Sound) This menu is enabled only after file is attached. 1.8 Move Select this menu to move to the previous or the next slide. This menu is enabled only after other slide is added. 1.9 Exit Select this menu to stop creating the current message and return to the previous screen. If select this menu, just exit without save and any popup . To send a photo message straight from your camera, video recorder or voice recorder. 1. After taking a picture with the camera, recording a video with the video recorder or recording sound with the voice recorder. 2. Select Send. 3. Select Via Picture Msg. 4. The selected image, video, or sound is inserted into the Picture Msg.
-
 1
1 -
2
-
3
-
4
-
5
-
6
-
7
-
8
-
9
-
10
-
11
-
12
-
13
-
14
-
15
-
16
-
17
-
18
-
19
-
20
-
21
-
22
-
23
-
24
-
25
-
26
-
27
-
28
-
29
-
30
-
31
-
32
-
33
-
34
-
35
-
36
-
37
-
38
-
39
-
40
-
41
-
42
-
43
-
44
-
45
-
46
-
47
-
48
-
49
-
 50
50 -
 51
51 -
 52
52 -
 53
53 -
 54
54 -
 55
55 -
 56
56 -
 57
57 -
 58
58 -
 59
59 -
 60
60 -
61
-
62
-
63
-
64
-
65
-
66
-
67
-
68
-
69
-
70
-
71
-
72
-
73
-
74
-
75
-
76
-
77
-
78
-
79
-
80
-
81
-
82
-
83
-
84
-
85
-
86
-
87
-
88
-
89
-
90
-
91
-
92
-
93
-
94
-
95
-
96
-
97
-
98
-
99
-
100
-
101
-
102
-
103
-
104
-
105
-
106
-
107
-
108
-
109
-
110
-
111
-
112
-
113
 |
 |