Pentax PZ-1p PZ-1p Manual - Page 75
Bracketing
 |
View all Pentax PZ-1p manuals
Add to My Manuals
Save this manual to your list of manuals |
Page 75 highlights
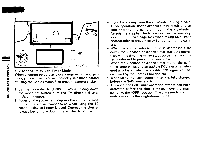
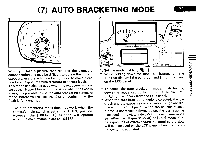
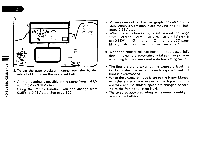
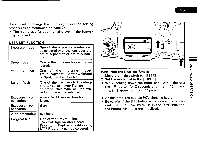
(7) AUTO BRACKETING MODE MIN 1 2 • • 1.0 When you take a picture that requires the exposure compensation and may be difficult to obtain the correct exposure, use the auto bracketing mode to make three bracketed exposures with different exposure levels. This mode can also be used when the exposure mode is set at the [Hyper Manual] mode. Also, when the flash is in use, it is possible to use the auto bracketing exposure mode. Before you release the shutter, confirm that the flash is fully charged. * The auto bracketing mode does not work when the camera's main switch is set at the [USER] position. However, the [USER-SET] function will operate when the main switch is set to [USER]. w, .-ON -USER OFF *** *•• 1. Set the mode dial to [ ]. 2. While holding down the mode set button, turn the Ty direct dial until the bar graph and [ U ] appear on the LCD panel. * To cancel the auto bracketing mode, while holding down the mode set button, turn the Tv dial until [ U ] disappears from the LCD panel. * When the auto bracketing mode is selected, the bar graph and the exposure compensation range are displayed on the LCD panel. When the shutter release button is depressed halfway down, the bar graph is displayed in the viewfinder. With the exposure mode set either the [Hyper Manual] or [250] mode, (underexposure) or overexposure indicated by the dots will be displayed on the LCD panel when the metering switch is activated. •01=0IM 411=M 0 z zmC0) -00 0
-
 1
1 -
2
-
3
-
4
-
5
-
6
-
7
-
8
-
9
-
10
-
11
-
12
-
13
-
14
-
15
-
16
-
17
-
18
-
19
-
20
-
21
-
22
-
23
-
24
-
25
-
26
-
27
-
28
-
29
-
30
-
31
-
32
-
33
-
34
-
35
-
36
-
37
-
38
-
39
-
40
-
41
-
42
-
43
-
44
-
45
-
46
-
47
-
48
-
49
-
50
-
51
-
52
-
53
-
54
-
55
-
56
-
57
-
58
-
59
-
60
-
61
-
62
-
63
-
64
-
65
-
66
-
67
-
68
-
69
-
 70
70 -
 71
71 -
 72
72 -
 73
73 -
 74
74 -
 75
75 -
 76
76 -
 77
77 -
 78
78 -
 79
79 -
 80
80 -
81
-
82
-
83
-
84
-
85
-
86
-
87
-
88
-
89
-
90
-
91
-
92
-
93
-
94
-
95
-
96
-
97
-
98
-
99
-
100
-
101
-
102
-
103
-
104
-
105
-
106
-
107
-
108
-
109
-
110
-
111
-
112
-
113
-
114
-
115
-
116
-
117
-
118
-
119
-
120
-
121
-
122
-
123
-
124
-
125
-
126
-
127
-
128
-
129
-
130
-
131
-
132
-
133
-
134
-
135
-
136
 |
 |
