Pentax PZ-1p PZ-1p Manual - Page 76
ONOIIVIdadO Aa30NVAaV
 |
View all Pentax PZ-1p manuals
Add to My Manuals
Save this manual to your list of manuals |
Page 76 highlights
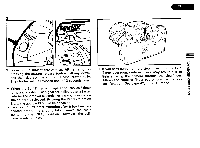
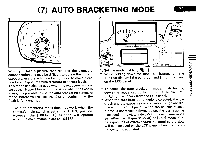
NOIIVIdadO a30NVAaV j n UOOSNFEFR a "%zzimg.P^ 3. To set the auto bracketing range, turn the AR dial while holding down the mode set button. * Auto bracketing is possible in the range from -- 4 EV to 4 EV in 0.3EV step. Using the Pentax function, you can change from 0.3EV to 0.5EV step. See page 100. Moving one dot on the bar graph indicates 0.3EV step. When 0.5 EV step is set, moving one dot indicates 0.5EV step. When the auto bracketing is set beyond the range from -- 2EV to + 2EV ( 3EV to - 3EV if EV step is set 0.5EV), 0 and [ O ] on the LCD panel blink ( 4:b or v [ in the viewfinder). When the shutter release button is depressed fully down, the camera automatically takes three pictures according to the memorized auto bracketing value. The first picture is taken at the exposure level the LCD indicates, the second is underexposed, and the third is overexposed. When the exposure mode is set to the Hyper Manual with the lens aperture ring set at the A position, the aperture and the shutter speed are changed according to the Pentax function No.6. The selected auto bracketing range remains until you remove the battery.
-
 1
1 -
2
-
3
-
4
-
5
-
6
-
7
-
8
-
9
-
10
-
11
-
12
-
13
-
14
-
15
-
16
-
17
-
18
-
19
-
20
-
21
-
22
-
23
-
24
-
25
-
26
-
27
-
28
-
29
-
30
-
31
-
32
-
33
-
34
-
35
-
36
-
37
-
38
-
39
-
40
-
41
-
42
-
43
-
44
-
45
-
46
-
47
-
48
-
49
-
50
-
51
-
52
-
53
-
54
-
55
-
56
-
57
-
58
-
59
-
60
-
61
-
62
-
63
-
64
-
65
-
66
-
67
-
68
-
69
-
70
-
 71
71 -
 72
72 -
 73
73 -
 74
74 -
 75
75 -
 76
76 -
 77
77 -
 78
78 -
 79
79 -
 80
80 -
 81
81 -
82
-
83
-
84
-
85
-
86
-
87
-
88
-
89
-
90
-
91
-
92
-
93
-
94
-
95
-
96
-
97
-
98
-
99
-
100
-
101
-
102
-
103
-
104
-
105
-
106
-
107
-
108
-
109
-
110
-
111
-
112
-
113
-
114
-
115
-
116
-
117
-
118
-
119
-
120
-
121
-
122
-
123
-
124
-
125
-
126
-
127
-
128
-
129
-
130
-
131
-
132
-
133
-
134
-
135
-
136
 |
 |
