Pentax PZ-1p PZ-1p Manual - Page 77
taking pictures
 |
View all Pentax PZ-1p manuals
Add to My Manuals
Save this manual to your list of manuals |
Page 77 highlights
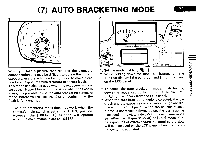
* When the shutter release button is depressed half- way down after the first picture is taken, [ blinks on the LCD panel to indicates that the camera is ready to take the second picture at any time. If your finger lifts up from the shutter release button, [ ] blinks for about 20 seconds and then stays on to indicate that the camera is ready to take an- other shot in the auto braketing mode. * When the auto bracketing is combined with the self- timer mode, the first picture is taken at the correct exposure, the second is underexposure, and the third is overexposure automatically. * When the auto bracketing range is set very narrow, it will have no effect when using negative film (espe- cially in negative color auto development). * In the auto bracketing mode, the camera automati- cally measures the exposure for each shot. * The focus is locked at the first picture and are re- mains until three pictures are taken. Auto bracketing exposure with flash When the auto bracketing mode is selected with the built-in flash or a Pentax dedicated flash is in use, the auto bracketing mode is possible by varying the amount as the discharged flash light. This function is useful when the different exposures are required on the main subject with the same exposure level as the background. * Before taking pictures, confirm that the flash is fully charged. * This auto brackenting mode works properly depending on the distance to the subject or the aperture setting. If the distance to the subject is relatively too far, the flash is discharged fully to obtain the correct exposure for the first picture, but overexposure cannot be made for the 2nd picture because the flash capacity may be used up. Auto Bracketing Mode combined with the Exposure Compensation Function You can combine the auto bracketing mode with exposure compensation function (See page 61) to compensate only in the overexposure (+) or the underexposure ( - ) direction. Example: Bracketing in the overexposure direction. 1. Select the auto bracketing mode and set the expo- sure compensation step at 0.3EV. 2. While depressing the exposure compensation button on the camera back, turn the Ty direct dial to shift the overall exposure range by 0.3EV in the overexposure ( ±) direction. 3. At this setting, the first picture is overexposed by 0.3EV, the second picture is exposed the correct exposure and the third frame is overexposed by 0.6EV. NOLLVEI3d0 a3ONVAaV
-
 1
1 -
2
-
3
-
4
-
5
-
6
-
7
-
8
-
9
-
10
-
11
-
12
-
13
-
14
-
15
-
16
-
17
-
18
-
19
-
20
-
21
-
22
-
23
-
24
-
25
-
26
-
27
-
28
-
29
-
30
-
31
-
32
-
33
-
34
-
35
-
36
-
37
-
38
-
39
-
40
-
41
-
42
-
43
-
44
-
45
-
46
-
47
-
48
-
49
-
50
-
51
-
52
-
53
-
54
-
55
-
56
-
57
-
58
-
59
-
60
-
61
-
62
-
63
-
64
-
65
-
66
-
67
-
68
-
69
-
70
-
71
-
 72
72 -
 73
73 -
 74
74 -
 75
75 -
 76
76 -
 77
77 -
 78
78 -
 79
79 -
 80
80 -
 81
81 -
 82
82 -
83
-
84
-
85
-
86
-
87
-
88
-
89
-
90
-
91
-
92
-
93
-
94
-
95
-
96
-
97
-
98
-
99
-
100
-
101
-
102
-
103
-
104
-
105
-
106
-
107
-
108
-
109
-
110
-
111
-
112
-
113
-
114
-
115
-
116
-
117
-
118
-
119
-
120
-
121
-
122
-
123
-
124
-
125
-
126
-
127
-
128
-
129
-
130
-
131
-
132
-
133
-
134
-
135
-
136
 |
 |