Ricoh PJ WX4152N Operating Instructions - Page 108
The Network/USB Settings menu tab includes the USB Settings menu, Network Settings menu,
 |
View all Ricoh PJ WX4152N manuals
Add to My Manuals
Save this manual to your list of manuals |
Page 108 highlights
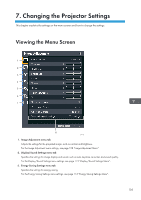
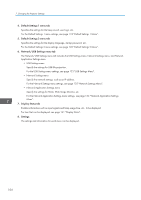
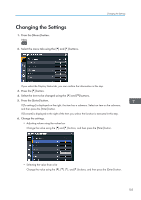
7. Changing the Projector Settings • Inputting numbers Use the number buttons on the remote control to input numbers. • Inputting text Use the keyboard that is displayed on screen to input text. You can also use the number buttons on the remote control to input numbers. 7. If a confirmation screen appears, select [OK], and then press the [Enter] button. 8. Press the [Menu] button. 9. If a confirmation screen appears, select [Reflect], and then press the [Enter] button. • The Network/USB Settings menu tab includes the USB Settings menu, Network Settings menu, and Network Application Settings menu. Open the menu according to the settings you want to change, and then go to Step 2 to change the settings. • The menu screen closes automatically thirty seconds after the last operation. Changes to the settings are automatically applied when you close the menu screen. You do not need to press the [Enter] button. • Settings in the Network/USB Settings menu are not applied until you select [Reflect] on the confirmation screen. • The menu screen is not accessible if you are projecting images from a USB memory device or server. Stop projecting the images to open the menu screen. 106
-
 1
1 -
2
-
3
-
4
-
5
-
6
-
7
-
8
-
9
-
10
-
11
-
12
-
13
-
14
-
15
-
16
-
17
-
18
-
19
-
20
-
21
-
22
-
23
-
24
-
25
-
26
-
27
-
28
-
29
-
30
-
31
-
32
-
33
-
34
-
35
-
36
-
37
-
38
-
39
-
40
-
41
-
42
-
43
-
44
-
45
-
46
-
47
-
48
-
49
-
50
-
51
-
52
-
53
-
54
-
55
-
56
-
57
-
58
-
59
-
60
-
61
-
62
-
63
-
64
-
65
-
66
-
67
-
68
-
69
-
70
-
71
-
72
-
73
-
74
-
75
-
76
-
77
-
78
-
79
-
80
-
81
-
82
-
83
-
84
-
85
-
86
-
87
-
88
-
89
-
90
-
91
-
92
-
93
-
94
-
95
-
96
-
97
-
98
-
99
-
100
-
101
-
102
-
 103
103 -
 104
104 -
 105
105 -
 106
106 -
 107
107 -
 108
108 -
 109
109 -
 110
110 -
 111
111 -
 112
112 -
 113
113 -
114
-
115
-
116
-
117
-
118
-
119
-
120
-
121
-
122
-
123
-
124
-
125
-
126
-
127
-
128
-
129
-
130
-
131
-
132
-
133
-
134
-
135
-
136
-
137
-
138
-
139
-
140
-
141
-
142
-
143
-
144
-
145
-
146
-
147
-
148
-
149
-
150
-
151
-
152
-
153
-
154
-
155
-
156
-
157
-
158
-
159
-
160
-
161
-
162
-
163
-
164
-
165
-
166
-
167
-
168
-
169
-
170
-
171
-
172
-
173
-
174
-
175
-
176
-
177
-
178
-
179
-
180
-
181
-
182
-
183
-
184
-
185
-
186
-
187
-
188
-
189
-
190
-
191
-
192
-
193
-
194
-
195
-
196
 |
 |
