Ricoh PJ WX4152N Operating Instructions - Page 95
Using the Electronic Pen, Electronic Pen Parts and Their Functions, Electronic Pen.
 |
View all Ricoh PJ WX4152N manuals
Add to My Manuals
Save this manual to your list of manuals |
Page 95 highlights
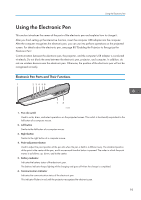
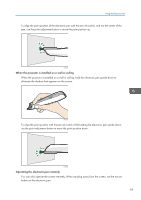
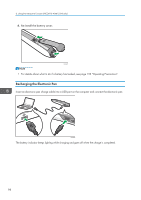
Using the Electronic Pen Using the Electronic Pen This section introduces the names of the parts of the electronic pen and explains how to charge it. After you finish setting up the interactive function, insert the computer USB adapter into the computer. After the computer recognizes the electronic pen, you can use it to perform operations on the projected screen. For details about the electronic pen, see page 88 "Enabling the Projector to Recognize the Electronic Pen". Communication between the electronic pen, the projector, and the computer USB adapter is conducted wirelessly. Do not block the area between the electronic pen, projector, and computer. In addition, do not use wireless devices near the electronic pen. Otherwise, the position of the electronic pen will not be recognized correctly. Electronic Pen Parts and Their Functions 1 2 3 4 56 7 8 CWD008 1. Pen nib switch Used to write, draw, and select operations on the projected screen. This switch is functionally equivalent to the left button of a computer mouse. 2. Left button Similar to the left button of a computer mouse. 3. Right button Similar to the right button of a computer mouse. 4. Point adjustment button Used to adjust the point position of the pen nib when the pen is held in a different way. The standard position of the point is the center of the pen, and it moves each time this button is pressed. The order in which the point moves is as follows: up, down, and to the center. 5. Battery indicator Indicates the battery status of the electronic pen. The battery indicator keeps lighting while charging and goes off when the charge is completed. 6. Communication indicator Indicates the communication status of the electronic pen. This indicator flickers in red until the projector recognizes the electronic pen. 93
-
 1
1 -
2
-
3
-
4
-
5
-
6
-
7
-
8
-
9
-
10
-
11
-
12
-
13
-
14
-
15
-
16
-
17
-
18
-
19
-
20
-
21
-
22
-
23
-
24
-
25
-
26
-
27
-
28
-
29
-
30
-
31
-
32
-
33
-
34
-
35
-
36
-
37
-
38
-
39
-
40
-
41
-
42
-
43
-
44
-
45
-
46
-
47
-
48
-
49
-
50
-
51
-
52
-
53
-
54
-
55
-
56
-
57
-
58
-
59
-
60
-
61
-
62
-
63
-
64
-
65
-
66
-
67
-
68
-
69
-
70
-
71
-
72
-
73
-
74
-
75
-
76
-
77
-
78
-
79
-
80
-
81
-
82
-
83
-
84
-
85
-
86
-
87
-
88
-
89
-
 90
90 -
 91
91 -
 92
92 -
 93
93 -
 94
94 -
 95
95 -
 96
96 -
 97
97 -
 98
98 -
 99
99 -
 100
100 -
101
-
102
-
103
-
104
-
105
-
106
-
107
-
108
-
109
-
110
-
111
-
112
-
113
-
114
-
115
-
116
-
117
-
118
-
119
-
120
-
121
-
122
-
123
-
124
-
125
-
126
-
127
-
128
-
129
-
130
-
131
-
132
-
133
-
134
-
135
-
136
-
137
-
138
-
139
-
140
-
141
-
142
-
143
-
144
-
145
-
146
-
147
-
148
-
149
-
150
-
151
-
152
-
153
-
154
-
155
-
156
-
157
-
158
-
159
-
160
-
161
-
162
-
163
-
164
-
165
-
166
-
167
-
168
-
169
-
170
-
171
-
172
-
173
-
174
-
175
-
176
-
177
-
178
-
179
-
180
-
181
-
182
-
183
-
184
-
185
-
186
-
187
-
188
-
189
-
190
-
191
-
192
-
193
-
194
-
195
-
196
 |
 |
