Ricoh PJ WX4152N Operating Instructions - Page 70
Configuring the Wireless LAN Settings for Infrastructure Mode
 |
View all Ricoh PJ WX4152N manuals
Add to My Manuals
Save this manual to your list of manuals |
Page 70 highlights
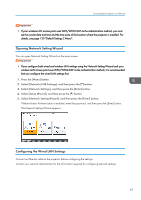
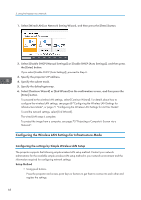
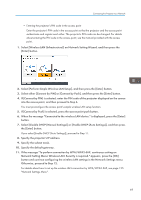
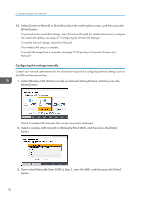
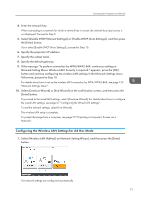
5. Using the Projector via a Network 1. Select [Wired LAN] on Network Setting Wizard, and then press the [Enter] button. 2. Select [Disable DHCP (Manual Settings)] or [Enable DHCP (Auto Settings)], and then press the [Enter] button. If you select [Enable DHCP (Auto Settings)], proceed to Step 6. 3. Specify the projector's IP address. 4. Specify the subnet mask. 5. Specify the default gateway. 6. Select [Continue Wizard] or [End Wizard] on the confirmation screen, and then press the [Enter] button. To proceed to the wireless LAN settings, select [Continue Wizard]. For details about how to configure the wireless LAN settings, see page 68 "Configuring the Wireless LAN Settings for Infrastructure Mode", or page 71 "Configuring the Wireless LAN Settings for Ad Hoc Mode". To end the network settings, select [End Wizard]. The wired LAN setup is complete. To project the image from a computer, see page 73 "Projecting a Computer's Screen via a Network". Configuring the Wireless LAN Settings for Infrastructure Mode Configuring the settings by Simple Wireless LAN Setup The projector supports the following simple wireless LAN setup method. Contact your network administrator for the available simple wireless LAN setup method in your network environment and the information required for configuring network settings. Setup Method • Using push buttons Press the projector and access point keys or buttons to get them to connect to each other and register the settings. 68
-
 1
1 -
2
-
3
-
4
-
5
-
6
-
7
-
8
-
9
-
10
-
11
-
12
-
13
-
14
-
15
-
16
-
17
-
18
-
19
-
20
-
21
-
22
-
23
-
24
-
25
-
26
-
27
-
28
-
29
-
30
-
31
-
32
-
33
-
34
-
35
-
36
-
37
-
38
-
39
-
40
-
41
-
42
-
43
-
44
-
45
-
46
-
47
-
48
-
49
-
50
-
51
-
52
-
53
-
54
-
55
-
56
-
57
-
58
-
59
-
60
-
61
-
62
-
63
-
64
-
 65
65 -
 66
66 -
 67
67 -
 68
68 -
 69
69 -
 70
70 -
 71
71 -
 72
72 -
 73
73 -
 74
74 -
 75
75 -
76
-
77
-
78
-
79
-
80
-
81
-
82
-
83
-
84
-
85
-
86
-
87
-
88
-
89
-
90
-
91
-
92
-
93
-
94
-
95
-
96
-
97
-
98
-
99
-
100
-
101
-
102
-
103
-
104
-
105
-
106
-
107
-
108
-
109
-
110
-
111
-
112
-
113
-
114
-
115
-
116
-
117
-
118
-
119
-
120
-
121
-
122
-
123
-
124
-
125
-
126
-
127
-
128
-
129
-
130
-
131
-
132
-
133
-
134
-
135
-
136
-
137
-
138
-
139
-
140
-
141
-
142
-
143
-
144
-
145
-
146
-
147
-
148
-
149
-
150
-
151
-
152
-
153
-
154
-
155
-
156
-
157
-
158
-
159
-
160
-
161
-
162
-
163
-
164
-
165
-
166
-
167
-
168
-
169
-
170
-
171
-
172
-
173
-
174
-
175
-
176
-
177
-
178
-
179
-
180
-
181
-
182
-
183
-
184
-
185
-
186
-
187
-
188
-
189
-
190
-
191
-
192
-
193
-
194
-
195
-
196
 |
 |
