Ricoh PJ WX4152N Operating Instructions - Page 69
Opening Network Setting Wizard, Configuring the Wired LAN Settings
 |
View all Ricoh PJ WX4152N manuals
Add to My Manuals
Save this manual to your list of manuals |
Page 69 highlights
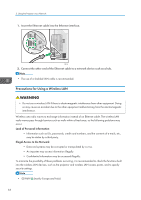
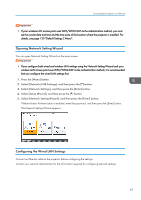
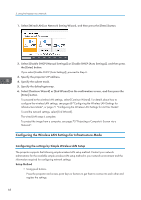
Connecting the Projector to a Network • If your wireless LAN access point uses WPA/WPA2-EAP as the authentication method, you must set the current date and time and the time zone of the location where the projector is installed. For details, see page 120 "Default Settings 2 Menu". Opening Network Setting Wizard You can open Network Setting Wizard on the menu screen. • If you configure both wired and wireless LAN settings using the Network Setting Wizard and your wireless LAN access point uses WPA/WPA2-EAP as the authentication method, it is recommended that you configure the wired LAN settings first. 1. Press the [Menu] button. 2. Select [Network/USB Settings], and then press the [ ] button. 3. Select [Network Settings], and then press the [Enter] button. 4. Select [Setup Wizard], and then press the [ ] button. 5. Select [Network Setting Wizard], and then press the [Enter] button. If Administrator Authentication is enabled, enter the password, and then press the [Enter] button. The Network Setting Wizard appears. Configuring the Wired LAN Settings Connect an Ethernet cable to the projector before configuring the settings. Contact your network administrator for the information required for configuring network settings. 67
-
 1
1 -
2
-
3
-
4
-
5
-
6
-
7
-
8
-
9
-
10
-
11
-
12
-
13
-
14
-
15
-
16
-
17
-
18
-
19
-
20
-
21
-
22
-
23
-
24
-
25
-
26
-
27
-
28
-
29
-
30
-
31
-
32
-
33
-
34
-
35
-
36
-
37
-
38
-
39
-
40
-
41
-
42
-
43
-
44
-
45
-
46
-
47
-
48
-
49
-
50
-
51
-
52
-
53
-
54
-
55
-
56
-
57
-
58
-
59
-
60
-
61
-
62
-
63
-
 64
64 -
 65
65 -
 66
66 -
 67
67 -
 68
68 -
 69
69 -
 70
70 -
 71
71 -
 72
72 -
 73
73 -
 74
74 -
75
-
76
-
77
-
78
-
79
-
80
-
81
-
82
-
83
-
84
-
85
-
86
-
87
-
88
-
89
-
90
-
91
-
92
-
93
-
94
-
95
-
96
-
97
-
98
-
99
-
100
-
101
-
102
-
103
-
104
-
105
-
106
-
107
-
108
-
109
-
110
-
111
-
112
-
113
-
114
-
115
-
116
-
117
-
118
-
119
-
120
-
121
-
122
-
123
-
124
-
125
-
126
-
127
-
128
-
129
-
130
-
131
-
132
-
133
-
134
-
135
-
136
-
137
-
138
-
139
-
140
-
141
-
142
-
143
-
144
-
145
-
146
-
147
-
148
-
149
-
150
-
151
-
152
-
153
-
154
-
155
-
156
-
157
-
158
-
159
-
160
-
161
-
162
-
163
-
164
-
165
-
166
-
167
-
168
-
169
-
170
-
171
-
172
-
173
-
174
-
175
-
176
-
177
-
178
-
179
-
180
-
181
-
182
-
183
-
184
-
185
-
186
-
187
-
188
-
189
-
190
-
191
-
192
-
193
-
194
-
195
-
196
 |
 |
