Samsung SCH U520 User Manual (ENGLISH) - Page 84
Text Message Settings, Picture/Video Message Settings, Off/On - With Auto View
 |
View all Samsung SCH U520 manuals
Add to My Manuals
Save this manual to your list of manuals |
Page 84 highlights
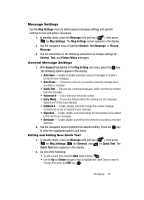
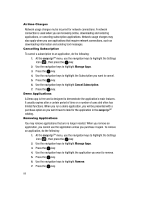
Note: You cannot edit the preloaded Quick Text entries included in your phone. 3. Use the keypad to enter or change the text content of your Quick Text. (See "Entering Text" on page 47 for more information.) 4. Once you're finished entering or changing your Quick Text entry, press the OK key. The Quick Text menu appears in the display with your new Quick Text entry highlighted. Tip: You can also create new Quick Text by using the Save Quick Text option in your Message Folders' Options menus. See "Message Folders" on page 77 for more information. Text Message Settings 1. With Text Message highlighted in the Msg Settings sub menu, press the OK key. The following text message options appear in the display: • Auto View - Off/On - With Auto View On, the full content of text messages appear in the display as they are received. • Signature - Create a signature, which can be attached at the bottom of outgoing messages (see Insert Sign. above). • Auto Scroll - Message text automatically scrolls, showing the entire message text in the display. 2. Use the navigation keys to highlight the desired setting. Press the OK key to enter the highlighted option's sub menu. Picture/Video Message Settings 1. With Picture/Video Message highlighted in the Msg Settings sub menu, press the OK key. The following options appear in the display: • Auto Receive - Options to save messages automatically in the Outbox, prompt before saving, or do not save messages in the Outbox. • Signature - Create a signature, which can be attached at the bottom of outgoing messages (see Insert Sign. above). 2. Use the navigation keys to highlight the desired setting. Press the OK key to enter the highlighted option's sub menu. 84
-
 1
1 -
2
-
3
-
4
-
5
-
6
-
7
-
8
-
9
-
10
-
11
-
12
-
13
-
14
-
15
-
16
-
17
-
18
-
19
-
20
-
21
-
22
-
23
-
24
-
25
-
26
-
27
-
28
-
29
-
30
-
31
-
32
-
33
-
34
-
35
-
36
-
37
-
38
-
39
-
40
-
41
-
42
-
43
-
44
-
45
-
46
-
47
-
48
-
49
-
50
-
51
-
52
-
53
-
54
-
55
-
56
-
57
-
58
-
59
-
60
-
61
-
62
-
63
-
64
-
65
-
66
-
67
-
68
-
69
-
70
-
71
-
72
-
73
-
74
-
75
-
76
-
77
-
78
-
 79
79 -
 80
80 -
 81
81 -
 82
82 -
 83
83 -
 84
84 -
 85
85 -
 86
86 -
 87
87 -
 88
88 -
 89
89 -
90
-
91
-
92
-
93
-
94
-
95
-
96
-
97
-
98
-
99
-
100
-
101
-
102
-
103
-
104
-
105
-
106
-
107
-
108
-
109
-
110
-
111
-
112
-
113
-
114
-
115
-
116
-
117
-
118
-
119
-
120
-
121
-
122
-
123
-
124
-
125
-
126
-
127
-
128
-
129
-
130
-
131
-
132
-
133
-
134
-
135
-
136
-
137
-
138
-
139
-
140
-
141
-
142
-
143
-
144
-
145
-
146
-
147
-
148
-
149
-
150
-
151
-
152
-
153
-
154
-
155
-
156
-
157
-
158
-
159
-
160
-
161
-
162
-
163
-
164
-
165
-
166
-
167
-
168
-
169
-
170
-
171
-
172
-
173
-
174
-
175
-
176
-
177
-
178
-
179
-
180
-
181
-
182
-
183
-
184
-
185
-
186
-
187
-
188
-
189
-
190
-
191
-
192
 |
 |