Samsung i830 User Manual (ENGLISH) - Page 142
Change the Calendar view, Occurs, Reminder, Remind Me, Categories, Add/Delete, Attendees, Status
 |
View all Samsung i830 manuals
Add to My Manuals
Save this manual to your list of manuals |
Page 142 highlights
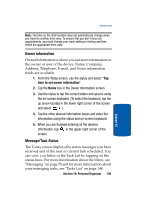
Note: If Yes is selected in All Day the time is automatically removed in the start and end times to indicate that there is no time limit. 8. Tap the Occurs box to select the frequency. 9. Tap Reminder and select either None or Remind Me. If Remind Me was selected, enter the amount of time before you are reminded. 10. Tap Categories and select either Business, Holiday, or Personal. You can also add or delete categories with the Add/Delete tab. Tap when finished. 11. Tap the Attendees box to invite others to the appointment from your contacts. Contacts must have an E-mail address to be added as an attendee. 12. Tap the Status box and select Free, Tentative, Busy, or Out of office. 13. Tap the Sensitivity box and select either Normal or Private. 14. Tap to save the new appointment. Change the Calendar view You can change your calendar view to the following: • Agenda - Displays a list of the current days appointments. • Day - Displays the day with times and any appointments. • Week - Displays the week. • Month - Displays the month. • Year - Displays the year. To change the view of the calendar, follow these steps: 142 Section 10
-
 1
1 -
2
-
3
-
4
-
5
-
6
-
7
-
8
-
9
-
10
-
11
-
12
-
13
-
14
-
15
-
16
-
17
-
18
-
19
-
20
-
21
-
22
-
23
-
24
-
25
-
26
-
27
-
28
-
29
-
30
-
31
-
32
-
33
-
34
-
35
-
36
-
37
-
38
-
39
-
40
-
41
-
42
-
43
-
44
-
45
-
46
-
47
-
48
-
49
-
50
-
51
-
52
-
53
-
54
-
55
-
56
-
57
-
58
-
59
-
60
-
61
-
62
-
63
-
64
-
65
-
66
-
67
-
68
-
69
-
70
-
71
-
72
-
73
-
74
-
75
-
76
-
77
-
78
-
79
-
80
-
81
-
82
-
83
-
84
-
85
-
86
-
87
-
88
-
89
-
90
-
91
-
92
-
93
-
94
-
95
-
96
-
97
-
98
-
99
-
100
-
101
-
102
-
103
-
104
-
105
-
106
-
107
-
108
-
109
-
110
-
111
-
112
-
113
-
114
-
115
-
116
-
117
-
118
-
119
-
120
-
121
-
122
-
123
-
124
-
125
-
126
-
127
-
128
-
129
-
130
-
131
-
132
-
133
-
134
-
135
-
136
-
 137
137 -
 138
138 -
 139
139 -
 140
140 -
 141
141 -
 142
142 -
 143
143 -
 144
144 -
 145
145 -
 146
146 -
 147
147 -
148
-
149
-
150
-
151
-
152
-
153
-
154
-
155
-
156
-
157
-
158
-
159
-
160
-
161
-
162
-
163
-
164
-
165
-
166
-
167
-
168
-
169
-
170
-
171
-
172
-
173
-
174
-
175
-
176
-
177
-
178
-
179
-
180
-
181
-
182
-
183
-
184
-
185
-
186
-
187
-
188
-
189
-
190
-
191
-
192
-
193
-
194
-
195
-
196
-
197
-
198
-
199
-
200
-
201
-
202
-
203
-
204
-
205
-
206
-
207
-
208
-
209
-
210
-
211
-
212
-
213
-
214
-
215
-
216
-
217
-
218
-
219
-
220
-
221
-
222
-
223
-
224
 |
 |
