Sharp MX-M232D Operation Guide - Page 73
Scanning Using The Keys On, The Machine - scanning problem
 |
View all Sharp MX-M232D manuals
Add to My Manuals
Save this manual to your list of manuals |
Page 73 highlights
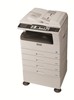
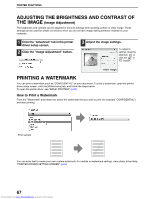
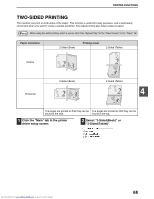
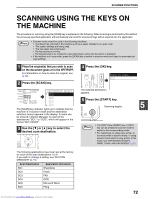
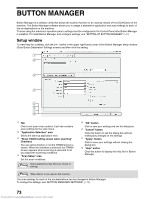
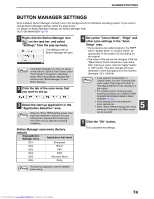
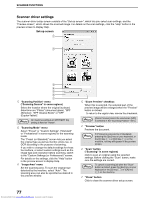
SCANNER FUNCTIONS SCANNING USING THE KEYS ON THE MACHINE The procedure for scanning using the [SCAN] key is explained in the following. When scanning is performed by this method, the previously specified application will automatically start and the scanned image will be acquired into the application. Note • Scanner mode cannot be used in the following situations: • A problem has occurred in the machine such as a paper misfeed or an open cover. • The system settings are being used. • The tray paper size is being set. • During copying or printing • During scanning of an original for a fax transmission (when the fax option is installed) • If the machine is in copy mode, press the [SCAN] key to switch to scanner mode and clear the previously set copy settings. 1 Place the original(s) that you wish to scan on the document glass or in the SPF/RSPF. For information on how to place the original, see (p.29). 2 Press the [SCAN] key. PRINT ON LINE DATA DESTINATION SELECT SC1: SCAN SC2: FAX LINE DATA SC3: SC4: The [SCAN] key indicator lights up to indicate that the machine is in scanner mode and the destination selection screen appears in the display. A name can be entered in Button Manager for each of the destinations "SC1:" to "SC6:", which will appear in the format "SC1:XXXXX". 3 Use the [ ] or [ ] key to select the desired scan destination. PQ ED COPY LEX SCAN LEX SCAN ACC The following applications have been set at the factory for each of the scan destinations 1 to 6. If you wish to change a setting, see "BUTTON MANAGER" (p.73). Scan Destination SC1: Application that starts Sharpdesk SC2: SC3: SC4: Email FAX OCR SC5: SC6: Microsoft Word Filing Downloaded from www.Manualslib.com manuals search engine 4 Press the [OK] key. BACK OK GHI PQRS Ready to scan. SC2: PY AN The selected destination appears. 5 Press the [START] key. MNO Scanning begins. WXYZ @.-_ AD-END 5 Note • The [COPY] key, [PRINT] key, or [FAX] key can be pressed in scanner mode to switch to the corresponding mode. • For restrictions on using copy, printer, or fax mode while in scanner mode, or using scanner mode while in copy, printer, or fax mode, see "OPERATION IN COPY, PRINT, SCAN, AND FAX MODES" (p.21). 72
-
 1
1 -
2
-
3
-
4
-
5
-
6
-
7
-
8
-
9
-
10
-
11
-
12
-
13
-
14
-
15
-
16
-
17
-
18
-
19
-
20
-
21
-
22
-
23
-
24
-
25
-
26
-
27
-
28
-
29
-
30
-
31
-
32
-
33
-
34
-
35
-
36
-
37
-
38
-
39
-
40
-
41
-
42
-
43
-
44
-
45
-
46
-
47
-
48
-
49
-
50
-
51
-
52
-
53
-
54
-
55
-
56
-
57
-
58
-
59
-
60
-
61
-
62
-
63
-
64
-
65
-
66
-
67
-
 68
68 -
 69
69 -
 70
70 -
 71
71 -
 72
72 -
 73
73 -
 74
74 -
 75
75 -
 76
76 -
 77
77 -
 78
78 -
79
-
80
-
81
-
82
-
83
-
84
-
85
-
86
-
87
-
88
-
89
-
90
-
91
-
92
-
93
-
94
-
95
-
96
-
97
-
98
-
99
-
100
-
101
-
102
-
103
-
104
-
105
-
106
-
107
-
108
-
109
-
110
-
111
-
112
-
113
-
114
-
115
-
116
-
117
-
118
-
119
-
120
-
121
-
122
-
123
-
124
-
125
 |
 |