Sharp MX-M232D Operation Guide - Page 95
Misfeed In The Machine
 |
View all Sharp MX-M232D manuals
Add to My Manuals
Save this manual to your list of manuals |
Page 95 highlights
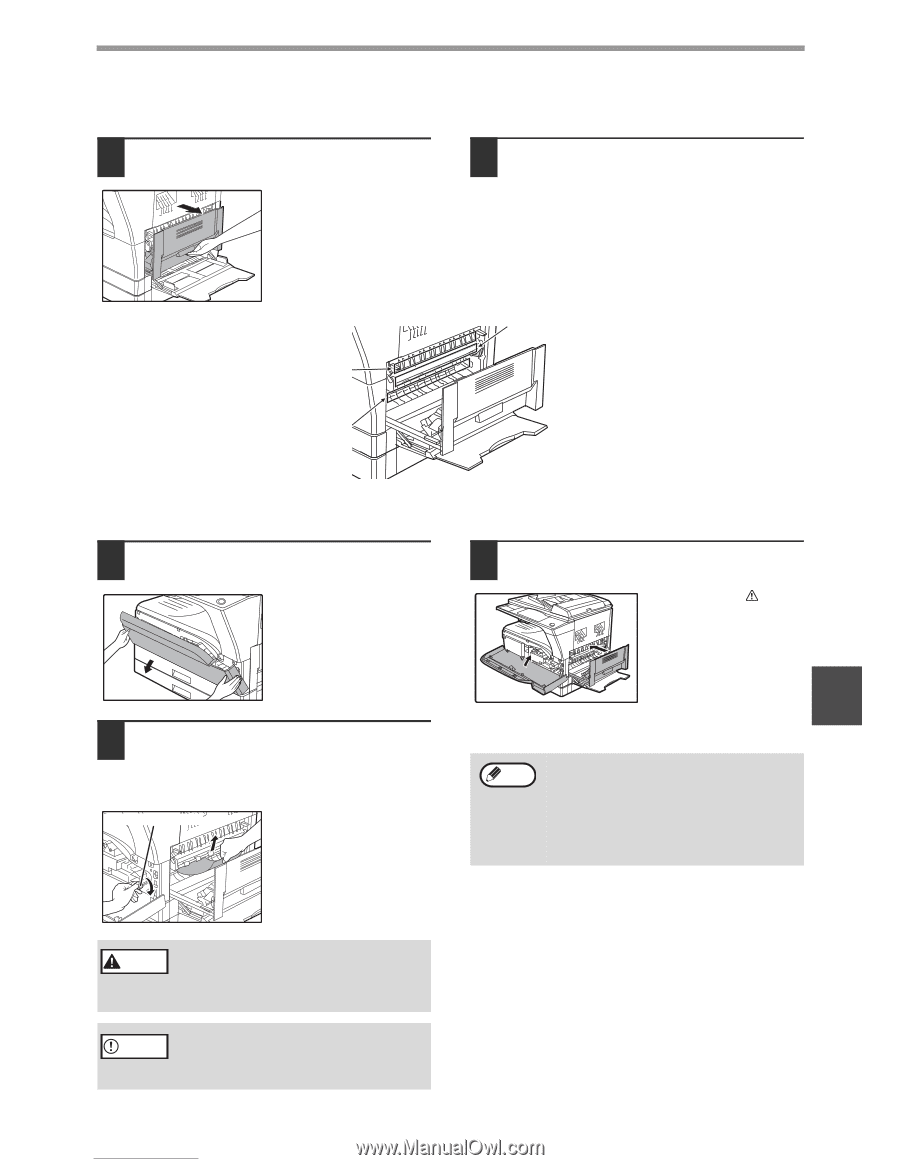
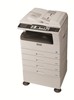
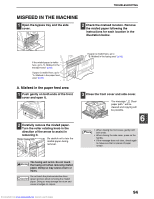
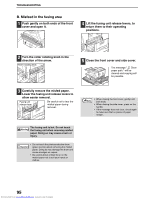
TROUBLESHOOTING MISFEED IN THE MACHINE 1 Open the bypass tray and the side cover. 2 Check the misfeed location. Remove the misfed paper following the instructions for each location in the illustration below. If the misfed paper is visible here, go to "C. Misfeed in the transport area" (p.96). If paper is misfed here, go to "A. Misfeed in the paper feed area" (p.94). A. Misfeed in the paper feed area 1 Push gently on both ends of the front cover and open it. 2 Carefully remove the misfed paper. Turn the roller rotating knob in the direction of the arrow to assist in removing it. Roller rotating knob Be careful not to tear the misfed paper during removal. If paper is misfed here, go to "B. Misfeed in the fusing area" (p.95). 3 Close the front cover and side cover. The message " Clear paper path." will be cleared and copying will be possible. 6 Note • When closing the front cover, gently hold both ends. • When closing the side cover, press on the handle. • If the message does not clear, check again to make sure that no pieces of paper remain. The fusing unit is hot. Do not touch Warning the fusing unit when removing misfed paper. Doing so may cause a burn or injury. Caution Do not touch the photoconductive drum (green portion) when removing the misfed paper. Doing so may damage the drum and cause smudges on copies. Downloaded from www.Manualslib.com manuals search engine 94
-
 1
1 -
2
-
3
-
4
-
5
-
6
-
7
-
8
-
9
-
10
-
11
-
12
-
13
-
14
-
15
-
16
-
17
-
18
-
19
-
20
-
21
-
22
-
23
-
24
-
25
-
26
-
27
-
28
-
29
-
30
-
31
-
32
-
33
-
34
-
35
-
36
-
37
-
38
-
39
-
40
-
41
-
42
-
43
-
44
-
45
-
46
-
47
-
48
-
49
-
50
-
51
-
52
-
53
-
54
-
55
-
56
-
57
-
58
-
59
-
60
-
61
-
62
-
63
-
64
-
65
-
66
-
67
-
68
-
69
-
70
-
71
-
72
-
73
-
74
-
75
-
76
-
77
-
78
-
79
-
80
-
81
-
82
-
83
-
84
-
85
-
86
-
87
-
88
-
89
-
 90
90 -
 91
91 -
 92
92 -
 93
93 -
 94
94 -
 95
95 -
 96
96 -
 97
97 -
 98
98 -
 99
99 -
 100
100 -
101
-
102
-
103
-
104
-
105
-
106
-
107
-
108
-
109
-
110
-
111
-
112
-
113
-
114
-
115
-
116
-
117
-
118
-
119
-
120
-
121
-
122
-
123
-
124
-
125
 |
 |