Sharp MX-M232D Operation Guide - Page 77
Specify the scanning area and set the, scan preferences., When you are ready to begin, scanning,
 |
View all Sharp MX-M232D manuals
Add to My Manuals
Save this manual to your list of manuals |
Page 77 highlights
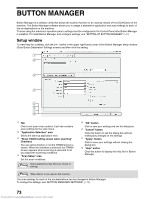
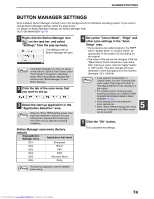
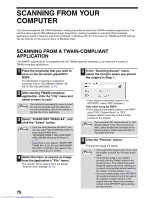
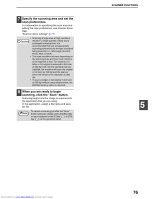
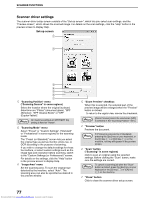
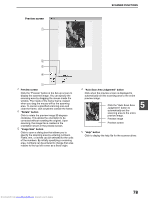
7 Specify the scanning area and set the scan preferences. For information on specifying the scan area and setting the scan preferences, see scanner driver Help. "Scanner driver settings" (p.77) Caution • Scanning a large area at high resolution results in a large quantity of data and a prolonged scanning time. It is recommended that you set appropriate scanning preferences for the type of original being scanned, i.e., Web page (monitor), Photo, FAX, or OCR. • The scan resolution will vary depending on the scanning area and how much memory in the machine is free. For example, if a letter or A4 original is scanned in full color at 300 dpi with only the standard memory installed, the machine will scan the original in full color at 150 dpi and the scanner driver will enhance the resolution to 300 dpi. • To scan a ledger or A3 original in full color at 600 dpi without using enhancement, the 256 MB memory option is required. 8 When you are ready to begin scanning, click the "Scan" button. Scanning begins and the image is acquired into the application that you are using. In the application, assign a file name and save the file. Note To cancel a scanning job after the "Scan" button has been clicked, press the [Esc] key on your keyboard or the [C] key ( ) or [CA] key ( ) on the operation panel. SCANNER FUNCTIONS 5 Downloaded from www.Manualslib.com manuals search engine 76
-
 1
1 -
2
-
3
-
4
-
5
-
6
-
7
-
8
-
9
-
10
-
11
-
12
-
13
-
14
-
15
-
16
-
17
-
18
-
19
-
20
-
21
-
22
-
23
-
24
-
25
-
26
-
27
-
28
-
29
-
30
-
31
-
32
-
33
-
34
-
35
-
36
-
37
-
38
-
39
-
40
-
41
-
42
-
43
-
44
-
45
-
46
-
47
-
48
-
49
-
50
-
51
-
52
-
53
-
54
-
55
-
56
-
57
-
58
-
59
-
60
-
61
-
62
-
63
-
64
-
65
-
66
-
67
-
68
-
69
-
70
-
71
-
 72
72 -
 73
73 -
 74
74 -
 75
75 -
 76
76 -
 77
77 -
 78
78 -
 79
79 -
 80
80 -
 81
81 -
 82
82 -
83
-
84
-
85
-
86
-
87
-
88
-
89
-
90
-
91
-
92
-
93
-
94
-
95
-
96
-
97
-
98
-
99
-
100
-
101
-
102
-
103
-
104
-
105
-
106
-
107
-
108
-
109
-
110
-
111
-
112
-
113
-
114
-
115
-
116
-
117
-
118
-
119
-
120
-
121
-
122
-
123
-
124
-
125
 |
 |