Sony CCD-VX3 Operation Manual
Sony CCD-VX3 Manual
 |
View all Sony CCD-VX3 manuals
Add to My Manuals
Save this manual to your list of manuals |
Sony CCD-VX3 manual content summary:
- Sony CCD-VX3 | Operation Manual - Page 1
SONY; Video Camera Recorder Hi 8 CCD-VX3 3-755-638-25 (1) Operation Manual Before operating this unit, please read this manual thoroughly and retain it for future reference. ?.,1- \ • • ' 00.1.0060. •-" e videoHi8 Handycam PRO 1992 by Sony Corporation - Sony CCD-VX3 | Operation Manual - Page 2
operating and maintenance (servicing) instructions in the literature accompanying approved in this manual could void camcorder. Record the serial number in the space provided on the right hand. Refer to these numbers whenever you call upon your Sony dealer regarding this product. Model No. CCD-VX3 - Sony CCD-VX3 | Operation Manual - Page 3
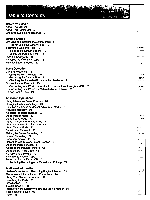
Manual 4 About This Camcorder 5 Checking Supplied Accessories 6 Getting Started Charging and Installing the Battery Pack 8 Tips for Using the Battery Pack 10 Setting the Date and Time 12 Installing the Lithium Battery Your Camcorder Abroad 79 Identifying the Parts 80 Specifications 87 Trouble - Sony CCD-VX3 | Operation Manual - Page 4
you want to shoot as soon as possible, read the chapters "Getting Started" and "Basic Operations." first. As you read through this manual, buttons and settings on the camcorder are shown in capital letters. e.g. Set the POWER switch to CAMERA. Note on TV Color Systems TV color systems differ from - Sony CCD-VX3 | Operation Manual - Page 5
.*1 Abou Thi CarK9r, ;F t. Soto The CCD-VX3 is a high picture quality Hi8 camcorder that uses the same 3CCD camera system found in professional video camera recorders. This system employs high density three-chip precision Charge Coupled Devices (CCDs). Each CCD image has a total of about 410,000 - Sony CCD-VX3 | Operation Manual - Page 6
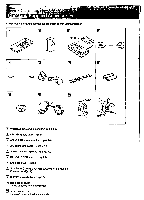
cable (1)(p.23, 72) • RFU-90UC RFU adaptor (1)(p.23) M Shoulder strap (1)(p.86) Size AA (IEC designation R6) batteries for the Remote Commander (2)(p.7) El CR2025 lithium battery (1)(p.12) ID Hood cap (1)(p.18) This is attached to the camcorder. E Jack covers (1 set) These are attached to the - Sony CCD-VX3 | Operation Manual - Page 7
into the Remote Commander Before you use the Remote Commander, insert two size AA(R6) batteries with polarity positioned correctly. 0 00` tQ 0 0 Note on battery The batteries will last for about six months under normal operation. If the Commander will not be used for a long period, remove - Sony CCD-VX3 | Operation Manual - Page 8
Getting Started n 31; - ,""`")1,4-4. '", The attery Pack Charging the Battery Pack Before using your camcorder, you first need to charge and then insert the battery pack. You can use the NP77H (supplied), NP-77HD and NP-77. Charge the battery pack with the supplied AC-V35 AC power adaptor. (1) - Sony CCD-VX3 | Operation Manual - Page 9
4, it Installing the Battery Pack into the Camcorder Align the right side of the battery pack with the white line on the camcorder. Slide the battery pack to the right. Charging and Installing the Battery Pack Removing the Battery Pack While pressing BATT, slide the battery pack out to the left. - Sony CCD-VX3 | Operation Manual - Page 10
fully charged and discharged about 500 times under normal temperatures. If the indicator flashes rapidly just after turning on the camcorder with a fully charged battery pack. the battery pack should be replaced with a new fully charged one. Note on the terminals If the terminals (metal parts on the - Sony CCD-VX3 | Operation Manual - Page 11
life indicator in the viewfinder. When the indicator and the battery lamp in the viewfinder change from slow to rapid flashing, replace the battery pack. Set the POWER switch to OFF, and replace the battery pack. Leave the tape in the camcorder in order to obtain a smooth transition when you begin - Sony CCD-VX3 | Operation Manual - Page 12
to activate the clock, you must first install a lithium battery. (1) Push to open the lithium battery compartment lid at the bottom of the camcorder. (2) Install the supplied battery with the positive (+) terminal facing up. (3) Close the battery compartment lid. 1 2 3 rep 0 c0 To change the - Sony CCD-VX3 | Operation Manual - Page 13
indicator keeps flashing in the display window when you set the POWER switch to CAMERA. Replace the battery with the Sony CR2025 or Duracell DL-2025 lithium battery. Using another battery may present a risk of fire or explosion. \\ I// JUL 4 1993 / I - 17\. I 4.93- / I While replacing the - Sony CCD-VX3 | Operation Manual - Page 14
- t 74• a to i r yt C'' ' Setting the Date and Time Before setting the clock, make sure a power source and lithium battery are installed. (1) While pressing the small green button on the POWER switch and slide it to CAMERA or OFF. (2) Press DATE(+) and TIME(NEXT) simultaneously - Sony CCD-VX3 | Operation Manual - Page 15
Inse gt4..• ;if • . • n• a Cassette Make sure that a power source is installed. (1) While pressing the small blue button on the EJECT knob, slide it in the direction of the arrow. The cassette compartment automatically lifts and opens. (2) Insert a cassette (not supplied) with the window facing - Sony CCD-VX3 | Operation Manual - Page 16
the first time (or after someone else has used it), focus the viewfinder lens. Make sure that the power source is connected to the camcorder. (1) While pressing the small green button on the POWER switch. slide it to CAMERA. (2) Slide the STANDBY switch up. (3) Turn the viewfinder lens adjustment - Sony CCD-VX3 | Operation Manual - Page 17
hand under the camcorder to support it. • This camcorder is equipped with a Sports Finder. You can look through the viewfinder without touching your eye to it [c]. To do so, turn the viewfinder adjustment ring clockwise completely. • Use the viewfinder frame as a guide to determine the horizontal - Sony CCD-VX3 | Operation Manual - Page 18
the internal ND filter Although the camcorder may be set for automatic use, the ND filter is still controlled manually. We recommend that you use camcorder in standby mode for five minutes or more with a cassette inserted, the camcorder automatically switches off. This prevents wear on the battery - Sony CCD-VX3 | Operation Manual - Page 19
the recording or playback time. Use it as a guide. There will be a time lag of several battery capacity. For the remaining battery indicators, see page 11. If the battery shutter feature In addition to the ND FILTER switch, this camcorder incorporates the ND shutter feature. See "Using an Optional - Sony CCD-VX3 | Operation Manual - Page 20
Zooming is a recording technique that lets you change the size of the subject in the scene. You can also use zoom to focus manually or to decide on a shooting angle before you start recording. For more professionallooking recordings, use the zoom sparingly. T side: for telephoto (subject appears - Sony CCD-VX3 | Operation Manual - Page 21
i6? 116,..smi.;,021 .:Lithatittl, " 4» - Ct Recording the Date or Time In Camera mode, press DATE (+) or TIME (NEXT). You can record the date or time displayed in the viewfinder with the picture. You cannot record the date and time at the same time. Except for the date or time indicator, no other - Sony CCD-VX3 | Operation Manual - Page 22
until it snaps to STANDBY. (2) Press EDITSEARCH. Press the - (c) side momentarily, and the last few seconds of the recorded portion plays back (Rec Review). Keep pressing EDITSEARCH to play back the last recorded portion (Edit Search). + side: to view the forward playback picture - side: to view the - Sony CCD-VX3 | Operation Manual - Page 23
connecting cable. Connecting to a TV without Video/Audio Input Jacks Connect the camcorder to the TV using the supplied RFU adaptor. Set the channel selector on the your area. Be sure to set the OUT/IN selector on your camcorder to OUT. With this connection, the sound is in monaural. VHF (C% 3CH - Sony CCD-VX3 | Operation Manual - Page 24
Commander (p.86). Before using the Commander, press REMOTE COMMANDER on the camcorder lightly so that the remote sensor pops up. Then slide the HOLD direction opposite the arrow. Be sure that the OUT/IN selector on the camcorder is set to OUT. (1) While pressing the small green button on the POWER - Sony CCD-VX3 | Operation Manual - Page 25
press x2 during normal playback. To •esume normal playback, press >. Notes on playback • When still picture mode lasts for 5 minutes or more, the camcorder automatically enters stop mode. • The sound is muted in the various playback modes. It can be heard in the double speed forward playback, but is - Sony CCD-VX3 | Operation Manual - Page 26
at a • t•1,6 SI " Returning to a Preset Point-Zero Memory Function The tape counter displayed in the viewfinder and the display window tells you the actual recording or playback time. You can use the tape counter to memorize a specific point on the tape and play back from that point. If the El - Sony CCD-VX3 | Operation Manual - Page 27
. You can display the date or time in the viewfinder, the display window, and on the TV screen. Press DATE(+) or TIME(NEXT) on the camcorder or DATA CODE on the Remote Commander. Each time you press DATA CODE, the display changes to the date, time and no indicator, cyclically. DATE - Sony CCD-VX3 | Operation Manual - Page 28
(p.9). Note on AC power adaptor You cannot use the AC-V25 AC power adaptor (not supplied) with this camcorder. Using a Car Battery Use the DCP-77 DC pack (not supplied). (1) Connect the cord of the DC pack to the cigarette lighter socket of the car (12 V or - Sony CCD-VX3 | Operation Manual - Page 29
Mode Items for VTR Mode Hi8 (p.75) • Select AUTO to have the camcorder automatically set the recording mode (Hi8 or standard 8 mm) depending upon cassette type being used. Hi8 (p.75) • Select AUTO to have the camcorder automatically set the recording mode (Hi8 or standard 8 mm) depending upon - Sony CCD-VX3 | Operation Manual - Page 30
two or more items in the menu at a time, move the cursor II, to select another item with v before pressing EXECUTE. • Only when the lithium battery is installed, the settings are saved for five minutes even if you detach the power source. The settings in the INTERVAL REC menu and the - Sony CCD-VX3 | Operation Manual - Page 31
A juktnlen • • - This section shows you how to record using manual adjustment functions. The camcorder's automatic functions offer you worry-free operation under most shooting conditions. But in some conditions, however, manual adjustment is better for creative recording. Automatic Adjustment Mode - Sony CCD-VX3 | Operation Manual - Page 32
of the setting to the AUTO LOCK switch. • As long as you push the FOCUS switch in the direction of the arrow (PUSH AUTO) during manual focus mode, you can shoot with automatic focusing. PROGRAM AE Modes You can select from four PROGRAM AE modes to fit the shooting situation. Set - Sony CCD-VX3 | Operation Manual - Page 33
IRIS, SHUTTER SPEED, GAIN and WHT BAL buttons and the CONTROL dial do not function. About the previous settings The lithium battery must be installed to temporarily save manual settings if you detach the battery. (The settings are saved for five minutes.) .... Notes on recording in Program AE - Sony CCD-VX3 | Operation Manual - Page 34
When to Use Manual Focus Use manual focus under the following conditions. • Insufficient light [a] • Subjects with little contrast-walls, sky, etc. [b] • Too much brightness behind the subject [c] • Horizontal stripes [d] • Subjects through frosted - Sony CCD-VX3 | Operation Manual - Page 35
, first focus in telephoto before recording, and then reset the shot length. (1) Set the FOCUS switch to MANUAL. The ct). indicator appears in the viewfinder. (2) Turn the zoom lever up until the lever stops (telephoto position). (3) Turn the focus ring to adjust the - Sony CCD-VX3 | Operation Manual - Page 36
of the arrow (PUSH AUTO). The auto focus functions while you are pushing the FOCUS switch toward PUSH AUTO. When you release the switch, manual focusing resumes. Use this switch to focus on one subject to the other with smooth focusing. 1 0 0 0 10 Czz 0 0O 0 0 FOCUS /AUTO rIAANUAL ..o. PUSH AUTO - Sony CCD-VX3 | Operation Manual - Page 37
look white and gets more natural color balance for camera recording. You can obtain better results by adjusting the white balance manually under the following conditions: Conditions Lighting conditions change quickly Conditions too bright, such as in photography studios Under sodium lamps Under - Sony CCD-VX3 | Operation Manual - Page 38
function during recording.) • When you adjust the aperture and shutter speed manually, and move from indoors to outdoors or vice-versa. slide the AUTO or vice-versa, or detach the battery for replacement while shooting in automatic white balance mode, point the camcorder to a white subject about 10 - Sony CCD-VX3 | Operation Manual - Page 39
slide the AUTO LOCK switch up to the topmost position and start recording. Then slide the AUTO LOCK switch down to the center position. The camcorder enters portrait mode. Theory of the portrait mode When shooting outdoors under bright sunlight in automatic mode, the aperture tends to close and both - Sony CCD-VX3 | Operation Manual - Page 40
• 0 its Mode .7 1 • You can record a subject with high-speed action and view the picture with less shaking when played back in still or slow mode. The shutter speed and the aperture are automatically adjusted to maintain the appropriate exposure depending on the speed of the subject. The sports - Sony CCD-VX3 | Operation Manual - Page 41
Using Sports Mode/Using the Aperture Priority Mode .; . ;.,C,?i:4140441 ; Usin • the Aperture Priority Mode You can select the aperture to determine the desired depth of field. The shutter speed is automatically set (between 1/60 and 1/2000) in combination with the aperture value to maintain - Sony CCD-VX3 | Operation Manual - Page 42
111 • • e • r. You can select the shutter speed from 16 speeds between 1/60 and 1/10000. When you select a faster shutter speed, movement appears clearer with less shaking when the tape is played back in still or slow mode. The aperture value is automatically adjusted according to the selected - Sony CCD-VX3 | Operation Manual - Page 43
aperture When you press IRIS, the aperture is locked at the value which was selected automatically at that time. You can now select the aperture manually from 13 values using the CONTROL dial: F1.6, F2, F2.4, F2.8, F3.4, F4, F4.8, F5.6, F6.8, F8, F9.6, F11, CLOSE. To open the aperture (larger - Sony CCD-VX3 | Operation Manual - Page 44
P. '44 at M•••j 1. iti Cs Note on gain level When you select a gain level that is too high, the picture may be distorted. To Lock the Manual Settings To prevent settings from being erased by an accidental pressing of a button, the aperture, gain, shutter speed and white balance can be locked at - Sony CCD-VX3 | Operation Manual - Page 45
t• *44 To Change the Setting To change an item with the P. indicator in the viewfinder Turn the CONTROL dial to change to the desired setting. To change an item without the► indicator in the viewfinder (1) Press the button of the item to be changed. The► indicator moves to that item. (2) Turn the - Sony CCD-VX3 | Operation Manual - Page 46
: To create a desired picture without changing the exposure You can make a desired recording by adjusting the aperture, shutter speed. and/or gain in manual mode. 0 Slide the AUTO LOCK switch down to the center position. El Press PROGRAM AE repeatedly so that no indicator appears in the viewfinder - Sony CCD-VX3 | Operation Manual - Page 47
•i '14 ftrA4tsti tlre E Use the following graph to select the setting. Aperture (F) 1.6 2 2.4 2.6 3.4 4.11 6.6 6.6 '.2-Case A 2 -Case B +1EV (2 steps) 0(3da5t. 2 -Case B Vertical axis: Aperture value in 0.5EV/step Horizontal axis: Shutter speed in 0.5EV/step Diagonal axis: Gain level in 0. - Sony CCD-VX3 | Operation Manual - Page 48
in the menu system to disable the ND shutter feature. (1) Set the camcorder to recording standby mode. (2) Open the lid of the control panel. (3) ,'. i STOP 4, Note on the ND FILTER switch When you are shooting in manual adjustment mode, the ND ON/ND OFF indicator does not appear in the viewfinder. - Sony CCD-VX3 | Operation Manual - Page 49
subject by displaying the zebra pattern. Use the zebra pattern as a guide for adjusting the aperture, shutter speed, and gain so that you you start recording, set ZEBRA to ON using the menu system. (1) Set the camcorder to recording standby mode. (2) Open the lid of the control panel. (3) Press MENU - Sony CCD-VX3 | Operation Manual - Page 50
or white) in the menu system before you start to record. (1) Set the camcorder to recording standby mode. (2) Open the lid of the control panel. (3) Set fading-in, press FADER after sliding the STANDBY switch up to set the camcorder to standby mode. When fading-out. press it while recording. (5) - Sony CCD-VX3 | Operation Manual - Page 51
-out/Making the Frame Recording Makin• the Frame Recording You can make a recording with an animated effect using frame recording. In frame recording, the camcorder records approx. four frames of a subject and then stops. To create an animated effect, you can then move the subject and then repeat - Sony CCD-VX3 | Operation Manual - Page 52
I..' • • .;4 • You can make a time-lapse recording by setting the camcorder to automatically record and standby sequentially. You can achieve an excellent Hi8 recording for flowering, emergence, etc. with this function. Before you start recording, set the desired recording time and standby ( - Sony CCD-VX3 | Operation Manual - Page 53
irt To Make Interval Recording Precisely When you select 30 sec. for waiting time and 1 sec. for a recording time, for example, recording repeats for 1 second at the intervals of 29 seconds. Recording time 29 sec Waiting time 30 sec 1sec i Recording time 29 sec Waiting time 30 sec To Stop - Sony CCD-VX3 | Operation Manual - Page 54
to a little darker. Before you begin, make sure that the lithium battery is installed. (1) While pressing the small green button on the POWER switch , slide it to CAMERA. (2) Slide the STANDBY switch up. (3) Point the camcorder at the title card and adjust the focus. (4) Press TITLE 1 or TITLE - Sony CCD-VX3 | Operation Manual - Page 55
Selecting the Color of the Title When the title is displayed in the viewfinder, you can change the title color by pressing COLOR/MODE. (1) If the title is not displayed in the viewfinder, press TITLE 1 (or TITLE 2) to display the title. (2) Press COLOR/ MODE and select the title color. Each time you - Sony CCD-VX3 | Operation Manual - Page 56
4i, Superimposing a Title Selecting the Display Mode of the Title You can scroll up. reverse and fade-in or fade-out your title. When the title is not displayed in the viewfinder. you can select the display mode by pressing COLOR/MODE. (1) If the title is displayed in the viewfinder. press - Sony CCD-VX3 | Operation Manual - Page 57
I Pi emi e Bulsodweedns Various Display Modes You can also display two titles at the same time with one title layered on the other (p.58). When you select scrolling mode, the title scrolls up and stops at the center. Display mode (Indicator inside the viewfinder) Normal display mode 1 title (no - Sony CCD-VX3 | Operation Manual - Page 58
either TITLE 1 or TITLE 2. •TITLE 1 CYAN TITLE 2 T t WITT LOVE [a) [b] CYAN WNT LOVE WHT CYAN To Superimpose a Title at the Beginning 1 Set the camcorder to standby mode. 2 Press TITLE 1 or TITLE 2. 3 Press START/STOP to start recording with the title displayed inside the viewfinder. 4 At the - Sony CCD-VX3 | Operation Manual - Page 59
displayed on a TV using the menu system. For connecting a TV, see page 23. Press DISPLAY to display the menu on the TV. (1) Set the camcorder to recording standby mode. (2) Press MENU. (3) Press v to move the cursor► to CUSTOM MODE. (4) Press < or > to move • to SET. (5) Press EXECUTE. The CUSTOM - Sony CCD-VX3 | Operation Manual - Page 60
••• +fit .„ • • n• • • Recording with the Custom Preset Function (1) Set the camcorder to recording standby mode. (2) Set CUSTOM MODE to ON in the menu system. (3) Slide the AUTO LOCK switch down to the center position. The cP - Sony CCD-VX3 | Operation Manual - Page 61
at the beginning of recording or playback Press INDEX MARK on the camcorder or the Commander in recording standby or playback standby mode. The which the index signal is marked. When playing back this tape, the camcorder keeps displaying the data code immediately before the erased one. If the data - Sony CCD-VX3 | Operation Manual - Page 62
I- unctiton ; J 4."7 ' • Scanning the Beginning of Each Program While Monitoring the Playback Picture-Index Scan (1) Use the Remote Commander. To view the picture on a TV. press DISPLAY. (1) Press INDEX on the Commander during normal playback or playback pause mode. (2) Press 114 or IP*. The - Sony CCD-VX3 | Operation Manual - Page 63
uopund xepui eq4 Bupn ;1' Scanning the beginning of Each Program in Sequence-Index Scan (2) (1) Press INDEX on the Commander during stop mode. (2) Press 4111 orIP*. The tape rewinds or advances rapidly and plays back for approximately 10 seconds from the point on which an index signal was marked. - Sony CCD-VX3 | Operation Manual - Page 64
• s n e n•ex unction T•I'..*:".1.0A1004•90 4.?"1;:;-. •LO'i 1. 4, Locating the Desired Program-Index Search (1) Press INDEX on the Commander during stop or playback mode. (2) Press INDEX repeatedly until the index number of the desired program is displayed in the viewfinder. (3) Press 444 or - Sony CCD-VX3 | Operation Manual - Page 65
64) (2) Press INDEX ERASE on the Commander within 2 to 10 seconds while the desired program plays back. After the index signal is erased, the camcorder returns to index scan or index search mode, whichever was used in step 1. INDEX FtEwe FF 2 INDEX ERASE 1 O C:s 0 Notes on erasing • Press ERASE - Sony CCD-VX3 | Operation Manual - Page 66
us n icture Adjusting a Still or Slow Picture You can adjust the playback picture when noise bands appear at the top or bottom of the picture during slow mode or when vertical shaking occurs during still mode. First display the menu in the viewfinder or on the TV screen. (1) Press MENU. (2) Press - Sony CCD-VX3 | Operation Manual - Page 67
rJ 11 ILL 4 ll Reducing Color Noise on Playback Picture The camcorder incorporates Chroma Noise Reduction (CNR) to minimize color noise or irregular colors generated when playing back the tape. This function activates when CNR mode is - Sony CCD-VX3 | Operation Manual - Page 68
The RC time code indicates the absolute position of a tape with hour. minute, second and frame. The code is automatically recorded during camera recording or video recording, and can be displayed in the viewfinder, the display window and the TV screen during playback. You can easily locate a desired - Sony CCD-VX3 | Operation Manual - Page 69
slide it to VTR. (2) Rewind the tape to the beginning and set the camcorder to playback pause mode. (3) Press TIME CODE WRITE on the Remote Commander. to the portion on which the RC time code has been written and set the camcorder to playback pause mode. Then follow steps 3 and 4 above. The RC time - Sony CCD-VX3 | Operation Manual - Page 70
Re-recording on a Previously Recorded Portion-EDIT SEARCH (1) During recording, you can review your last recorded portion in the viewfinder and re-record over it using EDITSEARCH. (1) Press START/STOP to set the camcorder to recording standby mode. (2) Keep pressing the + (forward playback) or - Sony CCD-VX3 | Operation Manual - Page 71
is displayed in the viewfinder, press COUNTER/TIME CODE to erase it and display the tape counter. (1) Press START/STOP to set the camcorder to recording standby mode. (2) Keep pressing the + (forward playback) or - (reverse playback) side of EDITSEARCH, and release the button where you want to - Sony CCD-VX3 | Operation Manual - Page 72
by editing with any other 8 mm. Mel Hi8. MBetamax. viiS VHS. Sous S-VHS, MIS VHSC or SIMI S-VHSC VCR that has video/audio inputs. Before Editing We recommend that you use power from the AC outlet using the AC power adaptor. Connect the camcorder to your VCR using the supplied connecting cable - Sony CCD-VX3 | Operation Manual - Page 73
mode again. Then repeat steps 2 and 4. To Stop Editing Press O on the camcorder and VCR. When you finish editing, reset EDIT mode to OFF(p.72). Use of the and RC time code The data code and RC time code recorded with the camcorder are not output from the S VIDEO connector or VIDEO jack. You can - Sony CCD-VX3 | Operation Manual - Page 74
the point where the insert should end by pressing *4 or IP* on the camcorder and set it to playback pause mode. (5) Press RESET. The counter resets 00. (6) Locate the point where the insert should begin by pressing 441on the camcorder and set it to recording pause mode. (7) Press ZERO MEM. The ZERO - Sony CCD-VX3 | Operation Manual - Page 75
re-record on this tape, slide the tab back out to cover the red mark. When Yogi Play Back The camcorder automatically select the playback mode according to the recording system (Hi8/standard 8 mm, SP/LP mode) in which you recorded the tape. To Play Back a Dual Soundtrack Tape To monitor the - Sony CCD-VX3 | Operation Manual - Page 76
leave it with the cassette compartment open for about 1 hour. If M does not light up when you turn on the power, you can use the camcorder again. - I 1 O C222) 0 o I -w - I \ On the Surface of the Tape If there is moisture on the surface of the tape, when you insert tape and press a tape - Sony CCD-VX3 | Operation Manual - Page 77
wet-type cleaning cassette. It may damage the video heads. Note If the V8-25CLEI cleaning cassette is not available in your area, consult your Sony service facility. Removing Dust from Inside the Viewfinder (1) While sliding the viewfinder lock RELEASE knob in the direction of the arrow, lift up the - Sony CCD-VX3 | Operation Manual - Page 78
44;woc. • e garnTerna ce iniOnnation and Precautions Precautions On Operation • Operate the camcorder using 7.2 V (battery pack), or 6.5 V (AC power adaptor). • For DC or AC operation, use only the accessories recommended in this manual. • You cannot use the AC-V25 AC power adaptor (not supplied - Sony CCD-VX3 | Operation Manual - Page 79
. If you cannot attach the power adaptor to the wall outlet, use a power cord plug adaptor (not supplied). Difference in Color Systems This camcorder is an NTSC system-based camcorder. If you want to view the playback picture on a TV, it must be an NTSC system-based TV or a PAL-M system-based - Sony CCD-VX3 | Operation Manual - Page 80
) SLIDE button (p.19) Press to slide the viewfinder if your nose touches the battery pack. a EJECT (cassette eject) knob (p.15) Slide to open the cassette compartment. 14 Battery mounting surface (p.9) Attach the battery pack to this surface. a DATE(+) and TIME(NEXT) buttons (p.14, 27) Press to - Sony CCD-VX3 | Operation Manual - Page 81
to the topmost (green) position, the camcorder adjusts the aperture, shutter speed (between 1/60 and 1/250), gain and white balance automatically. When you slide it down to the center position, you can adjust the aperture, shutter speed, gain and white balance manually. You can also use the PROGRAM - Sony CCD-VX3 | Operation Manual - Page 82
when you connect the camcorder to a TV. 0 manually. Turn it upward for telephoto and downward for wide-angle. 0 Tripod receptacle (p.17) Attach a tripod (not supplied) here. When attaching a non-Sony battery lamp (p.18, 91) This red lamp lights up during camera recording. When it flashes, the battery - Sony CCD-VX3 | Operation Manual - Page 83
OUT/IN selector (p.23, 72, 74) controller. In this case, you cannot use the The VIDEO/AUDIO and S VIDEO jacks of this supplied Remote Commander. camcorder work as both input and output jacks. Ir stands for Local Application Control Bus Set the selector to OUT to view the recorded System. The - Sony CCD-VX3 | Operation Manual - Page 84
only. C3 Grip strap (p.17) Put your hand through the grip strap to hold the camcorder. Adjust the length of the strap so that your thumb can easily touch the START/STOP -in microphone (stereo) E Camera recording/battery lamp (p.18, 91) This red lamp lights up during camera recording. When it flashes, - Sony CCD-VX3 | Operation Manual - Page 85
signal. INDEX ERASE: Press to erase the index signal. TIME CODE WRITE button (P.69) To write the RC time code on a prerecorded tape, set the camcorder to playback pause mode, press this button and pressI> orII. COUNTER RESET button ffl • REC (recording) buttons To record from a TV or a VCR, press - Sony CCD-VX3 | Operation Manual - Page 86
works at commander mode VTR2. The commander modes (1.2 and 3) are used to distinguish this camcorder from other Sony VCRs to avoid remote control misoperation. If you use another Sony VCR at commander mode VTR2, we recommend that you change the commander mode or cover the remote sensor of the - Sony CCD-VX3 | Operation Manual - Page 87
8 mm video format cassette (Hi8 or standard 8 mm) Tape 6 min. (E6/P6-120) Image device 3CCD (Charge Coupled Device 1/3") Viewfinder Electronic viewfinder (monochrome manual (13 steps) Gain control Auto/manual oz.)(including the battery pack NP-77H, lithium battery CR2025, cassette E6- - Sony CCD-VX3 | Operation Manual - Page 88
• :" If you run into any problems using the camcorder, use the following table to troubleshoot the problem. Symptom START/STOP does not operate ring. cloth. Nothing can be viewed The power of the camcorder Open the aperture in manual 43 except for a black was turned off with the aperture - Sony CCD-VX3 | Operation Manual - Page 89
heads using the Sony 77 V8-25CLH cleaning cassette. No sound or only a low The stereo tape is played back Set HIFI SOUND mode to 75 sound is heard when with the camcorder set to HIFI STEREO. playing back a tape. SOUND El or M. The power does not go The battery is not inserted - Sony CCD-VX3 | Operation Manual - Page 90
not pop up. Something is blocking the Remote Commander. The remote sensor is hidden by a part of the camcorder body. The batteries are not inserted with the correct polarity. The batteries are dead. The HOLD switch is working. Press REMOTE COMMANDER lightly so the remote sensor pops up. Take away - Sony CCD-VX3 | Operation Manual - Page 91
tape, turn off the camcorder, and leave it with the cassette compartment open for about 1 hour. The video heads may be contaminated (p.76). Some other trouble has occurred. Disconnect the power source and contact your Sony dealer or local authorized facility. El The lithium battery is weak or the - Sony CCD-VX3 | Operation Manual - Page 92
(p.91) t'i! PROGRAM AE and manual mode indicators (p.32. 43) FRI White balance mode indicators (p.37) ail Playing back or recording in Hi8 format (p.75) LA Manual focusing (p.35) 1)3,1 Custom mode and RC time code indicators (p.26. 61, 68. 71) Battery remaining indicator (p.11) Date or Time (p.14) - Sony CCD-VX3 | Operation Manual - Page 93
can be increased by shifting up the FM carrier frequency range. In the Hi8 video system, the FM carrier frequency range of the luminance signal is shifted up hi-fi monaural model is used to play back a tape recorded by this camcorder in AFM hi-fi stereo, the playback sound will be in an L+R monaural - Sony CCD-VX3 | Operation Manual - Page 94
tape format An 8 mm video tape track is divided into several areas so that the specified information is to be recorded in each area. This camcorder records the RC time code and data code as well as index signals in one of the areas. 4I.s Tape transport Head transport Video + audio - Sony CCD-VX3 | Operation Manual - Page 95
51 Gain 43 H Headphones jack Hi8 system Hold switch Hood cap 19, 83 Lithium battery 12 LP mode 75 M Manual focus 34 Manual adjustment mode 31 36 R RC time code Rec review Recording lamp Remote Commander Remote Commander Title Title fader Tripod mounting Trouble checks 19, 26 20 - Sony CCD-VX3 | Operation Manual - Page 96
question about this product, call: Sony Customer Information Center East Coast: 201-930-7669 (SONY) NJ Central: 708-250-7669 (SONY) IL West Coast: 714-821-7669 (SONY) CA or write to: Sony Customer Information Center Sony Drive, Mail Drop #T1-11. Park Ridge. NJ 07656 Sony Corporation Printed in Japan
-
 1
1 -
 2
2 -
 3
3 -
 4
4 -
 5
5 -
 6
6 -
 7
7 -
8
-
9
-
10
-
11
-
12
-
13
-
14
-
15
-
16
-
17
-
18
-
19
-
20
-
21
-
22
-
23
-
24
-
25
-
26
-
27
-
28
-
29
-
30
-
31
-
32
-
33
-
34
-
35
-
36
-
37
-
38
-
39
-
40
-
41
-
42
-
43
-
44
-
45
-
46
-
47
-
48
-
49
-
50
-
51
-
52
-
53
-
54
-
55
-
56
-
57
-
58
-
59
-
60
-
61
-
62
-
63
-
64
-
65
-
66
-
67
-
68
-
69
-
70
-
71
-
72
-
73
-
74
-
75
-
76
-
77
-
78
-
79
-
80
-
81
-
82
-
83
-
84
-
85
-
86
-
87
-
88
-
89
-
90
-
91
-
92
-
93
-
94
-
95
-
96
 |
 |

SONY;
3-755-638-25
(1)
Video
Camera
Recorder
Hi
8
CCD-VX3
Operation
Manual
Before
operating
this
unit,
please
read
this
manual
thoroughly
and
retain
it
for
future
reference.
•••::••••
..•••••-
\
•
•
?.,1
-
'
•-"
0
0.1.
0
06
0.
video
Hi8
Handycam
PRO
e
1992
by
Sony
Corporation