Sony CCD-VX3 Operation Manual - Page 82
Eimei
 |
View all Sony CCD-VX3 manuals
Add to My Manuals
Save this manual to your list of manuals |
Page 82 highlights
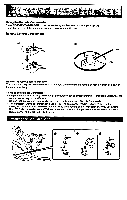
..Mt; • ler T-; s f• r.,' • e. DISPLAY El MRAUM Cf l 033 Nee EIMEI REW 0 FP PAUSE •RECD C::1 07 '33 30 O 31 CZ O ozza czz, 0 O 0 CI 0 DISPLAY button (p.24) Press to display the viewfinder screen indicators on the TV when you connect the camcorder to a TV. 0 Tape transport buttons (p.24, 25) _ STOP • REW (rewind) r.> PLAY (playback) FF (fast-forward) II PAUSE • REC (recording) < 411410. > FRAME (direction select/frame-byframe) 1► SLOW (slow speed playback) 0 Carrying handle 0 Focus ring (p. 35) Turn to focus the subject manually. 0 Cassette compartment (p.15) 31 Zoom lever (p.35) Turn to change the size of the subject in the scene manually. Turn it upward for telephoto and downward for wide-angle. 0 Tripod receptacle (p.17) Attach a tripod (not supplied) here. When attaching a non-Sony tripod, make sure that the length of the camera mounting screw is shorter than 6.5 mm (9/32 inches). Otherwise, the screw might damege the inner part of the camcorder. 33 Menu operation buttons (p.30) MENU: Press to display the menu in the viewfinder. v: Press to select the desired item. : Press to set the mode of the selected item. EXECUTE: Press to store the settings. 0 Viewfinder lens adjustment ring (p.16) To focus the viewfinder lens, turn this ring until the indicator in the viewfinder comes into sharp focus. g Camera recording/battery lamp (p.18, 91) This red lamp lights up during camera recording. When it flashes, the battery is dead. 0 Hooks for shoulder strap (p.86) Attach the shoulder strap (supplied) here. 0 SUPERIMPOSE buttons (p.54, 58) Use to supenmpose a title over the scene. TITLE 1 and TITLE 2 buttons: Press to insert or turn off the title. You can store a title to each button. MEMORY: Press to store a title. COLOR/MODE: Press to select the color of the title while the title is displayed in the viewfinder. Press to select the display mode of the title while the title is not displayed. INDEX MARK button (p.61) Press to mark an index signal. If you mark it at the beginning of each program, you can easily locate the desired one later. 82
-
 1
1 -
2
-
3
-
4
-
5
-
6
-
7
-
8
-
9
-
10
-
11
-
12
-
13
-
14
-
15
-
16
-
17
-
18
-
19
-
20
-
21
-
22
-
23
-
24
-
25
-
26
-
27
-
28
-
29
-
30
-
31
-
32
-
33
-
34
-
35
-
36
-
37
-
38
-
39
-
40
-
41
-
42
-
43
-
44
-
45
-
46
-
47
-
48
-
49
-
50
-
51
-
52
-
53
-
54
-
55
-
56
-
57
-
58
-
59
-
60
-
61
-
62
-
63
-
64
-
65
-
66
-
67
-
68
-
69
-
70
-
71
-
72
-
73
-
74
-
75
-
76
-
 77
77 -
 78
78 -
 79
79 -
 80
80 -
 81
81 -
 82
82 -
 83
83 -
 84
84 -
 85
85 -
 86
86 -
 87
87 -
88
-
89
-
90
-
91
-
92
-
93
-
94
-
95
-
96
 |
 |
