Sony DCR PC105 Operating Instructions - Page 120
Recording a still image on a “Memory Stick”– Memory photo recording
 |
UPC - 027242629172
View all Sony DCR PC105 manuals
Add to My Manuals
Save this manual to your list of manuals |
Page 120 highlights
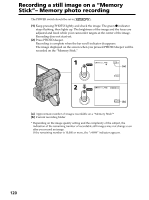
Recording a still image on a "Memory Stick"- Memory photo recording The POWER switch should be set to . (1) Keep pressing PHOTO lightly and check the image. The green z indicator stops flashing, then lights up. The brightness of the image and the focus are adjusted and fixed while your camcorder targets at the center of the image. Recording does not start yet. (2) Press PHOTO deeper. Recording is complete when the bar scroll indicator disappears. The image displayed on the screen when you pressed PHOTO deeper will be recorded on the "Memory Stick." 1 50min 1152 FINE 12 [a] 101 2 50min 1152 FINE 101 [b] [a] Approximate number of images recordable on a "Memory Stick"* [b] Current recording folder * Depending on the image quality setting and the complexity of the subject, the indication of the remaining number of recordable still images may not change even after you record an image. If the remaining number is 10,000 or more, the ">9999" indicator appears. 120
-
 1
1 -
2
-
3
-
4
-
5
-
6
-
7
-
8
-
9
-
10
-
11
-
12
-
13
-
14
-
15
-
16
-
17
-
18
-
19
-
20
-
21
-
22
-
23
-
24
-
25
-
26
-
27
-
28
-
29
-
30
-
31
-
32
-
33
-
34
-
35
-
36
-
37
-
38
-
39
-
40
-
41
-
42
-
43
-
44
-
45
-
46
-
47
-
48
-
49
-
50
-
51
-
52
-
53
-
54
-
55
-
56
-
57
-
58
-
59
-
60
-
61
-
62
-
63
-
64
-
65
-
66
-
67
-
68
-
69
-
70
-
71
-
72
-
73
-
74
-
75
-
76
-
77
-
78
-
79
-
80
-
81
-
82
-
83
-
84
-
85
-
86
-
87
-
88
-
89
-
90
-
91
-
92
-
93
-
94
-
95
-
96
-
97
-
98
-
99
-
100
-
101
-
102
-
103
-
104
-
105
-
106
-
107
-
108
-
109
-
110
-
111
-
112
-
113
-
114
-
 115
115 -
 116
116 -
 117
117 -
 118
118 -
 119
119 -
 120
120 -
 121
121 -
 122
122 -
 123
123 -
 124
124 -
 125
125 -
126
-
127
-
128
-
129
-
130
-
131
-
132
-
133
-
134
-
135
-
136
-
137
-
138
-
139
-
140
-
141
-
142
-
143
-
144
-
145
-
146
-
147
-
148
-
149
-
150
-
151
-
152
-
153
-
154
-
155
-
156
-
157
-
158
-
159
-
160
-
161
-
162
-
163
-
164
-
165
-
166
-
167
-
168
-
169
-
170
-
171
-
172
-
173
-
174
-
175
-
176
-
177
-
178
-
179
-
180
-
181
-
182
-
183
-
184
-
185
-
186
-
187
-
188
-
189
-
190
-
191
-
192
-
193
-
194
-
195
-
196
-
197
-
198
-
199
-
200
-
201
-
202
-
203
-
204
-
205
-
206
-
207
-
208
-
209
-
210
-
211
-
212
-
213
-
214
-
215
-
216
-
217
-
218
-
219
-
220
-
221
-
222
-
223
-
224
-
225
-
226
-
227
-
228
-
229
-
230
-
231
-
232
-
233
-
234
-
235
-
236
-
237
-
238
-
239
-
240
 |
 |
