Sony DCR PC105 Operating Instructions - Page 179
Windows XP, Other OS, Playing back Video CDs, Viewing pictures recorded on a tape on a computer
 |
UPC - 027242629172
View all Sony DCR PC105 manuals
Add to My Manuals
Save this manual to your list of manuals |
Page 179 highlights
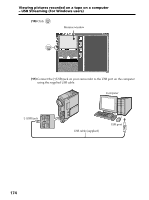
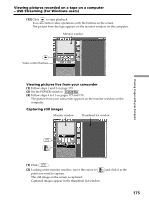
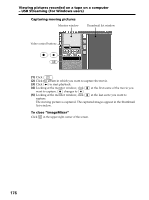
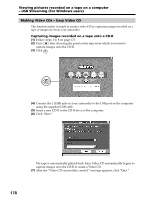
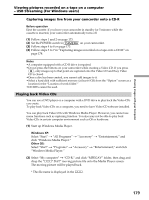
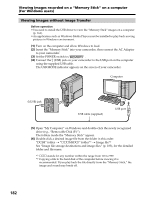
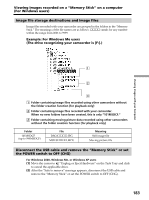
Viewing Images with your Computer Viewing pictures recorded on a tape on a computer - USB Streaming (For Windows users) Capturing images live from your camcorder onto a CD-R Before operation Eject the cassette. If you leave your camcorder in standby for 5 minutes while the cassette is inserted, your camcorder automatically turns off. (1) Follow steps 1 and 2 on page 173. (2) Set the POWER switch to on your camcorder. (3) Follow steps 4 to 8 on page 173. (4) Follow steps 3 to 7 in "Capturing images recorded on a tape onto a CD-R" on page 178. Notes •A computer equipped with a CD-R drive is required. •Do not press the buttons on your camcorder while creating a Video CD. If you press , only images up to that point are captured onto the Video CD and Easy Video CD is closed. •Once a disc has been created, you cannot add images to it. •Select a hard disk with sufficient memory (at least 6 GB) from the "Option" screen as a location for the "Location of work folder." •CD-RWs cannot be used. Playing back Video CDs You can use a DVD player or a computer with a DVD drive to play back the Video CDs you create. To play back Video CDs on a computer, you need to have Video CD software installed. You can play back Video CDs with Windows Media Player. However, you cannot use menu functions such as capturing function. You also may not be able to play back Video CDs in certain computer environment such as OS or hardware. (1) Start up Windows Media Player. Windows XP: Select "Start" t "All Programs" t "Accessory" t "Entertainment," and click "Windows Media Player." Other OS: Select "Start" t "Programs" t "Accessory" t "Entertainment," and click "Windows Media Player." (2) Select "My computer" t "CD-R," and click "MPEGAV" folder, then drag and drop the "sss*.DAT" moving picture file onto the Media Player screen. The moving picture will be played back. * The file name is displayed in the sss. 179
-
 1
1 -
2
-
3
-
4
-
5
-
6
-
7
-
8
-
9
-
10
-
11
-
12
-
13
-
14
-
15
-
16
-
17
-
18
-
19
-
20
-
21
-
22
-
23
-
24
-
25
-
26
-
27
-
28
-
29
-
30
-
31
-
32
-
33
-
34
-
35
-
36
-
37
-
38
-
39
-
40
-
41
-
42
-
43
-
44
-
45
-
46
-
47
-
48
-
49
-
50
-
51
-
52
-
53
-
54
-
55
-
56
-
57
-
58
-
59
-
60
-
61
-
62
-
63
-
64
-
65
-
66
-
67
-
68
-
69
-
70
-
71
-
72
-
73
-
74
-
75
-
76
-
77
-
78
-
79
-
80
-
81
-
82
-
83
-
84
-
85
-
86
-
87
-
88
-
89
-
90
-
91
-
92
-
93
-
94
-
95
-
96
-
97
-
98
-
99
-
100
-
101
-
102
-
103
-
104
-
105
-
106
-
107
-
108
-
109
-
110
-
111
-
112
-
113
-
114
-
115
-
116
-
117
-
118
-
119
-
120
-
121
-
122
-
123
-
124
-
125
-
126
-
127
-
128
-
129
-
130
-
131
-
132
-
133
-
134
-
135
-
136
-
137
-
138
-
139
-
140
-
141
-
142
-
143
-
144
-
145
-
146
-
147
-
148
-
149
-
150
-
151
-
152
-
153
-
154
-
155
-
156
-
157
-
158
-
159
-
160
-
161
-
162
-
163
-
164
-
165
-
166
-
167
-
168
-
169
-
170
-
171
-
172
-
173
-
 174
174 -
 175
175 -
 176
176 -
 177
177 -
 178
178 -
 179
179 -
 180
180 -
 181
181 -
 182
182 -
 183
183 -
 184
184 -
185
-
186
-
187
-
188
-
189
-
190
-
191
-
192
-
193
-
194
-
195
-
196
-
197
-
198
-
199
-
200
-
201
-
202
-
203
-
204
-
205
-
206
-
207
-
208
-
209
-
210
-
211
-
212
-
213
-
214
-
215
-
216
-
217
-
218
-
219
-
220
-
221
-
222
-
223
-
224
-
225
-
226
-
227
-
228
-
229
-
230
-
231
-
232
-
233
-
234
-
235
-
236
-
237
-
238
-
239
-
240
 |
 |